Troubleshooting, connectivity, and security issues are always important tasks and require expertise to do these tasks. We can identify latency with the use of Flow Logs, which will allow us to immediately resolve/tweak application performance issues without affecting end users.
Each inbound and outbound traffic will be logged using Flow Logs, allowing us to analyze the data. We can find the gaps in the security and also we can avoid threats and malware entering the network.
In this blog, we will discuss VPC Flow Log and will do hands-on to demonstrate how to configure Flow Log to analyze the IP traffic that is going to and from network interfaces from VPC.
In this blog, we will cover:
- What is VPC Flow Log?
- Uses of VPC Flow Log
- Understanding VPC Flow Log
- VPC Flow Log Records
- Limitations of VPC Flow Log
- Hands-on: Publishing Flow Log to Cloudwatch Log group
- Hands-on: Publishing Flow Log to S3 bucket
- Conclusion
What is a VPC Flow Log?
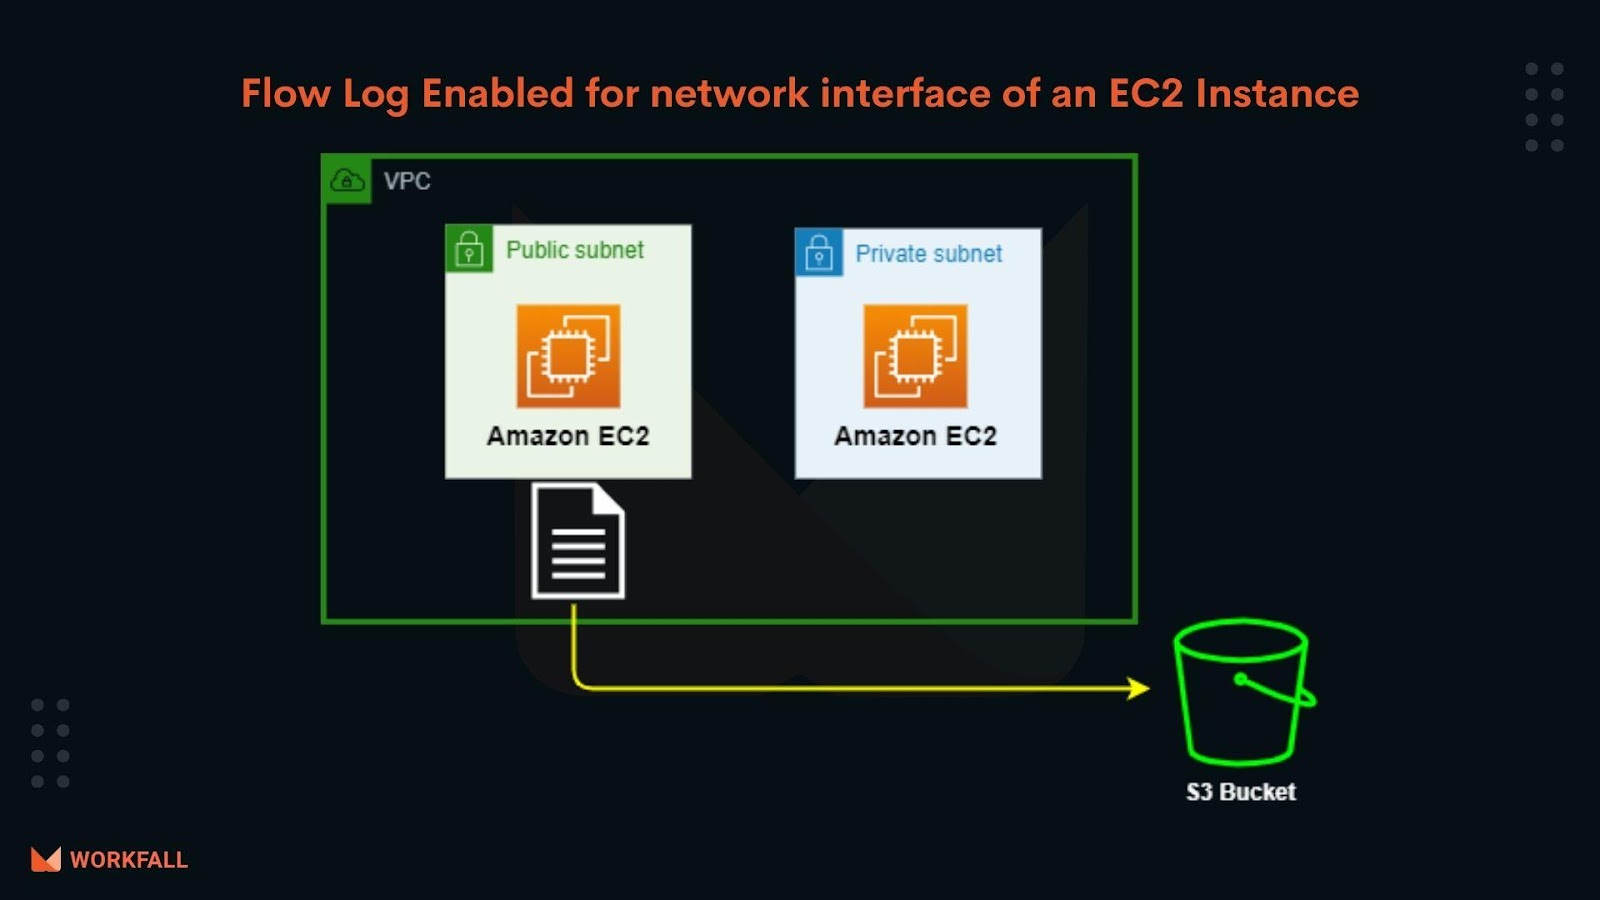
- VPC Flow Logs is a feature that records information about IP traffic flowing to and from network interfaces within the VPC.
- We can configure Flow Logs to capture that information and send it to either the CloudWatch Log group or the S3 bucket.
- Once the logging is sent to one of the destinations, we can then use that data for further analysis.
Uses of Flow Logs
- Monitoring the traffic that is coming to the AWS resources such as EC2 Instances
- Determining the direction of the traffic to and from the network interfaces.
- Diagnosing overly restrictive security group rules.
Collecting the Flow Logs doesn’t impact the network throughput or latency.
We will be charged for delivering logs to the CloudWatch log group and S3 bucket.
Understanding Flow Logs
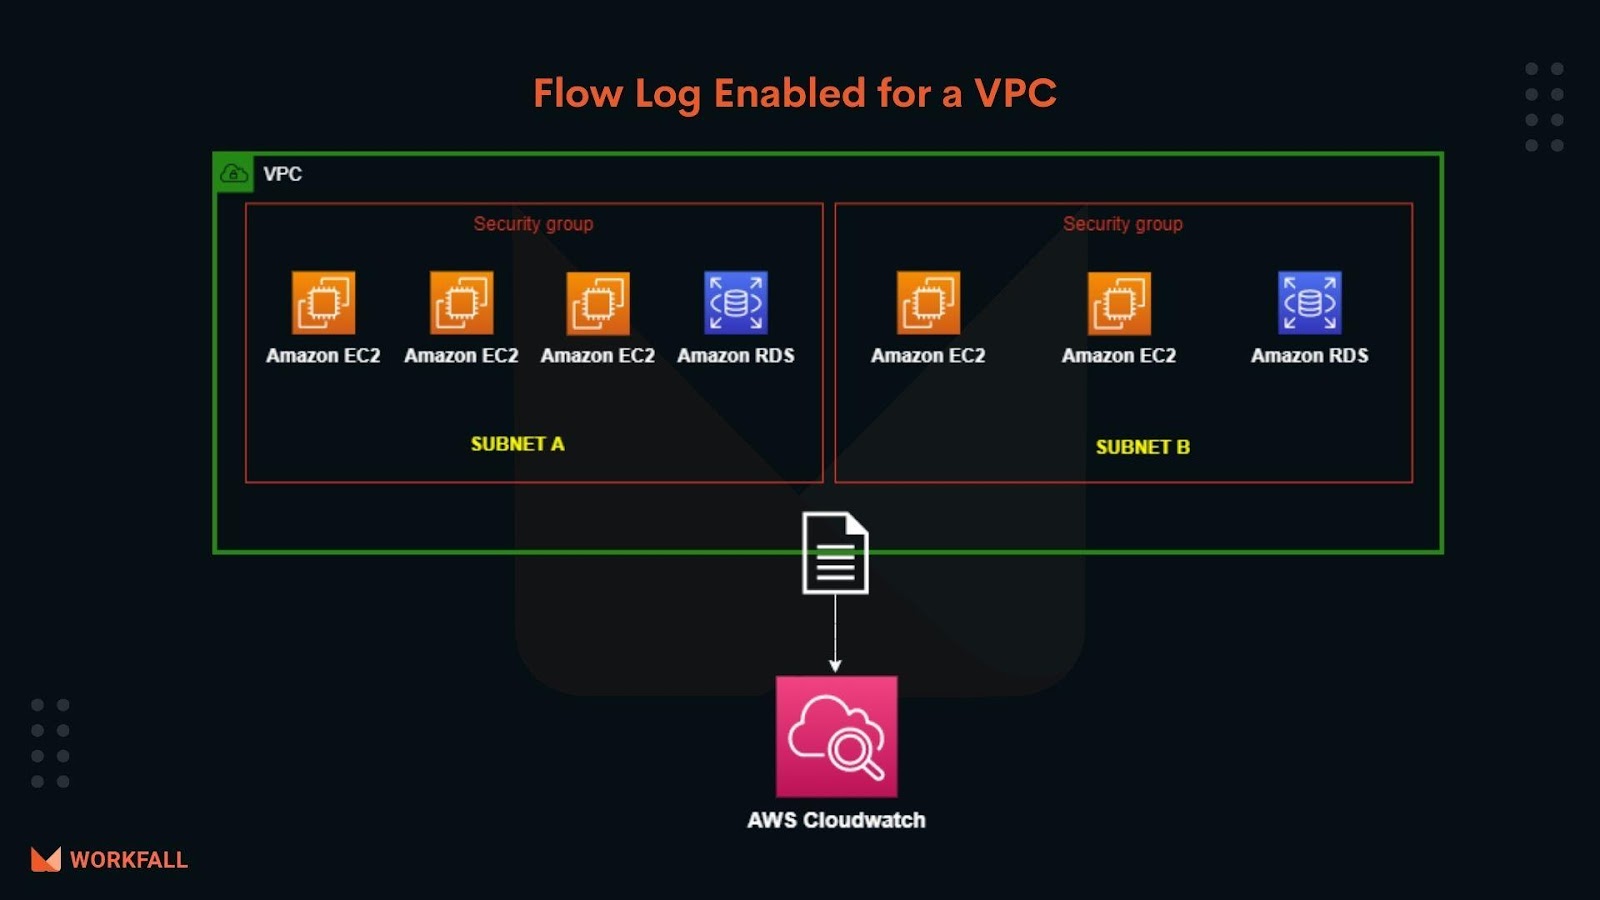
- VPC, Network Interfaces, and Subnets can all have Flow Logs.
- All subnets and network interfaces within a VPC will be monitored if the Flow Logs are set for that VPC.
- The network interfaces inside that subnet will be monitored if Flow Logs are enabled on the subnet level.
- Flow Log records are Flow Log records that are gathered from network interfaces, subnets, and VPCs.
- When creating and configuring Flow Logs, we’ll require the following information.
Accepted traffic and denied traffic are two types of traffic that must be captured.
- The storage destination for Flow Logs data, such as Cloudwatch Log groups or S3 buckets.
- The resource type for which the vpc Flow Logs should be created (Subnet, Network interface, VPC).
We can tag Flow Logs that are created for each network interface, subnets, or VPC’s.
Flow Log records
By default, The Flow Logs can record the following information.
- Accepted and rejected traffic
- Traffic through NAT Gateway
- Traffic through Transit Gateway
- TCP flag sequence
- Network access control list rules and security groups
- IPv6 Traffic
- No data and skipped records
Flow Log limitations
To use Flow Logs, you need to be aware of the following limitations:
- You cannot enable Flow Logs for network interfaces that are in the EC2-Classic platform. This includes EC2-Classic instances that have been ClassicLink-linked to a VPC.
- Flow Logs for VPCs that are peering with your VPC can’t be enabled until the peer VPC is in your account.
- You can’t change the setup or record format of a Flow Log once it’s been established. For example, you can’t associate a different IAM role with the Flow Log, or add or remove fields in the Flow Log record. Instead, you can delete the Flow Log and create a new one with the required configuration.
- The Flow Log displays the primary private IPv4 address in the dstaddr field if your network interface has multiple IPv4 addresses and traffic is sent to a secondary private IPv4 address. Create a Flow Log using the pkt-dstaddr field to capture the original destination IP address.
- The Flow Log displays the primary private IPv4 address in the dstaddr field when traffic is transmitted to a network interface and the destination is not one of the network interface’s IP addresses. Make a Flow Log using the pkt-dstaddr field to capture the original destination IP address.
- The Flow Log displays the primary private IPv4 address in the srcaddr field if traffic is sent from a network interface but the source is not one of the network interface’s IP addresses. Make a Flow Log using the pkt-srcaddr field to capture the original source IP address.
- Regardless of the packet source or destination, the srcaddr and dstaddr fields in the Flow Log always reflect the primary private IPv4 address when traffic is sent to or sent by a network interface. Create a Flow Log containing the pkt-srcaddr and pkt-dstaddr fields to capture the packet source or destination.
- Regardless of the selected maximum aggregation interval, when your network interface is joined to a Nitro-based instance, the aggregation interval is always 1 minute or less.
Flow Logs do not capture all IP traffic. The following types of traffic are not logged:
- When instances contact the Amazon DNS server, traffic is created by them. All traffic to your own DNS server is logged if you use it.
- A Windows instance generates traffic for Amazon Windows licence activation.
- For example, metadata traffic to and from 169.254.169.254.
- The Amazon Time Sync Service traffic to and from 169.254.169.123.
- Traffic to the default VPC router’s reserved IP address.
- Traffic between a network interface on an endpoint and a network interface on a Network Load Balancer
Data from Flow Logs can be published to two destinations, as previously stated.
- Cloudwatch Log group
- S3 Bucket
Let’s implement Flow Logs for the CloudWatch Log group and S3 bucket!
Hands-on
- Publishing Flow Logs to Cloudwatch Log group
- Creating IAM Policy
- Creating IAM Role
- Creating Cloudwatch log group
- Creating Flow Log for a network interface
- Creating Flow Log for a subnet
- Creating Flow Log for a VPC
- Publishing Flow Logs to the S3 bucket
- Creating S3 Bucket
- Understanding Flow Log files
- Creating Flow Log for a Subnet
- Creating Flow Log for a VPC
Publishing Flow Logs to Cloudwatch Log group
- The data from all Flow Logs can be uploaded directly to the Cloudwatch Log group.
- For each network interface, Cloudwatch log streams will be produced. Flow Log records will be present in the log streams.
- We can create multiple Flow Logs and based on the traffic event (Eg: Accepted traffic), We can send them to the CloudWatch log group.
- Before we can create Flow Logs, we need to give them access to publish logs to the Cloudwatch Log group.
- Creating IAM Policy
Let’s build an IAM Role for the Flow Logs so that data may be sent to the Cloudwatch Log group.
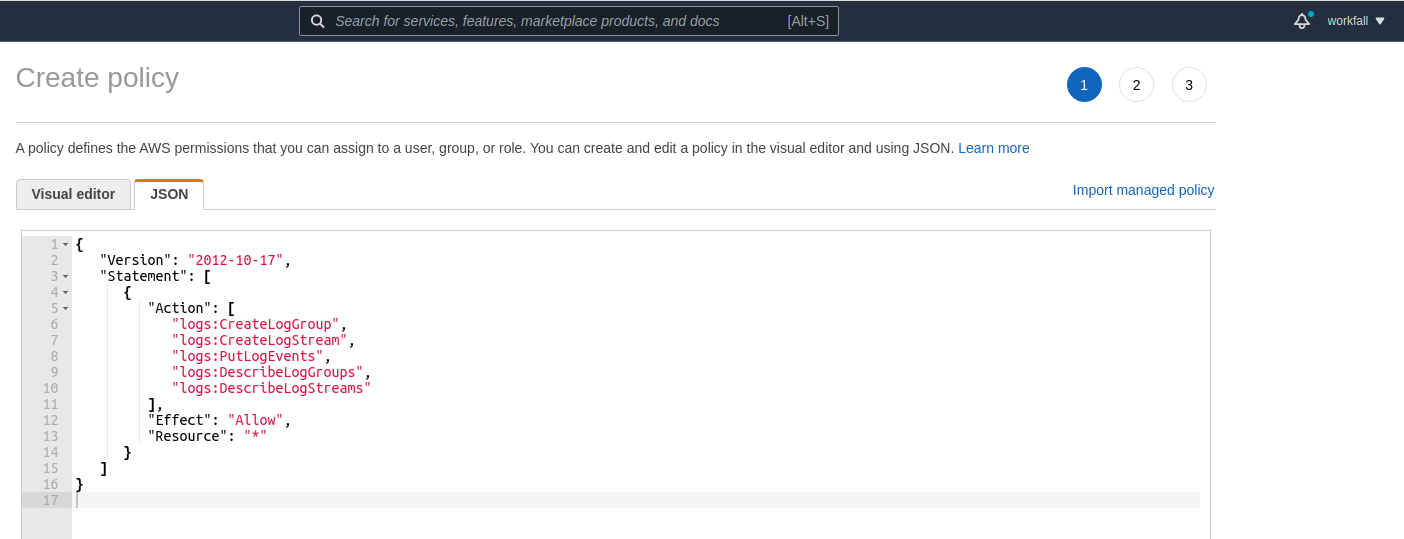
CreateLogGroup, DescribeLogGroups, CreateLogStream, DescribeLogStreams, and PutLogEvents are the minimum permissions necessary for Flow Logs.
Login to the IAM Console to create a policy.
Choose Policies from the Navigation pane, then click Create Policy.
Replace the existing policy with the below contents in the JSON tab, give the policy a name, and click Create policy.
{
   "Version": "2012-10-17",
   "Statement": [
      {
         "Action": [
            "logs:CreateLogGroup",
            "logs:CreateLogStream",
            "logs:PutLogEvents",
            "logs:DescribeLogGroups",
            "logs:DescribeLogStreams"
         ],
         "Effect": "Allow",
         "Resource": "*"
      }
   ]
}

Once the policy is created, We need to create an IAM role and attach the policy with it.
The role will be used later while creating Flow Logs.
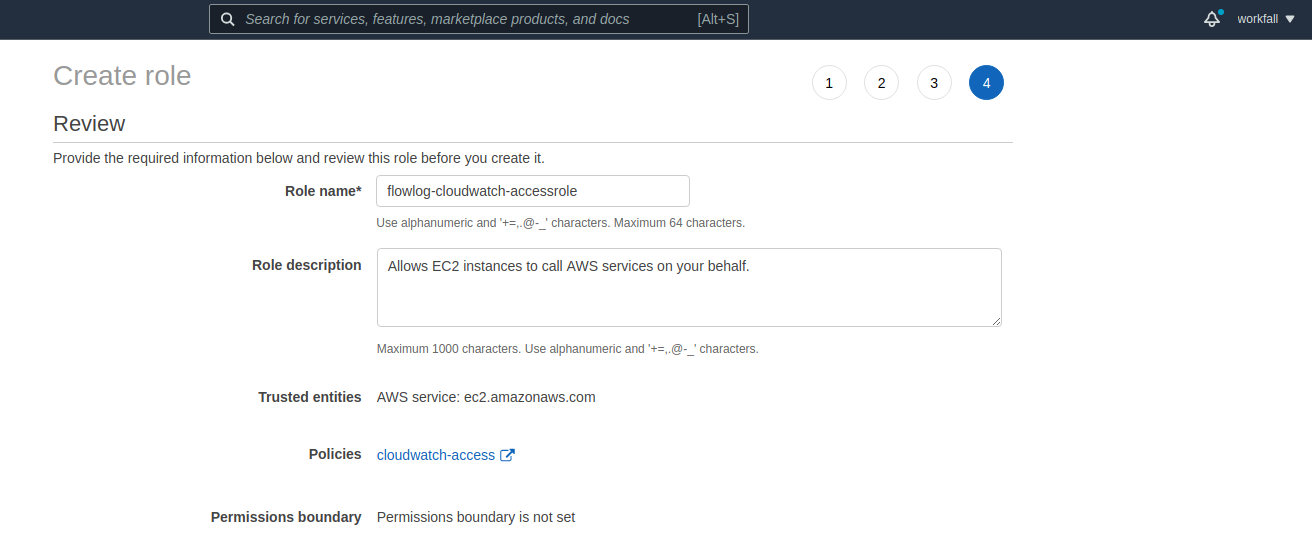
- Creating IAM Role
To Create an IAM Role, Choose Roles and click Create Role
Then Choose EC2 as a Service to create a Role.

and click Next: Permissions
Look for the name of the policy that we generated. Choose it.

Finally, give the role a name and then click Create Role.
We should also ensure that the role has a trustworthy relationship that permits the Flow Logs service to take it.
{
   "Version": "2012-10-17",
   "Statement": [
      {
         "Sid": "",
         "Effect": "Allow",
         "Principal": {
           "Service": "vpc-flow-logs.amazonaws.com"
         },
         "Action": "sts:AssumeRole"
      }
   ]
}
For that, Choose the Role that we have created, Select Trust Relationships
, and click Edit trust relationship
To do so, select the role that we’ve created. Click Edit Trust Relationships after selecting Trust Relationships.
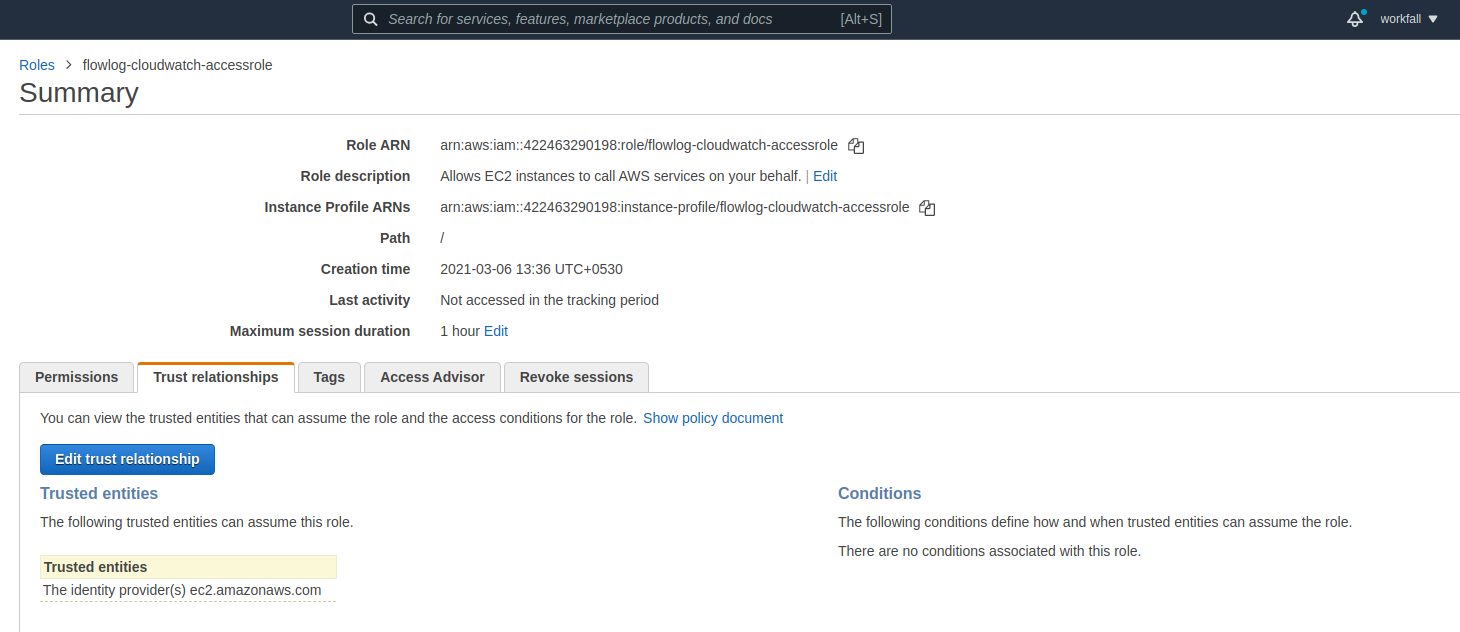
Substitute vpc-flow-logs.amazonaws.com for ec2.amazonaws.com, and then click Update trust policy.

Now that we’ve completed the minimum permissions required for the Flow Logs service to publish Flow Logs data to the Cloudwatch Log group, we can go on to the next step.
Take note of the Role’s ARN (Role ARN), which will be utilized to create Flow Logs.
We can construct Flow Logs for Network Interfaces, Subnets, and VPCs, as previously stated.
- Creating Cloudwatch Log Group
We should first create a CloudWatch log group where VPC Flow Logs will be stored.
Ensure that a log group is formed in the same region as the Flow Logs.
To make a Log group, follow these steps. Go to CloudWatch Console and log in.
Choose Log groups in the navigation pane under Logs.
Create a log group by clicking the Create log group button.

Give the log group a name and, if necessary, an expiry date, then click Create.

- Creating a Network Interface Flow Log
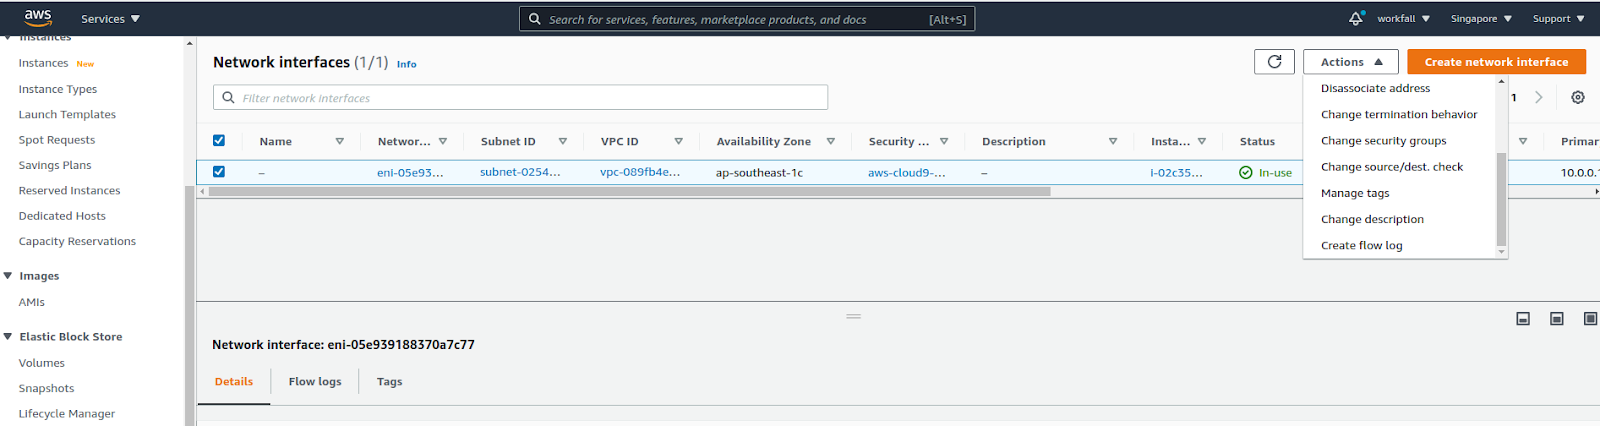
Log in to the EC2 Console to create Flow Logs for Network Interfaces. Select Network Interfaces from the navigation pane.
Select the network interface and then click Create Flow Log under Actions.
Give the Flow Log a name in the Flow Log configuration.
It will ask for the sort of traffic that needs to be captured when using Filter.
To log both refused and accepted traffic, select All.
For the Maximum aggregation interval, Choose the maximum period of time during which a Flow Log is captured and aggregated into one Flow Logs record.

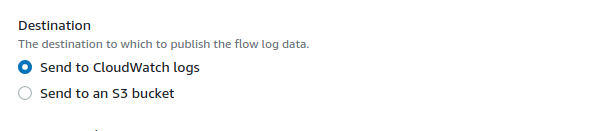
For Destination, Choose to Send to CloudWatch logs
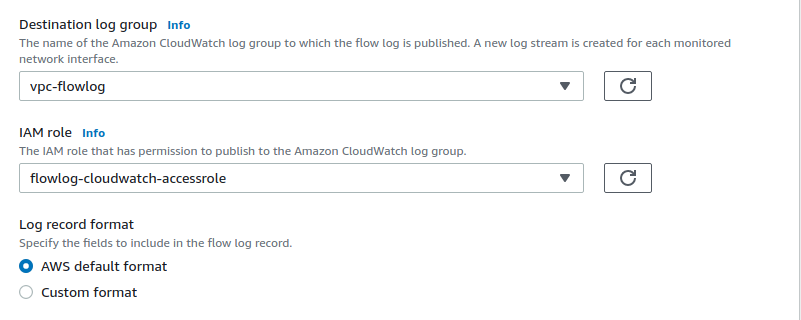
For the Destination log group, Choose the CloudWatch log group which we have already created.
For the IAM role, choose the role that was already created.
For the Log record format, We can choose either the default format or we can configure a custom format if required.
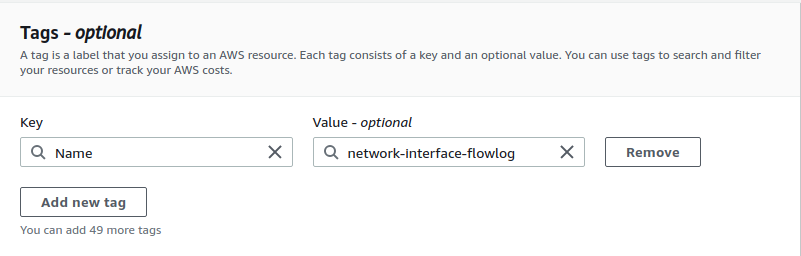
Add a tag for the Flow Log and click Create Flow Log.
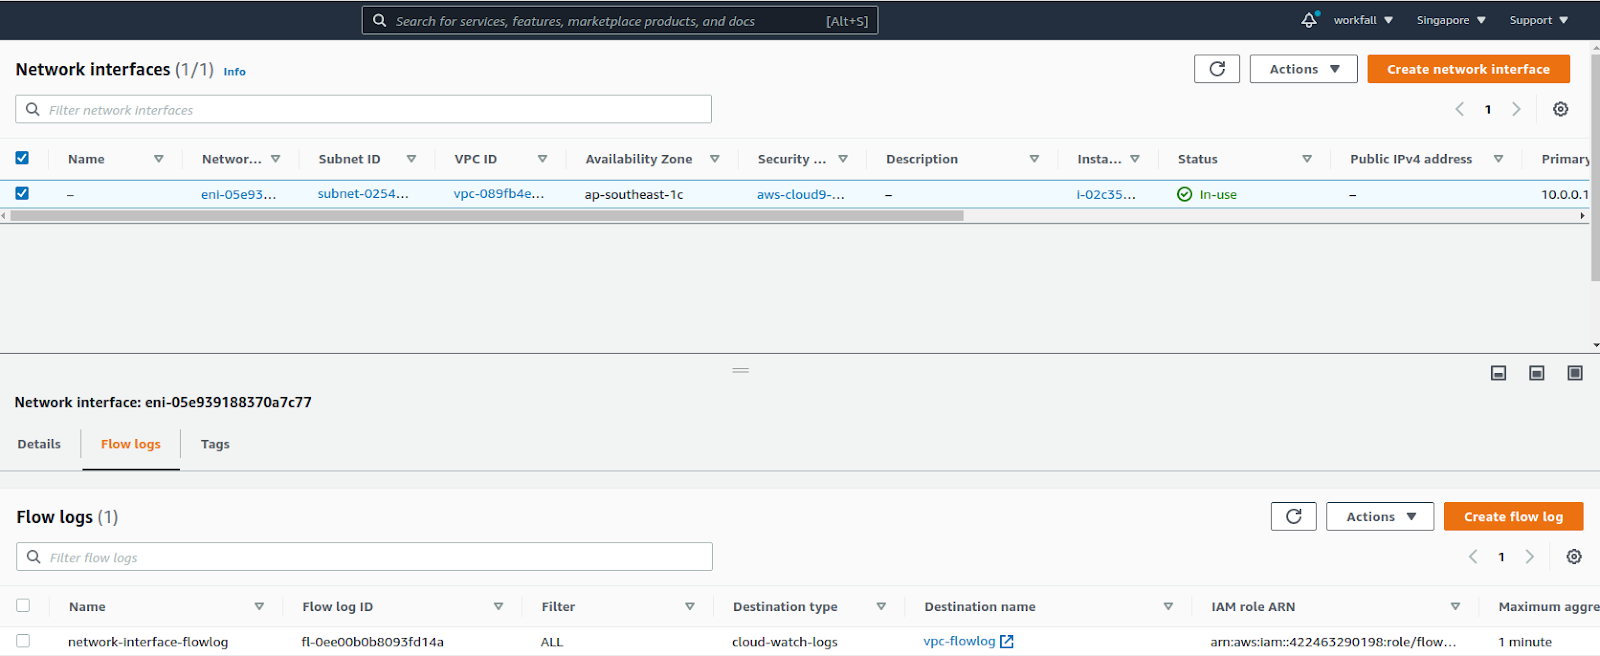
To check if the Flow Log is applied for the network interface, Select the Network interface for which we have created the Flow Log, Choose Flow Logs
You can find the details of Flow Log such as Flow Log name, Flow Log ID, Destination name, etc.
To delete a Flow Log for a network interface, Choose the network interface and then choose Flow Logs.
Under Actions, Click Delete Flow Logs
Type delete and click Delete.

- Creating Flow Log for Subnets

Login to VPC Console, In the navigation pane, choose Subnets.
From the lists of subnets, Choose the subnet for which you wish to create VPC Flow Log.
Under Actions, click Create Create Flow Log

Under the Flow Log setting, Provide a name for the Flow Log.
For Filter, It will ask for the type of traffic that needs to be recorded.
Choose All to log rejected and accepted traffics.
For the Maximum aggregation interval, Choose the maximum period of time during which a Flow Log is captured and aggregated into one Flow Logs record.

For Destination, Choose to Send to CloudWatch logs
For the Destination log group, Choose the CloudWatch log group which we have already created.
For the IAM role, choose the role that was already created.
For the Log record format, We can choose either the default format or we can configure a custom format if required.
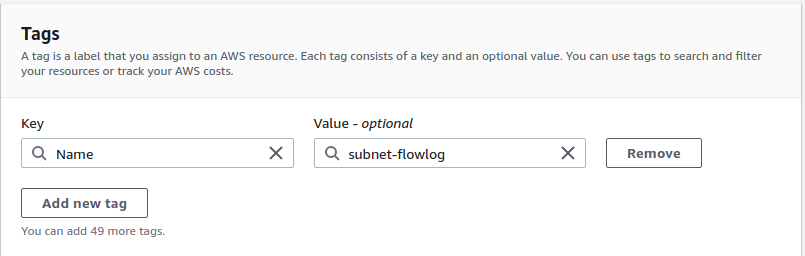
Add a tag for the Flow Log and click Create Flow Log.
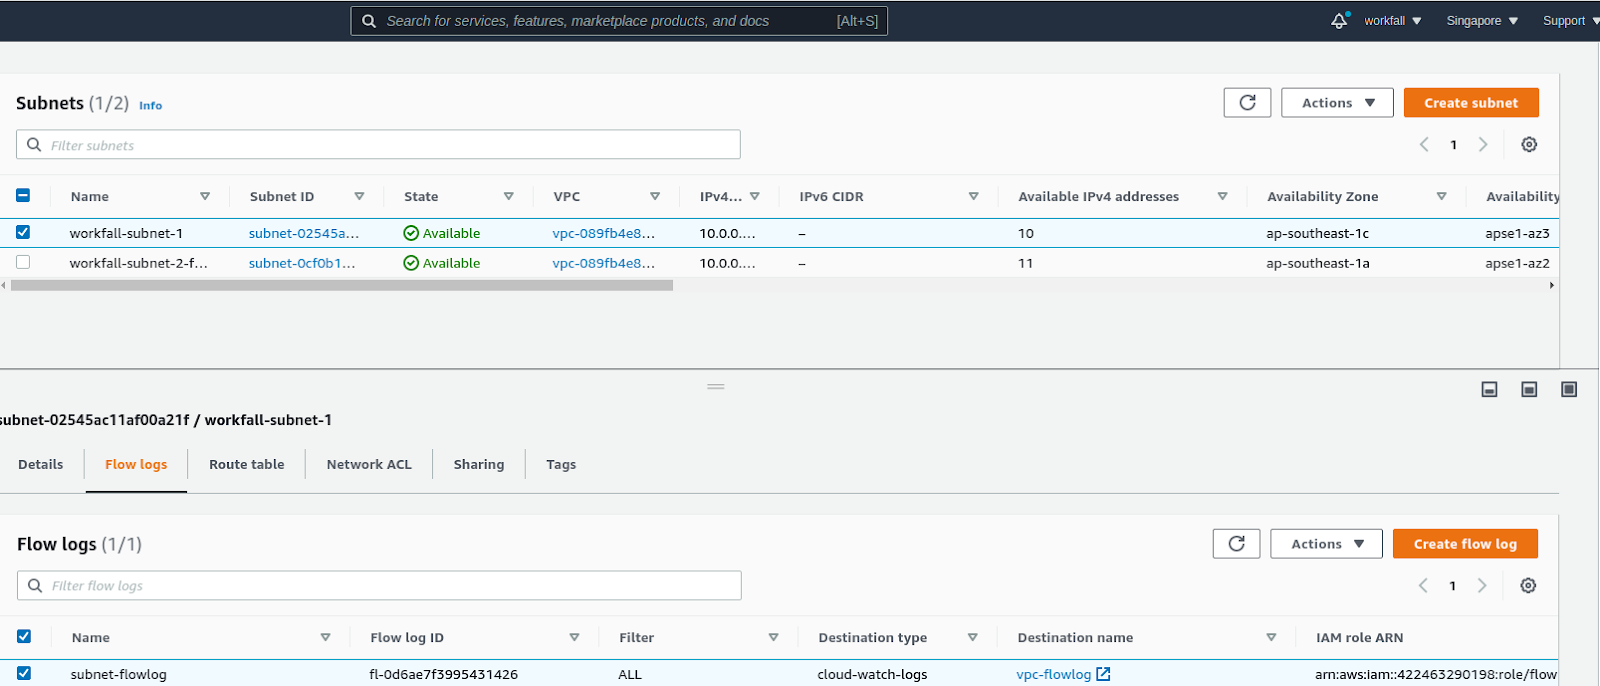
To check if the Flow Log is applied for the subnet, Select the subnet for which we have created the Flow Log, Choose Flow Logs
You can find the details of Flow Log such as Flow Log name, Flow Log ID, Destination name, etc.
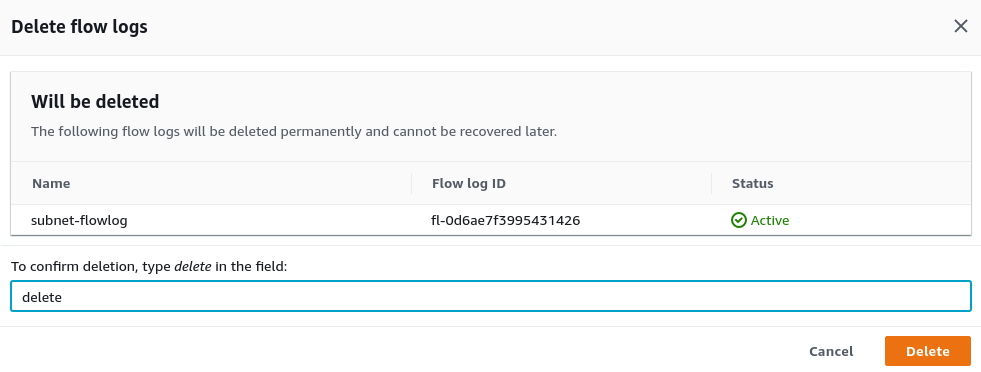
To delete a Flow Log for a subnet, Choose the Subnet and then choose Flow Logs.
Under Actions, Click Delete Flow Logs

Type delete and click Delete.
- Creating Flow Log for a VPC
To create a Flow Log for a VPC, log in to VPC Console
In the navigation pane, Choose Your VPCs
Select the VPC for which you want to create VPC Flow Log,
Under Actions, Click Create Flow Log
Under the Flow Log setting, Provide a name for the Flow Log.
For Filter, It will ask for the type of traffic that needs to be recorded.
Choose All to log rejected and accepted traffic.
For the Maximum aggregation interval, Choose the maximum period of time during which a Flow Log is captured and aggregated into one Flow Logs record.

For Destination, Choose to Send to CloudWatch logs
Choose the CloudWatch log group that we’ve already generated for the Destination log group.
Choose the role that has already been created for the IAM role.
For the Log record format, we have the option of using the default format or configuring a custom format if necessary.
Add a tag for the Flow Log and click Create Flow Log.

Flow Log is created for the VPC.
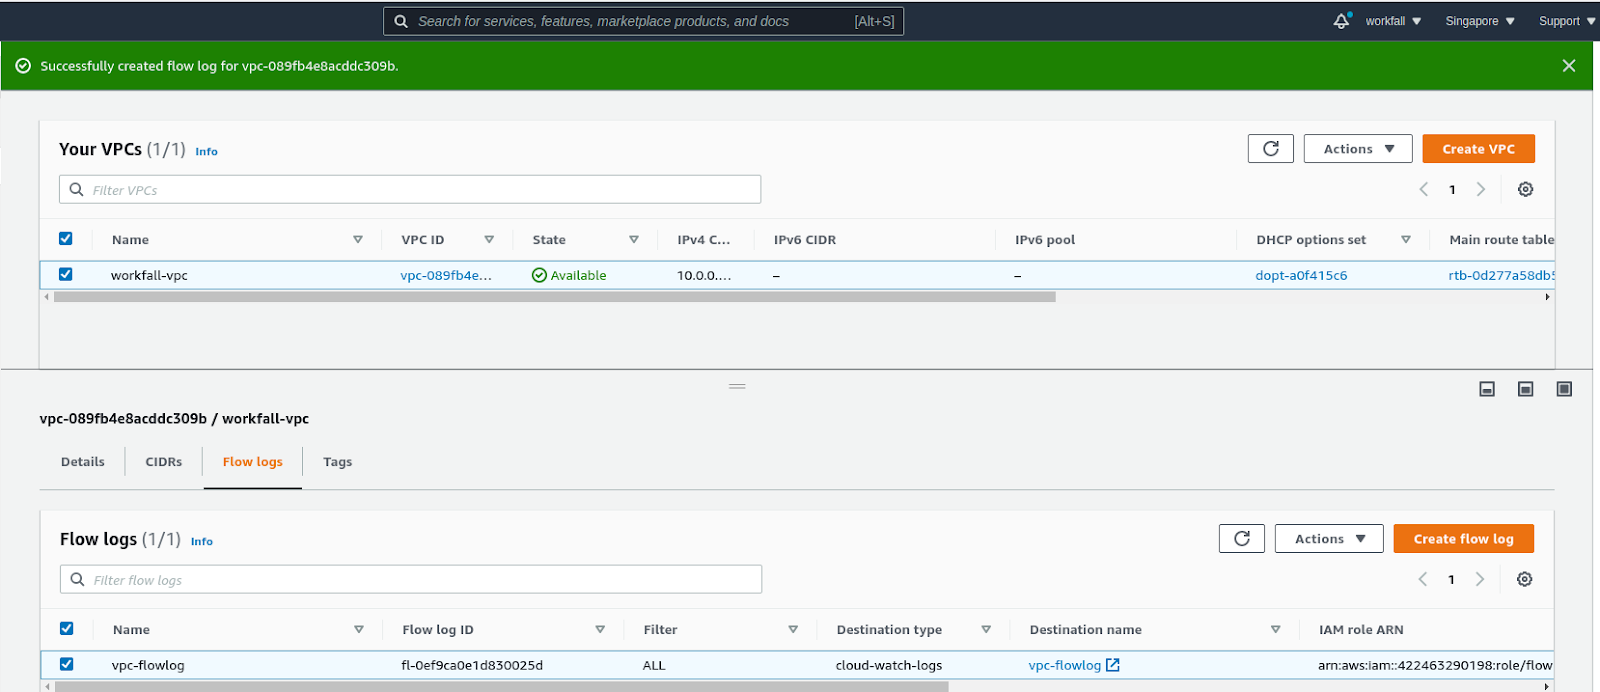
Now We know how to configure Flow Logs for Network interfaces, Subnets, and VPC and publish the Flow Logs to the CloudWatch Log Group.
Publishing Flow Logs to S3 Bucket
- If you want to transfer data from Flow Logs to an S3 bucket rather than a Cloudwatch log group. It’s something we can set up.
- Data from Flow Logs can be published to an S3 bucket.
- We should have an existing S3 bucket for the Flow Logs to send the data to the S3 bucket.
- The traffic information collected by Flow Logs will be sent to the S3 bucket and stored as log file objects.
- Creating S3 Bucket
To create an S3 bucket, Login to S3 Console. Click Create bucket

Provide a name for the bucket and Choose the same AWS region where the bucket should be created, leave the rest of the settings to default, and click Create bucket.

- Understanding Flow Log files
Flow Logs collect Flow Log records, consolidate them to log files, and then publish the log files to the S3 bucket at 5 minutes intervals.
Each log file will have the details about the IP traffic recorded in the last 5 minutes.
The maximum file size of each log file can be 75 MB. If the log file reaches the file limit, The Flow Logs will create a new log file and start storing log records there.
Then the log files will be stored in the S3 bucket.
Creating S3 Bucket Policies for Flow Logs
By default, All the S3 buckets and objects we create are private.
The below S3 Bucket policy grants the Flow Logs permission to publish logs to the S3 bucket.
{
    "Version": "2012-10-17",
    "Statement": [
       {
          "Sid": "AWSLogDeliveryWrite",
          "Effect": "Allow",
          "Principal": {"Service": "delivery.logs.amazonaws.com"},
          "Action": "s3:PutObject",
          "Resource":
"arn:aws:s3:::bucket_name/optional_folder/AWSLogs/account_id/*",
          "Condition": {"StringEquals": {"s3:x-amz-acl": "bucket-owner-full-control"}}
       },
       {
          "Sid": "AWSLogDeliveryAclCheck",
          "Effect": "Allow",
          "Principal": {"Service": "delivery.logs.amazonaws.com"},
          "Action": "s3:GetBucketAcl",
          "Resource": "arn:aws:s3:::bucket_name"
       }
    ]
}
If the above permission is not attached to the respective S3 bucket, Then the Flow Logs will automatically apply for permissions while creating Flow Logs.
- Creating Flow Log for Subnet
Let’s go ahead and create Flow Logs for the subnets and publish the Flow Logs to the S3 bucket.
From the lists of subnets, Choose the subnet for which you wish to create VPC Flow Log.
Under Actions, click Create Create Flow Log
Under the Flow Log setting, Provide a name for the Flow Log.
For Filter, It will ask for the type of traffic that needs to be recorded.
Choose All to log rejected and accepted traffics.
For Maximum aggregation interval, Choose the maximum period of time during which a Flow Log is captured and aggregated into one Flow Logs record.
For Destination, choose to Send to Amazon S3 bucket

To find the ARN of the S3 bucket, Go to the S3 console,
Select the S3 bucket that we created for storing Flow Logs and click Copy ARN

Go back to the Flow Log creation page and paste the ARN of the bucket which you have copied.

For the Log record format, we can choose either the default format or we can configure a custom format if required.
Click Create Flow Log after adding a tag to the Flow Log.
To see if the Flow Log is enabled for the subnet, go here. Select the subnet for which the Flow Log was created.
Select Flow Logs
You can find the details of Flow Log such as Flow Log name, Flow Log ID, Destination name, etc.
Select the Subnet and then Flow Logs to delete a Flow Log for that subnet.
Under Actions, Click Delete Flow Logs
Type delete and click Delete.
- Creating Flow Log for a VPC
To build a Flow Log for a VPC and publish it to an S3 bucket, follow these steps.
Using the VPC Console, log in. In the left-hand navigation pane, click Select Your Virtual Private Clouds
Choose the VPC for which you wish to build a VPC Flow Log, and then click Next.
Under Actions, Click Create Flow Log
Click Create Flow Log under Actions.
Give the Flow Log a name in the Flow Log configuration.
It will ask for the sort of traffic that needs to be captured when using Filter.
To log both refused and accepted traffics, select All.
Choose the greatest duration of time for a Flow Log to be gathered and aggregated into a single Flow Logs record for Maximum aggregation interval.
For Destination, Choose Send to Amazon S3 bucket
To find the ARN of the S3 bucket , Go to S3 console,
Select the S3 bucket that we created for storing Flow Logs and click Copy ARN
Return to the Flow Log creation page and paste the bucket’s ARN that you copied previously.
For the Log record format, we have the option of using the default format or configuring a custom format if necessary.
Click Create Flow Log after adding a tag to the Flow Log.
Flow Log is created for the VPC. For the VPC, a Flow Log is created.
We now know how to set up Flow Logs for network interfaces, subnets, and VPCs, as well as how to publish them to an S3 bucket.
Conclusion
We have implemented Flow Logs for Network interfaces, Subnets, and VPC to analyze the traffic that is coming in and out of the AWS network. The logs can be analyzed from the CloudWatch log group and/or S3 bucket which will help us to fix security and performance issues. We will discuss more security in our upcoming blogs. Stay tuned to keep getting all updates about our upcoming new blogs on AWS and relevant technologies.
Meanwhile …
Keep Exploring -> Keep Learning -> Keep Mastering
This blog is part of our effort towards building a knowledgeable and kick-ass tech community. At Workfall, we strive to provide the best tech and pay opportunities to AWS-certified talents. If you’re looking to work with global clients, build kick-ass products while making big bucks doing so, give it a shot at workfall.com/partner today.