To download or upload data and access other back-end services, most front-end applications must communicate with a server using the HTTP protocol. The HttpClient service class in @angular/common/http provides an Angular application with an HTTP client API.
The HttpClient is a lightweight, easy-to-use, and robust HTTP client library. It allows developers to collect external data, post to it, and more.
It offers the ability to request typed response objects, testability features, streamlined error handling, and also provides request and response interception.
The XMLHttpRequest interface or the retrieve API is used by the front-end of applications to communicate with back-end services in order to get or transmit data via HTTP protocol. With the help of HttpClient, this communication is handled in Angular.
In this blog we’ll cover:
- What is HttpClient Angular?
- HttpClient Methods in Angular
- Benefits of HttpClient in Angular
- How to use the HttpClient GET method?
- Prerequisite
- Hands-on
- Conclusion

To know more about the Angular framework, its features, and custom pipes in Angular, refer to our blog:
https://www.workfall.com/learning/blog/how-to-create-custom-pipes-in-angular-framework/
What is HttpClient Angular?
Every front-end application needs to communicate with the backend microservices to share the data over the HTTP protocol. In angular, this communication is done via the HttpClient. HttpClient in angular is used to perform HTTP requests and handle the response received from the server.
- The HttpClient service is available in the @angular/common/http package in the angular framework
- The HttpClient service is included in the HTTP client module which can be used to initiate the HTTP requests and handle the responses in angular applications
- For the HttpClient service to work, one needs to import HttpClientModule in the application using the app module
- The HttpClient service gives a responsibility to implement other functionalities like interceptors, headers, etc.
Why do we need HttpClient?
The retrieve API, also known as the XMLHttpRequest interface, is used by front-end applications to communicate with back-end services in order to retrieve or transmit data over the HTTP protocol. HttpClient is used to communicate in Angular.
HttpClient Methods in Angular
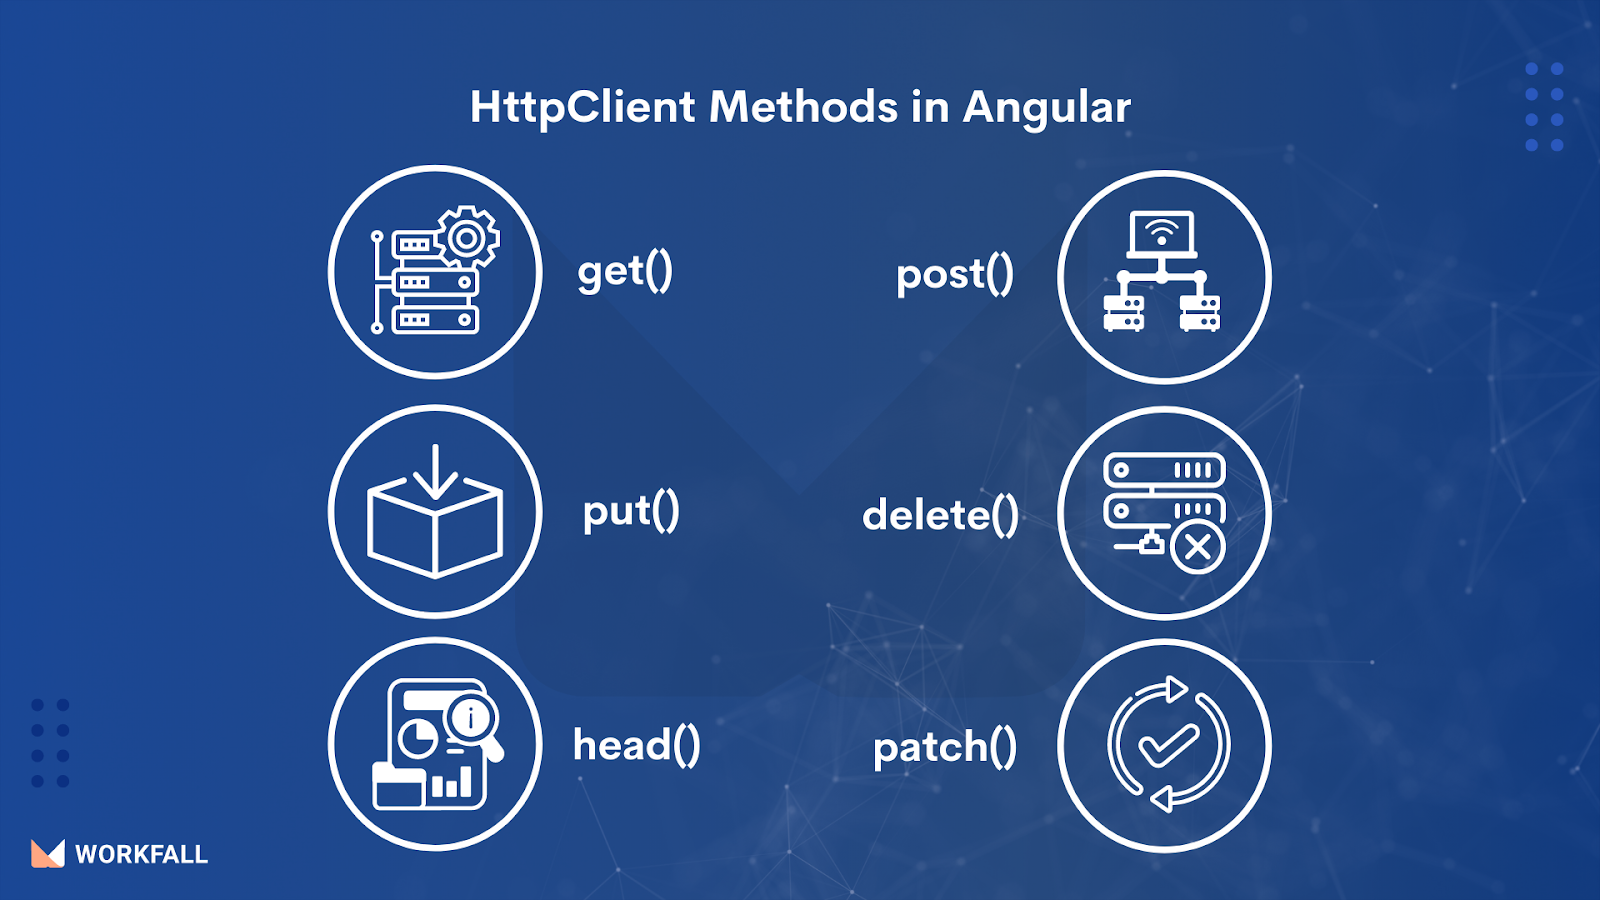
There are different types of HttpClient methods provided by the angular framework –
- get() – To retrieve data from the server
- post() – To post new client data to the server
- put() – To update the data to the server for the given resource or create one if it does not exist
- delete() – To delete the item from the server for the given resource
- head() – To retrieve meta-information written in the response headers without the response body
- patch() – To update a part of the information for the given resource
Benefits of HttpClient in Angular
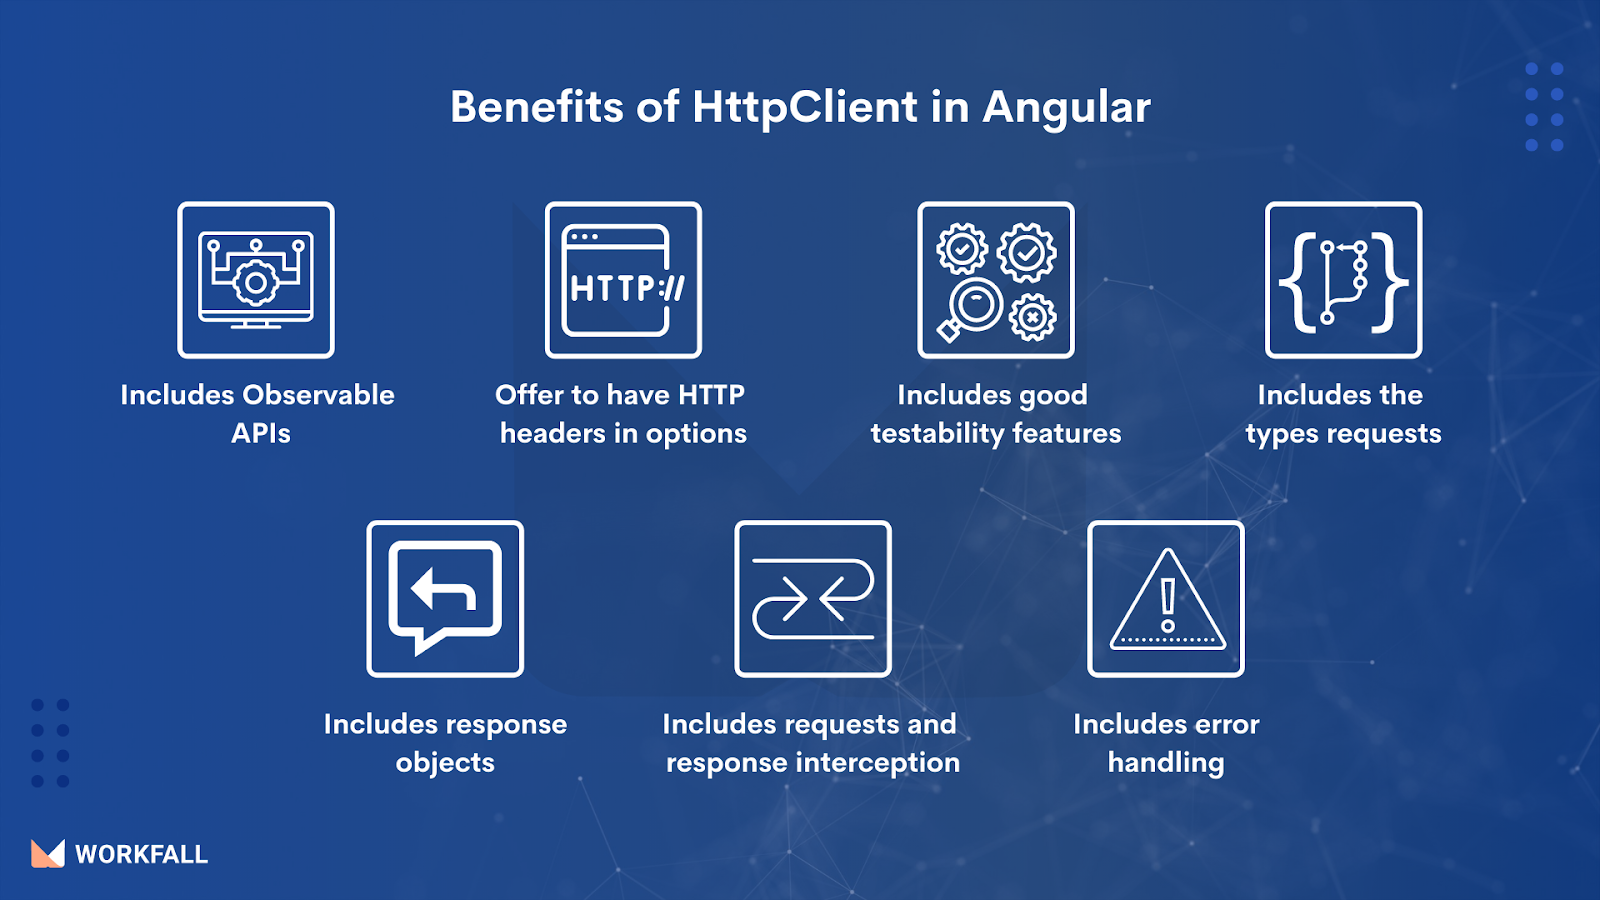
- Includes Observable APIs
- Offers to have http headers in options
- Includes good testability features
- Includes the typed requests
- Includes response object
- Includes request and response interception
- Includes error handling
How to use the HttpClient GET method?
Several HttpClient methods are responsible for backend microservices and performing the required operation. In this blog, we will take a look at the GET method which will be responsible for interacting with an open-source endpoint and fetching the data. Follow the below steps to understand how to set up the end-to-end communication –
- Import the HttpClientModule in the application module
- Import the HttpClient in service or component class
- Make note it is considered to have the HTTP calls in the service class as it makes the code reusable and easy to maintain
- Inject the HttpClient in the class constructor method
- Implement the HTTP GET method call. For this tutorial, we will use a fake restful api provided by the json placeholder (https://jsonplaceholder.typicode.com/)
- Import the service into the required calling component class
- Call the component class method to make the HTTP request and retrieve the data from the server
Prerequisite
To work on the angular application we will first need to install the node software. You can download the software from this <a href="https://nodejs.org/en/download/" target="_blank">link</a> and run the installer. Follow the setup wizard steps and restart your machine post the successful implementation. Use the following command to verify the nodejs installation.

This command will show the installed node version upon successful installation.
Hands On
Now let’s build a small implementation to explore how to create HTTP calls. In this exercise, we will do the following steps:
- Create an angular project
- Configure the HttpClientModule in an application module
- Creating the service
- Injecting the service in the component class
- Parsing the response and displaying it to the user
- Run the application
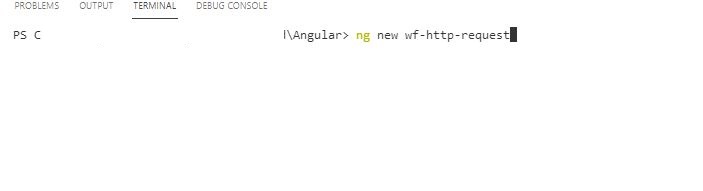
Create an angular project
Open the IDE of your choice and open the terminal window. I am using Visual Studio Code as it is easy to set up and offers a lot of customization features. Once the terminal window is open enter the following code <code>ng new wf-http-request</code> in the window to get the application setup running in minutes. If you’re doing it for the first time the setup might take 5-7 minutes depending on your network bandwidth.
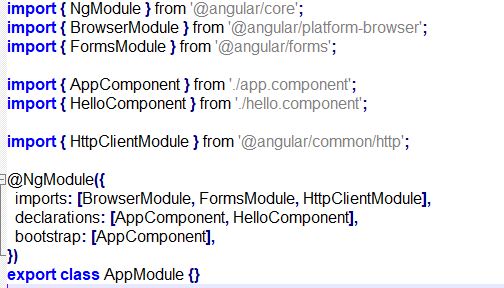
Configure the HttpClientModule
The <code>ng new</code> the command usually creates a template application for the learners to quickly get the angular application running on a system. We will use this same template application and align it as per our implementation. Now import <code>HttpClientModule</code> in the application module file present in the <code>app</code> folder. Remember that the app module works as an entry point for any angular application.
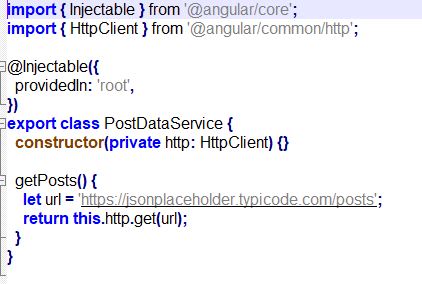
Creating the service
To create a service that is responsible to interact with the backend server and get the data from the server. Create a service class in the <code>service</code> folder by firing the following command in the terminal window – <code>ng generate service post-data</code>. The service class will be responsible to make the call to the backend server and get the results for the client.
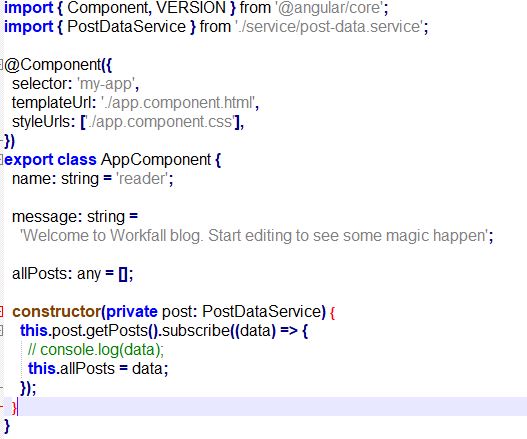
Injecting the service in the component class
Injecting the service in the component class is a very easy task as now we already have all the things required for the application. In this class, we will simply create a method responsible for calling the service class method and map the response with a variable named – <code>allPosts</code> that will be used in the HTML template for viewing.
Parsing the response
To parse the response returned by the component class method we will use the HTML template and the angular <code>*ngFor</code> expression.

Run the application
Running the application is very easy. Navigate to the terminal and from the project root directory trigger the following command – <code>ng server -o</code>. The command will be responsible to build the angular project and open the application in the browser on port number 4200.

Once the application is running the browser of your choice. Click on the dashboard and contact us hyperlinks to navigate to the different components while being on a single page.
To practice this implementation on your system, use the following URL to get the downloaded angular project up and running on your machine, navigate to the project directory and run the <code>npm install</code> command.
https://github.com/workfall/angular-http-client
Conclusion
In this blog, we explained how the HttpClient class is used to make HTTP requests and manage the server’s response. Then, we demonstrated the implementation of creating an angular app and made the first HTTP request with the help of HttpClientModule in Angular. Stay tuned to keep getting all updates about our upcoming new blogs on different technologies.
Meanwhile…
Keep Exploring -> Keep Learning -> Keep Mastering
This blog is part of our effort towards building a knowledgeable and kick-ass tech community. At Workfall, we strive to provide the best tech and pay opportunities to AWS-certified talents. If you’re looking to work with global clients, build kick-ass products while making big bucks doing so, give it a shot at workfall.com/partner today.