If you are a Facebook user, you are using Webhooks unknowingly 🙂 . For example, whenever your close friend posts something new or comments on your Facebook posts, there is an event that will take place and a post request will be created that will serve you with a notification stating that your friend has posted or updated some information on your Facebook page. There are millions of other applications using Webhooks for automating event-driven processes in real-time. In this blog, we will discuss Webhooks and demonstrate how to create and receive webhooks using Python and Node.js.
In this blog we will cover:
- What are Webhooks?
- How do Webhooks work?
- How are Webhooks different from APIs?
- Popular Webhooks Providers
- Best Webhooks Testing Tools
- Types of Webhooks Requests
- Use Cases of Webhooks
- Bottlenecks in Webhooks
- How to create Webhooks in Python?
- How to receive Webhooks in Node.js application?
- Conclusion
What are Webhooks?

The term “Webhook” was devised in 2007 by Jeff Lindsay in the computer programming term “hook”. Webhooks are asynchronous events used for single-way communication from a source application to the destination application.
Whenever a customer places an order on your site or has some items saved to the cart. Some inbuilt functionality should be there to notify the customer about the same. So that he rests assured that the order is placed successfully and the company rests assured that the customer is notified and reminded of the order confirmation and important items left in the cart or other significant events.
Webhooks makes your work stress-free by making these tasks easier as it sends your customer automated messages whenever any specific event occurs. Here, events could be anything from a purchase order to a transaction made from your bank account. They are simply HTTP messages passed from one server to another to signify an event.
These events are fully customizable and can communicate any type of information. The format of webhook messages is usually JSON.
How do Webhooks work?
As shown in the below image, the events are triggered in the first application, and then they will generate the HTTP request that will connect with the destination application and post the required message or notification in the destination application. That’s how the whole communication takes place and also, it’s one-way. That means the request will be sent to the server but there will be no response from the destination sent back to the source.

The function of a webhook is to connect the source application to the destination application for real-time data sharing.
Saas organizations like GitHub, Shopify, Stripe, Twilio, and Slack use webhooks to support different types of events based on the activities that happen within them.
How do Webhooks different from APIs?

Popular Webhooks Providers

Best Webhooks Testing Tools

Types of Webhook Requests
There are two types of requests you could receive depending on the webhooks provider – GET and POST. Simply put, the GET webhook queries to have the payload appended as a query string to the webhook URL whereas the payload of POST webhook requests is contained in the request body, which could also include characteristics such as authentication tokens.
Use Cases of Webhooks

- Next-generation B2B API Gateway: The webhooks API help suppliers self-serve their subscription to your data and let them migrate to your developer portal at their own speed.
- Master Data Synchronization: Through the developer portal your company can make event-driven webhooks API discoverable. This allows new systems to access master data with a significantly lesser lead time. Also, as a webhooks API provider, you can view all the consumers of your data and need not get the development team involved while adding new customers.
- Enable more Process Automation: The stakeholders of your company could get to access real-time events more easily, allowing further opportunities to automate processes faster. Also, as a provider of the event, you get to know and access all the systems that received your data.
- Making your Business Smarter: Access to real-time events gets you real-time business intelligence. Providing your real-time events in a single portal and providing authorized access to set up subscriptions helps you lay the foundation for a smart and agile organization.
Bottlenecks in Webhooks
Webhooks belong to an open federated system and hence, unique security, accessibility, and throughput constraints need to be addressed. As the messages are transmitted over the internet, their encryption and authentication must be addressed as well.
How to Create Webhooks in Python?
The best way to learn about webhooks is actually to create your own. Alright, let’s go ahead and program a webhook in Python.
Note: For prerequisites, you should have the latest Python and pip versions installed. You can make use of any editor; we have used Visual studio code for showing this.
Here, we are using D: directory and inside it, we have created a folder named python_project.
Go to the terminal and use the below command to install a virtual environment in Python. This will install a virtual environment package for you. Once done with the installation, you will receive the output as shown below.

Now, using the below command creates a virtual environment named “Workfallenv”. You can give it any name. This will create a virtual environment for you in the python_project folder. Our virtual environment is created successfully.

Now, we have to activate our Workfallenv that we created in the previous step. You can do that by using the below command. Our environment is activated. You can see the output below as shown.

Now, inside your Workfallenv, we will install a requests package. You can do so using the command below. Our package is installed successfully.

Now, you will create a webhooks_workfall.py file in which we will execute some commands to create a webhook. Firstly, we have to import the required module requests and JSON.
The Requests module is used for sending HTTP requests using Python to a specified URL.
While JSON on the other hand is used here to convert the Python dictionary string to the JSON format that can be written to a file. Using it you can read data directly from JSON files.

To generate the webhooks URL you can refer to the site webhook.site
The image shown below is the webhook.site webpage. You have to copy “Your unique URL” from the below page and paste it into the webhooks_workfall.py file.
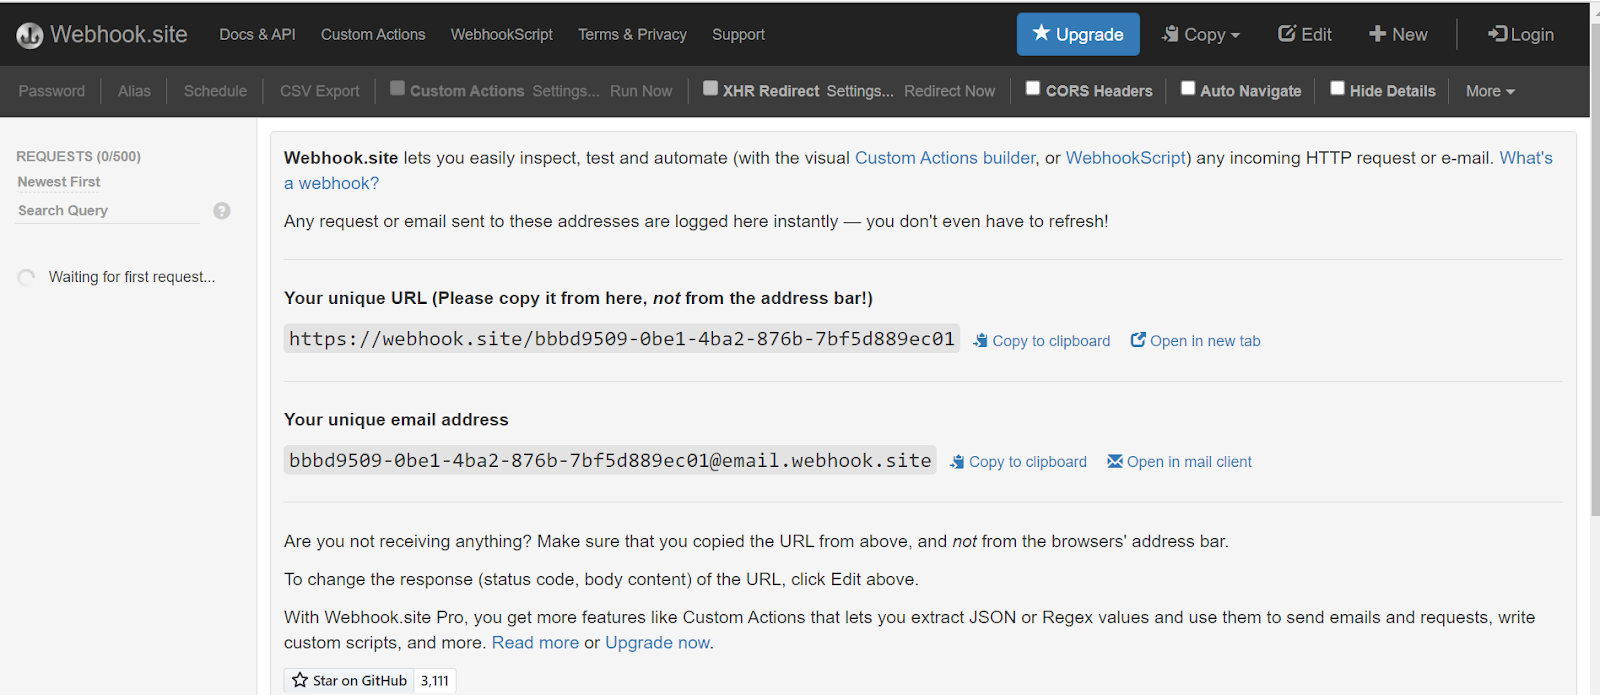
We will declare a variable webhookUrl to store the URL copied from the page above.

Now, we will define some datasets in the code as we have done in the below image. You can define the data as per your choice. The data should be defined in a form of a Python dictionary.

Now, we will declare another variable where we will define the post method from the requests library which is used for sending information. There are different methods used like the get method used to receive information. Inside the post method, we can define the parameter, here we have webhookUrl.
For the second parameter, we will declare the parameter as data and store the JSON output of the dataset that we defined earlier.
Next, we are going to define the HTTP headers, here we will define the content-type as application/json.

Now, just save your Python file, and in the terminal below, write the following command to execute the file.

If the code is executed successfully, you will get the output as shown in the image below.
Our code ran successfully!

Now, you can go back to the webhook.site webpage. You will see the request details as shown below. The request message is shown in the Raw content below in JSON format.

So, this is how we can create Webhooks in Python.
Now let’s build an implementation on how to send and receive webhooks in two different applications.

Prerequisites: You must have the Node.js and Python packages installed. For Node.js you need to install the “child_process” module as well. We will import the sys module in Python to communicate with Node.js.
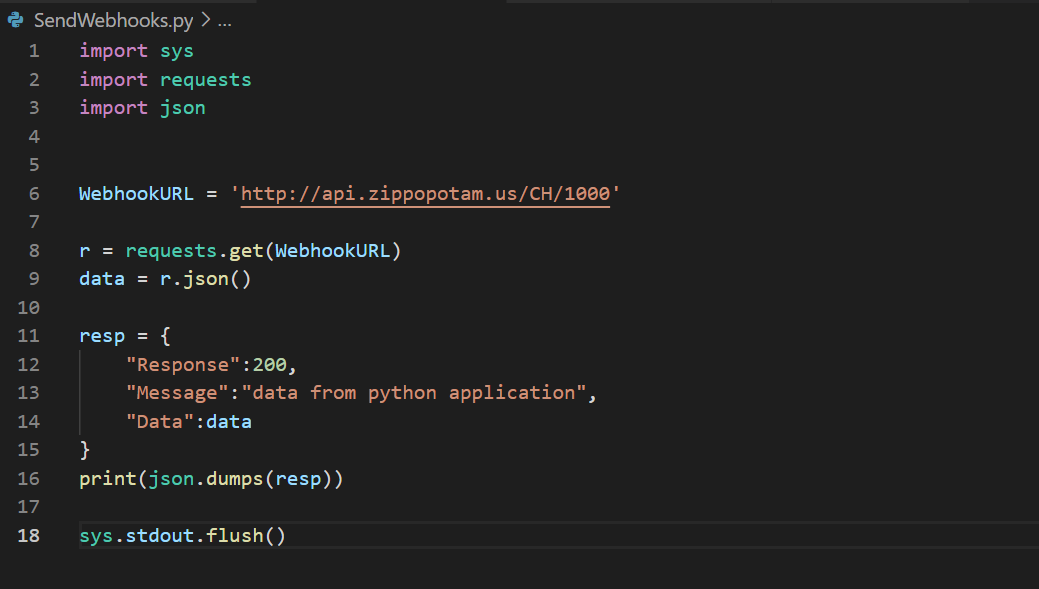
- We will create a Python file named SendWebhooks.py (For sending the Webhook).
- We will import the required libraries such as sys, requests, and JSON.
- For the dataset, we are pulling the data from a site that provides free APIs http://www.zippopotam.us/.
- We will create a Nodejs file named ReceiveWebhooks.js (For receiving the Webhook).

Next, we will get the data from WebhookURL using the get method.

Next line of code will convert the data stored in variable r into JSON format.

The next line of code contains the response variable block which will have the following attributes mentioned as below.

In the next step, we will print the response in JSON form.

The last line of the code will send the data to the Node.js application.

The complete Python code will look something like this:
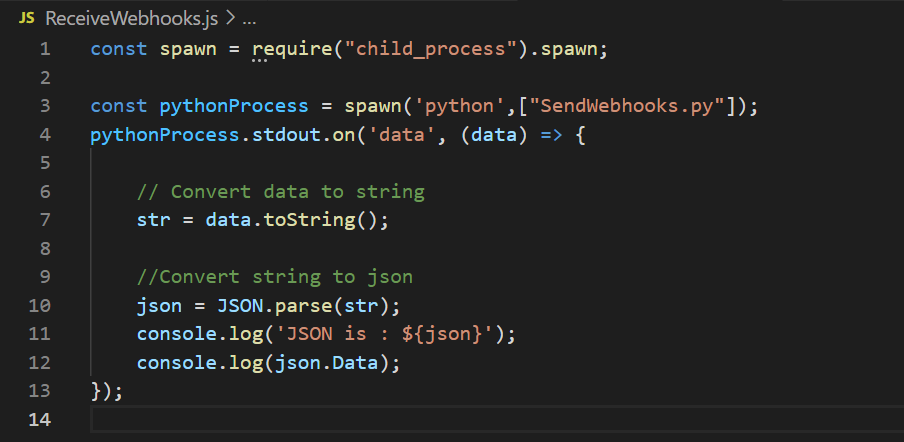
For another application, we are using Node.js. We will create a file named ReceiveWebhooks.js
Here, we will import the child_process module.
child_process.spawn() method spawns the child process asynchronously, without blocking the Node.js event loop.
The second line of code will call the Python script (SendWebhooks.py).
Process.stdout is an inbuilt application programming interface that is used for sending data out of a program.
The next step is to execute the Python program. You will get the output something like this shown in the below image.
With the help of the GET API call. The Python script will get the data from the URL present in the code.

Now, we will run the Node.js script.
The Node.js app will print the data it received from the Python app in the output. You can see the required output below.

We have come to the end of hands-on for what webhooks are and how to create webhooks in Python. We also did the hands-on real-time scenario where we established the communication between 2 distinct applications (Python and Node.js).
Conclusion
In this blog, we’ve explored what webhooks are, how we can create a virtual environment in Python, and how webhooks are created in Python and received on Node.js. We will come up with more such use cases in our upcoming blogs. Stay tuned to keep getting all updates about our upcoming new blogs on different technologies.
Meanwhile…
Keep Exploring -> Keep Learning -> Keep Mastering
This blog is part of our effort towards building a knowledgeable and kick-ass tech community. At Workfall, we strive to provide the best tech and pay opportunities to AWS-certified talents. If you’re looking to work with global clients, build kick-ass products while making big bucks doing so, give it a shot at workfall.com/partner today.