Amazon Web Services provides us with the flexibility of managing the data in the databases with ease. The flexibility is thus provided by an AWS Service called Amazon Aurora. An Amazon Aurora cluster contains one or more DB instances and a cluster volume that helps us manage the data for those DB instances. A cluster volume is basically a virtual database storage volume that spreads across various availability zones. Each zone thereby has two copies of the data. There exist two types of database instances that make up a cluster. A primary instance that supports read and write actions and a replica that connects to the same volume but only supports read-only operations. Each cluster can only have up to 15 replicas that span across the three availability zones. If ever the primary database instance becomes unavailable or not in use, Amazon Aurora automatically initiates the process of failing over to an Aurora Replica. In this blog, we will have a look at how we can make use of the Amazon RDS flexibilities to deploy an Amazon Aurora Global Database that replicates the data and spans across multiple regions.
Amazon Aurora – Recap

Amazon Aurora is a relational database for the cloud that supports MySQL and PostgreSQL and combines the speed and availability of standard enterprise databases with the simplicity and cost-effectiveness of open-source databases.
Amazon Aurora databases are up to 5x faster than MySQL databases and 3x faster than PostgreSQL databases. It offers commercial databases security, availability, and reliability at a fraction of the cost. Amazon RDS handles all aspects of Amazon Aurora, including hardware provisioning, database setup, patching, and backups.
Hands-on
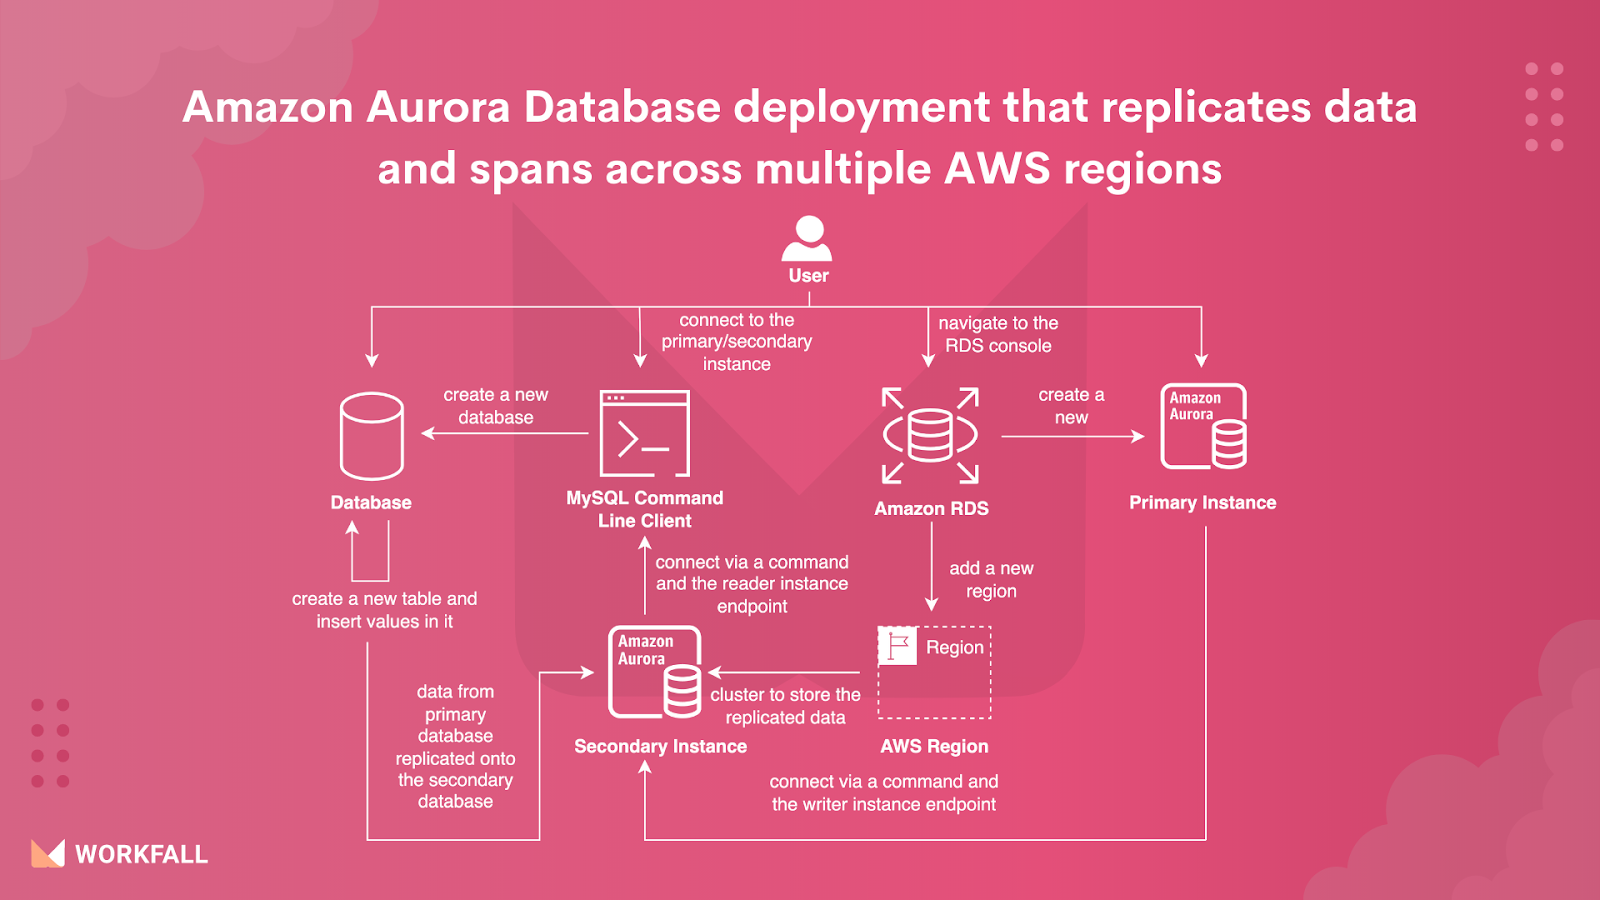
In this hands-on, we will see how we can perform an Amazon Aurora Database deployment thereby replicating the data across secondary databases in some other AWS region. Navigating to the Amazon RDS dashboard, we will create a new Amazon Aurora database which will consist of the required data to be replicated. We will create an Amazon Aurora cluster instance with the latest version of MySQL support for the Dev/Test template. While configuring the DB instances, we will be using the memory-optimized instances with the r family series. Blocking the public access for the Database instance, we will create a new security group and disable the deletion protection as well.
Finally, we will enter a username and password that will be used to log in to the DB instance. We will then add a new AWS region to create a Secondary cluster of the Primary database. On successful creation of the Primary and Secondary clusters, we will log in to the Primary database instance using the writer instance’s endpoint and a MySQL command on the MySQL Command Line Client terminal. On the prompt, you will be required to enter the password for the database instance that you configured while creating the instance. Then we will create a new schema on the primary cluster. Activating the newly created schema, we will then create a new table inserting values in the table. You can run the select query to check if the values have been stored successfully in the created table. We will then copy the secondary instance’s reader endpoint and use the same in a new MySQL Command Line Client terminal to log in to the Secondary database.
On the prompt, you will be required to enter the password for the database instance that you configured while creating the instance. Activating the primary cluster’s schema, we will check if the schema that was created in the primary cluster is successfully cloned to the secondary cluster or not. On success, we will execute a select query on the newly created table in that schema to check if the data inside the table is replicated successfully or not. Post that, we will perform the Failover Global Database action to make the Secondary cluster the Primary cluster and vice versa. On successful transition, we will then finally check the roles of the final instances.
To implement the same, we will do the following:
- Log in to the AWS account and navigate to the console.
- Navigate to the Amazon RDS dashboard.
- Create a new Amazon Aurora database using the provided configuration steps.
- Navigate to the Add AWS Region for the created database and follow the configuration steps to add a new AWS region.
- On creation, note the Primary and the Secondary database.
- Navigate to the MySQL Command Line Client terminal, using the writer instance’s endpoint, login to the Primary Database instance.
- Create a new schema.
- Following the creation step, activate the newly created schema.
- Create a new table.
- Insert values inside the newly created table.
- Navigate to the Secondary Database dashboard and copy the Reader Instance’s endpoint.
- Open a new MySQL Command Line Client terminal and login to the Secondary instance using the provided command.
- Using a command, navigate to the schema and activate the same schema that was created in the Primary Database to check if the cloning took place effectively.
- Execute a select query on the Secondary Database to check if the values inserted in the Primary Database were cloned successfully.
- Perform the Failover Global Database action to make the Secondary Database as the Primary Database and vice versa.
- Check if the transition of the Role was successful.
Log in to the AWS account and navigate to the console.

Search for the Amazon RDS service and click on it.

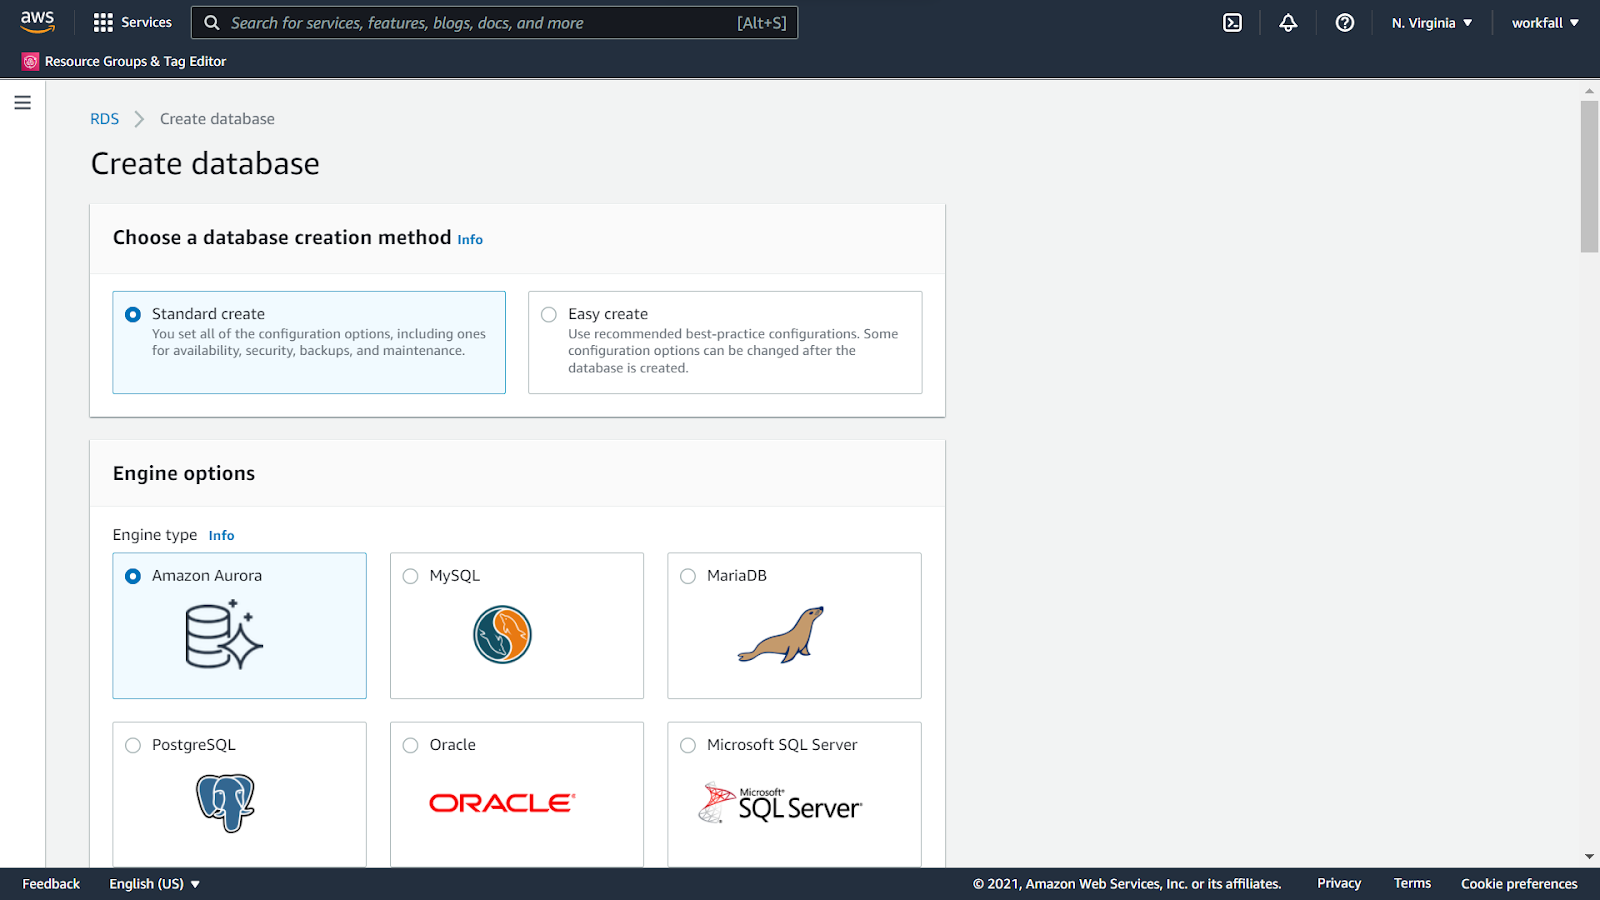
On the RDS dashboard, click on Create database.

Select Standard create and for the Engine Type, select Amazon Aurora.
Select the Edition and the Capacity Type as shown in the image below.

Expand the Replication features section and select Single-master.
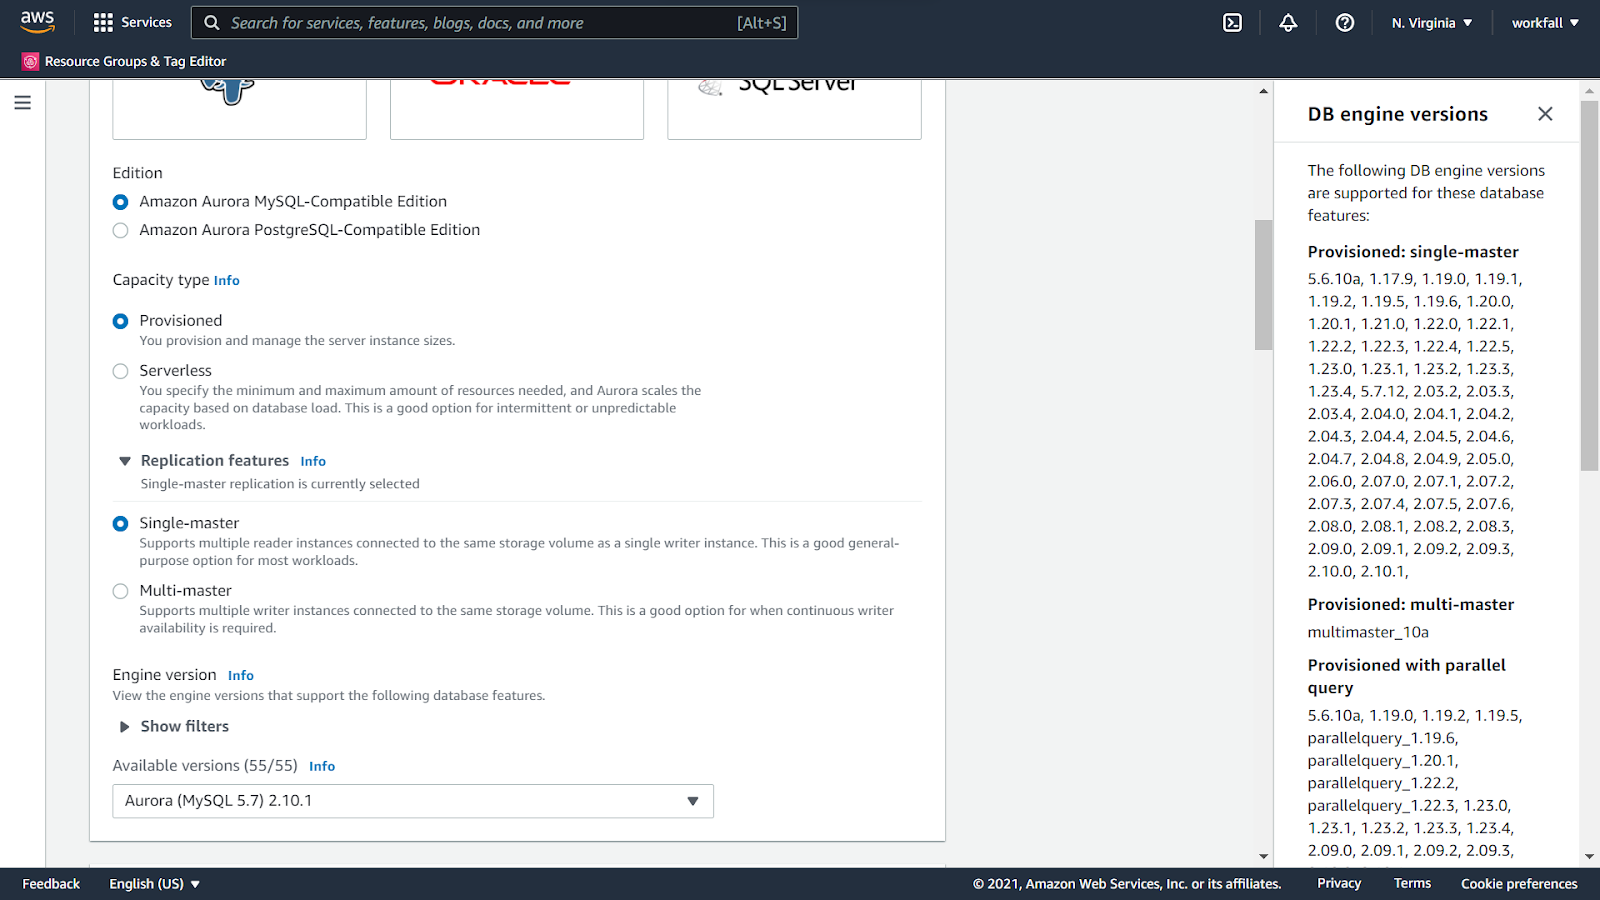
For the Engine version, select the latest Aurora version from the dropdown. Select the template as Dev/Test.

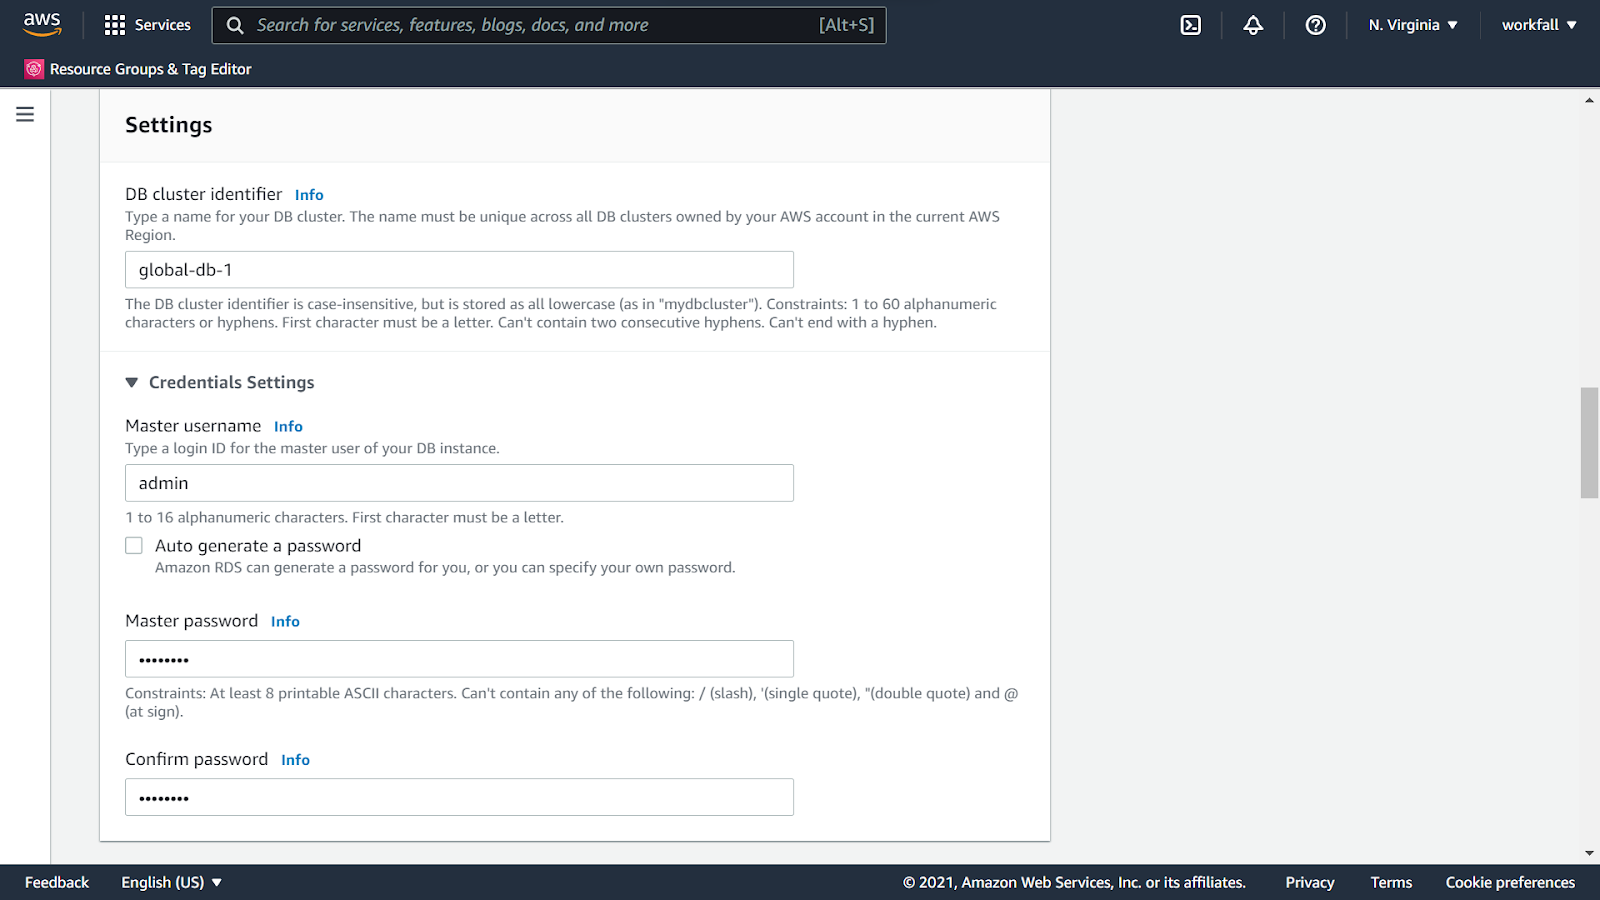
Enter in a name for the DB cluster identifier. Leave the master username as it is and enter a password for the master.
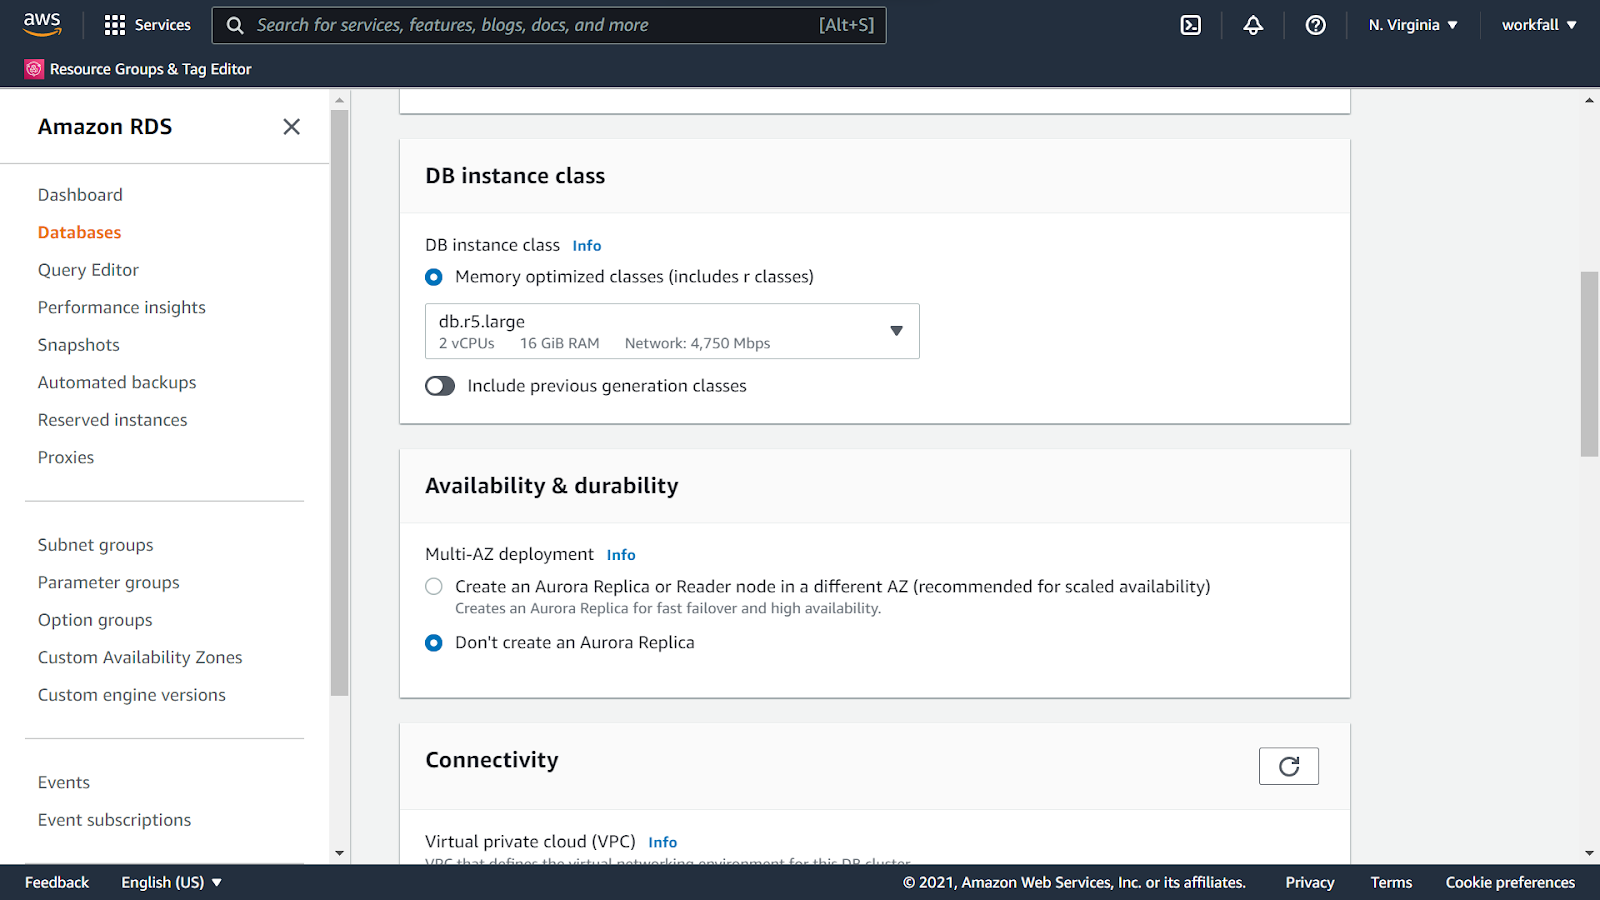
Under the DB instance class, select the DB class as Memory optimized classes and in the dropdown, select the db.r5.large instance. Select Don’t create an Aurora Replica for the next option.

Under Connectivity, either select a default VPC or the VPC you wish to create the DB instance in. Select the Subnet group as default and the public access as No.

For the security group, select Create new. Enter a name for the security group and the port as 3306.

Expand Additional configurations and scroll down to the bottom and ensure that Enable deletion protection is unchecked.

Click on Create database.

The process might take some time to create the instance and make it available.

Once the creation is successful, select the instance and click on Actions.

Select Add AWS Region from the dropdown.

Add a name for the Global Database Identifier. Select the Secondary region as EU(Paris).

For the DB instance, select db.r5.large from the dropdown and do not create an Aurora Replica.
Select the default VPC and the default subnet. Make sure to block Public Access.

Make the database port as 3306.

Scroll down to the bottom leaving the other configurations as default.

Click on Add region. This might take some time to finish the process.

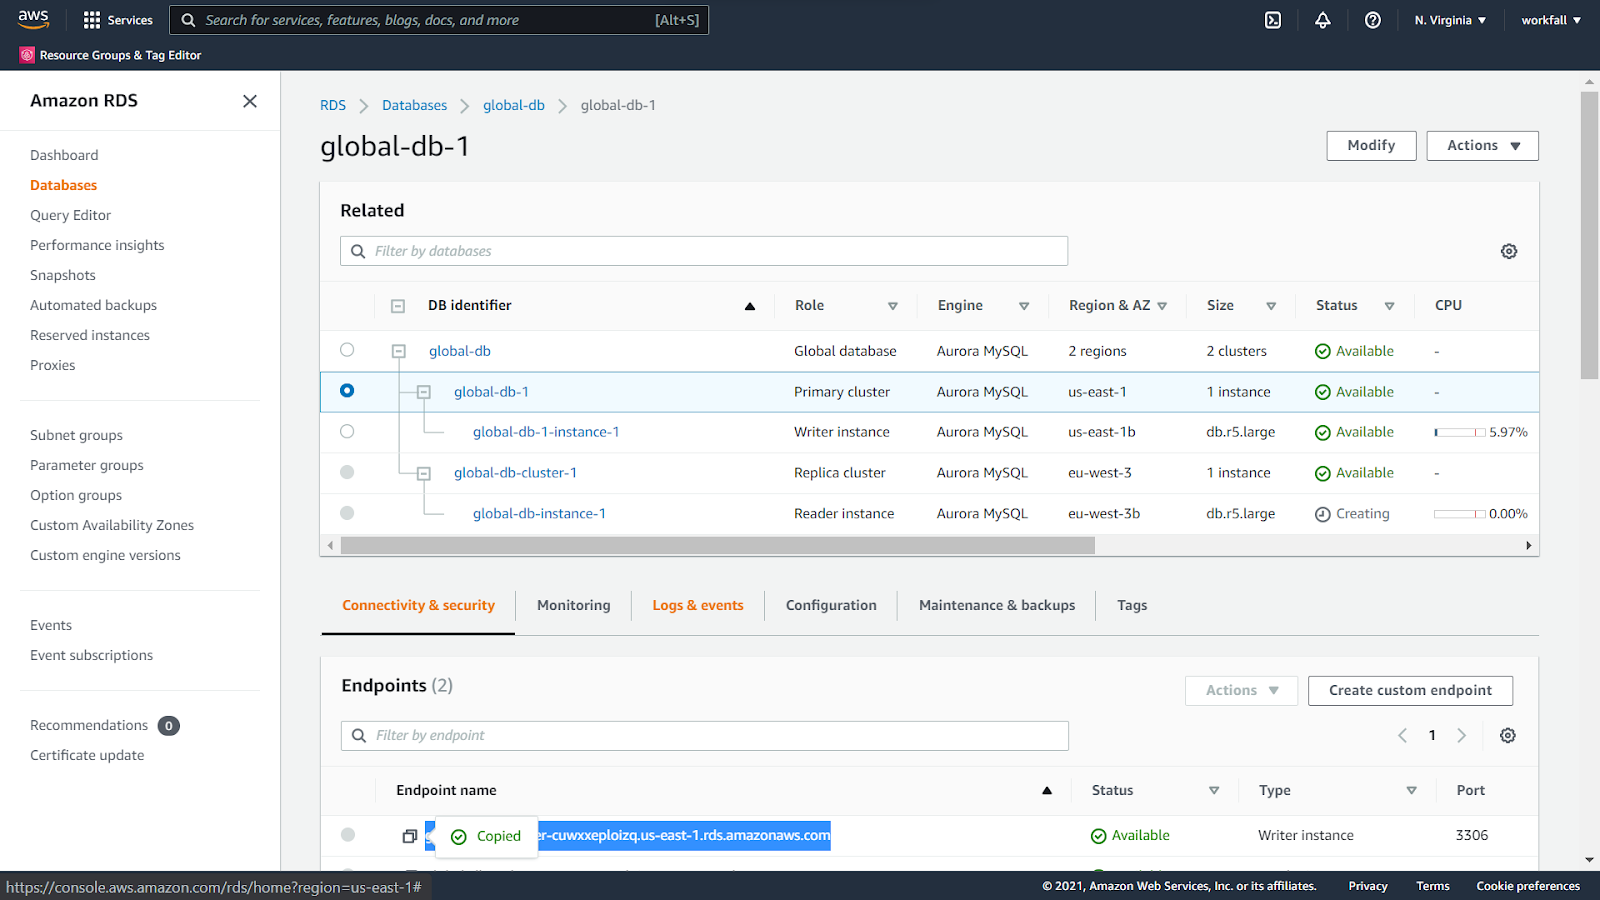
The previous DB instance will now have the role as Primary Cluster and a new Secondary Cluster will be created. Wait till the Status becomes Available for the Secondary Cluster.

Copy the Endpoint name of the writer instance.
Connect to the instance using the below command:
mysql -h <Primary Cluster Writer Endpoint> -P 3306 -u admin -p
On success, you will see the screen as shown below:

Create a new database using the command:
CREATE database <db_name>;

Connect to the database using the command:
USE aurora;

Create a table in the schema:
CREATE table employee (emp_no bigint, name varchar(50));

Run a few insert statements to enter values in the created table:
insert into employee values (1, ‘John’);
insert into employee values (2, ‘Sam’);

Use the below command to commit the changes:
Commit;

Run the select query to see if the values are stored:
select * from employee;

Navigate back to the RDS console, select the cluster and click on it.

Check the AWS region. You are now navigated to the Paris region. Copy the endpoint of the Reader instance type.

Create a new session and use the below command to connect to the instance:
mysql -h <Secondary Reader Endpoint> -P 3306 -u admin -p

Run the below command to connect to the schema:
USE aurora;

Run the select query for the table you created above. You will get to see the data that you inserted.

Now, navigate back to the console and select the primary cluster. Click on Actions and select Failover the global database.

Select the secondary cluster from the dropdown and click on Failover global database.

The process of Failover might take some time.
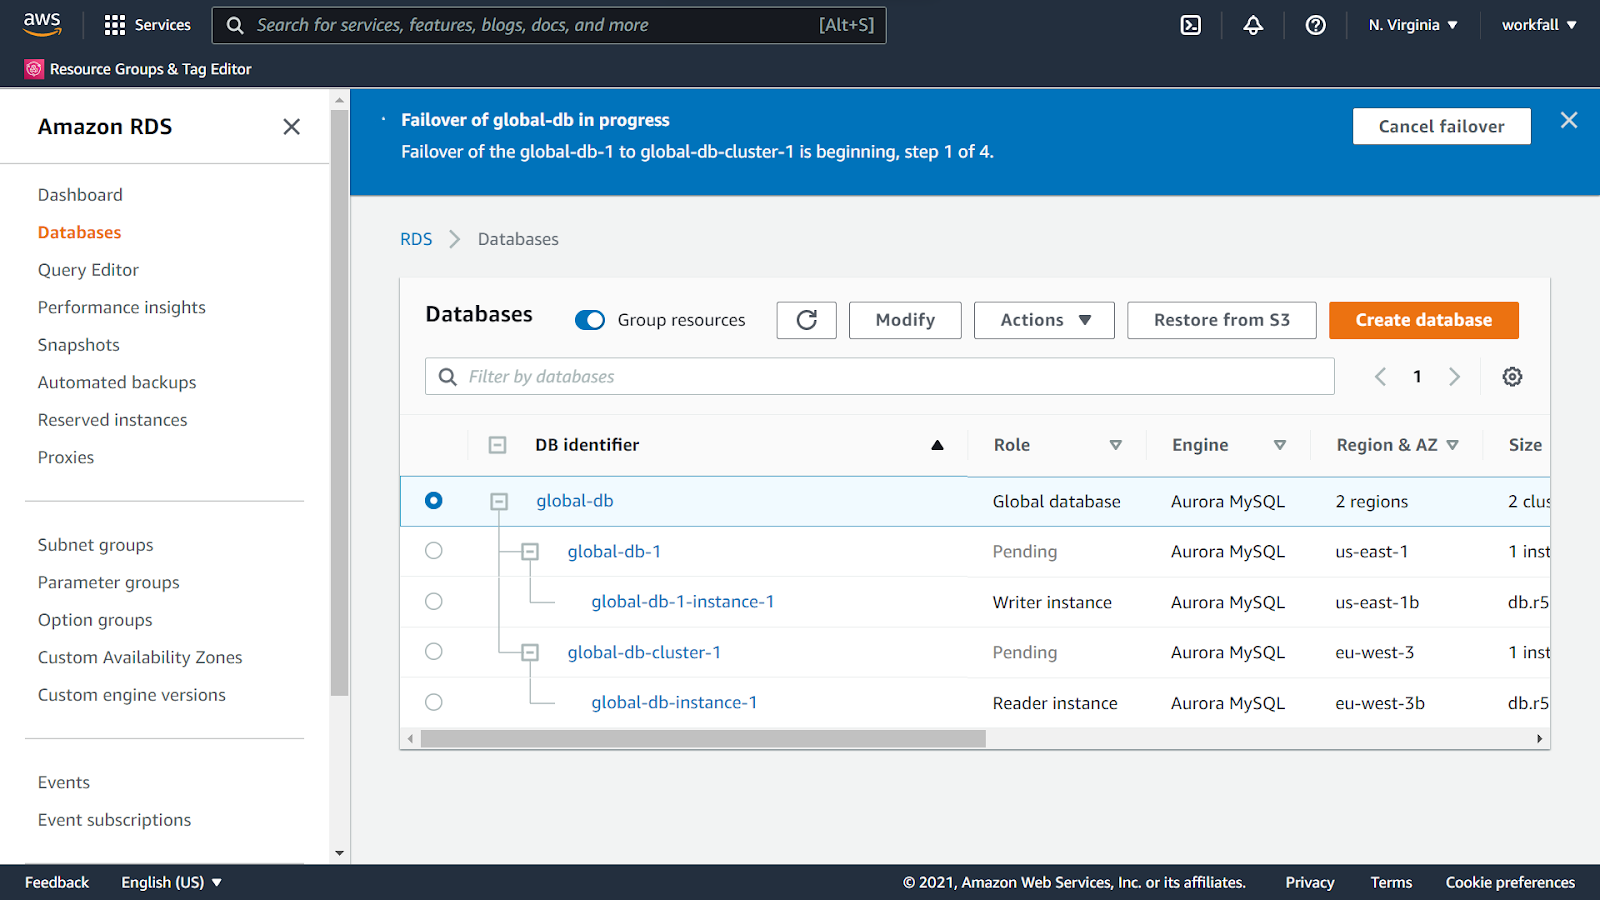
Once the failover process completes, you will see the region of the primary cluster has now changed and the previous instance has become the secondary cluster.

Conclusion
In this blog, we saw how we can perform an Amazon Aurora Database deployment thereby replicating the data across secondary databases in another AWS region.
Navigating to the Amazon RDS dashboard, we created a new Amazon Aurora database. We then added a new AWS region to create a Secondary cluster of the Primary database. On successful creation of the Primary and Secondary clusters, we performed the login action for the Primary database instance using the writer instance’s endpoint and a MySQL command on the MySQL Command Line Client terminal.
Then we created a new schema on the primary cluster. Activating the newly created schema, we created a new table inserting values in the table. We then copied the secondary instance’s reader endpoint and used the same in a new MySQL Command Line Client terminal to log in to the Secondary database.
We then activated and checked if the schema that was created in the primary cluster was successfully cloned to the secondary cluster or not. On success, we executed a select query on the newly created table in that schema to check if the data inside the table was replicated successfully or not.
Post that, we performed the Failover Global Database action to make the Secondary cluster as the Primary cluster and vice versa. On successful transition, we finally checked the roles of the final instances.
We will discuss more use cases for the services used in our upcoming blogs. Stay tuned to keep getting all updates about our upcoming new blogs on AWS and relevant technologies.
Meanwhile …
Keep Exploring -> Keep Learning -> Keep Mastering
This blog is part of our effort towards building a knowledgeable and kick-ass tech community. At Workfall, we strive to provide the best tech and pay opportunities to AWS-certified talents. If you’re looking to work with global clients, build kick-ass products while making big bucks doing so, give it a shot at workfall.com/partner today.