In our previous blog on how to establish and maintain a scalable network using Amazon Managed Blockchain (Part 1), we discussed Blockchain and Amazon Managed Blockchain. We have also discussed its components, benefits, features, pricing, customers, and how it works. In this blog, we will discuss how to use AWS Blockchain Templates to configure and launch AWS CloudFormation stacks to create blockchain networks. We will be demonstrating how to use the AWS Blockchain Template for Ethereum to create a private blockchain network on AWS through AWS CloudFormation.
In this blog, we will cover:
- AWS Blockchain Templates
- How does it work?
- Benefits of AWS Blockchain templates
- Types of AWS Blockchain Templates
- Setting up an Ethereum network to create blockchain templates using cloud formation stacks
- Conclusion
AWS Blockchain Templates
Using popular open-source frameworks, AWS Blockchain Templates makes it quick and easy to develop and deploy secure blockchain networks. Instead of wasting time and resources manually setting up your blockchain network, you can focus on building your blockchain apps with these templates.
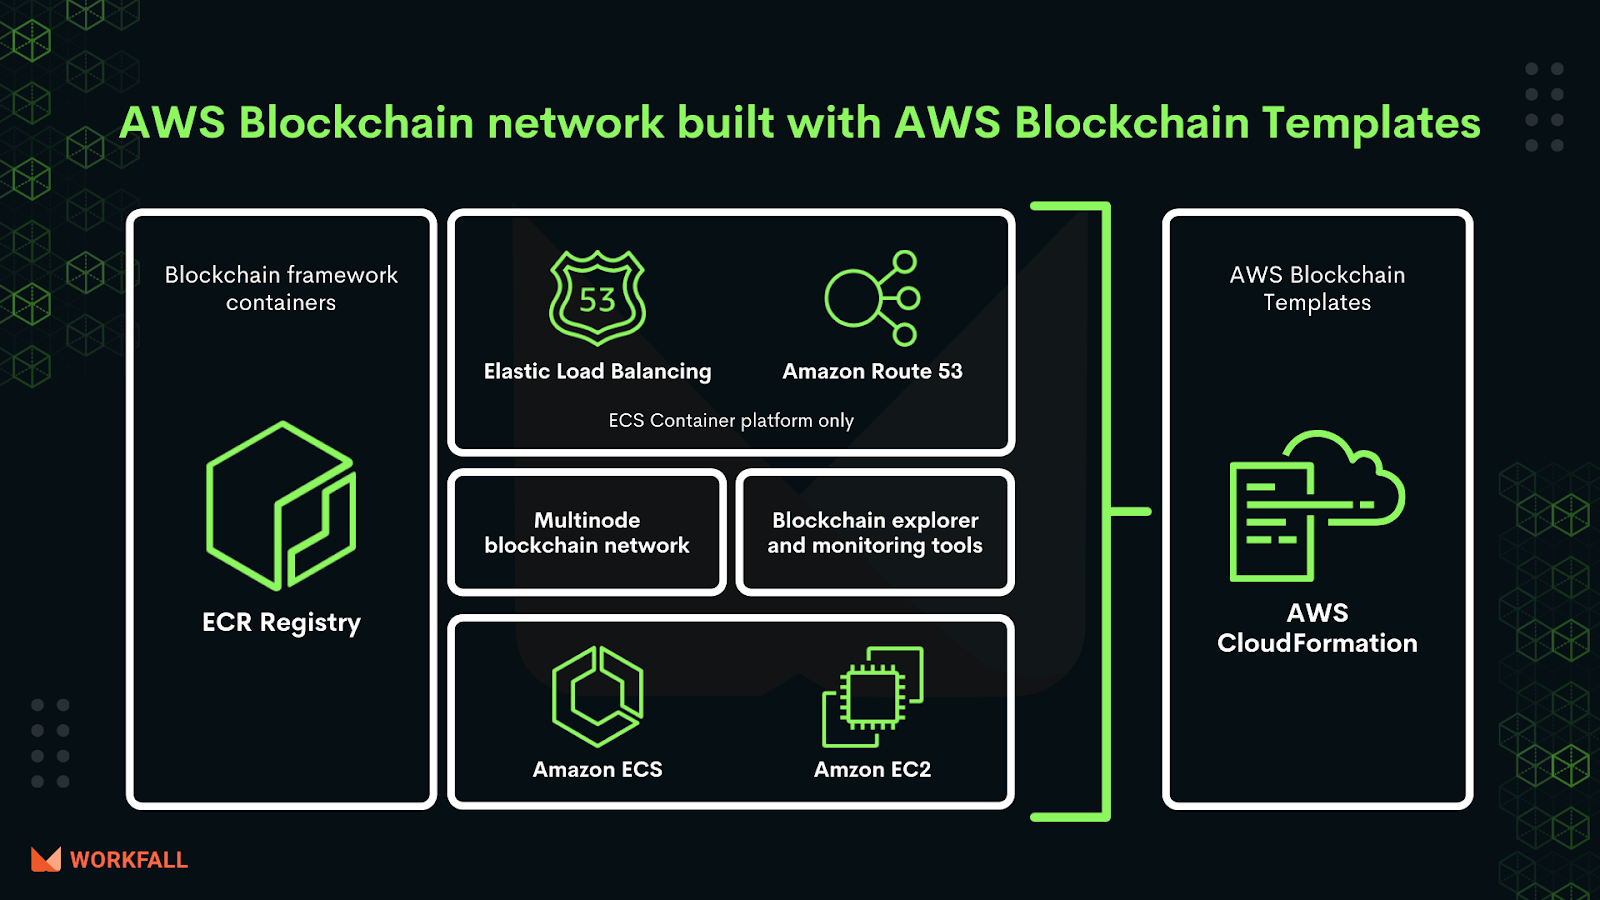
The blockchain framework you pick is deployed as containers on an Amazon Elastic Container Service (ECS) cluster or directly on an EC2 host running Docker. You may leverage your VPC subnets and network Access Control Lists to build your blockchain network on your own Amazon VPC.
The following image depicts the basic components of an AWS blockchain network built with AWS Blockchain Templates.
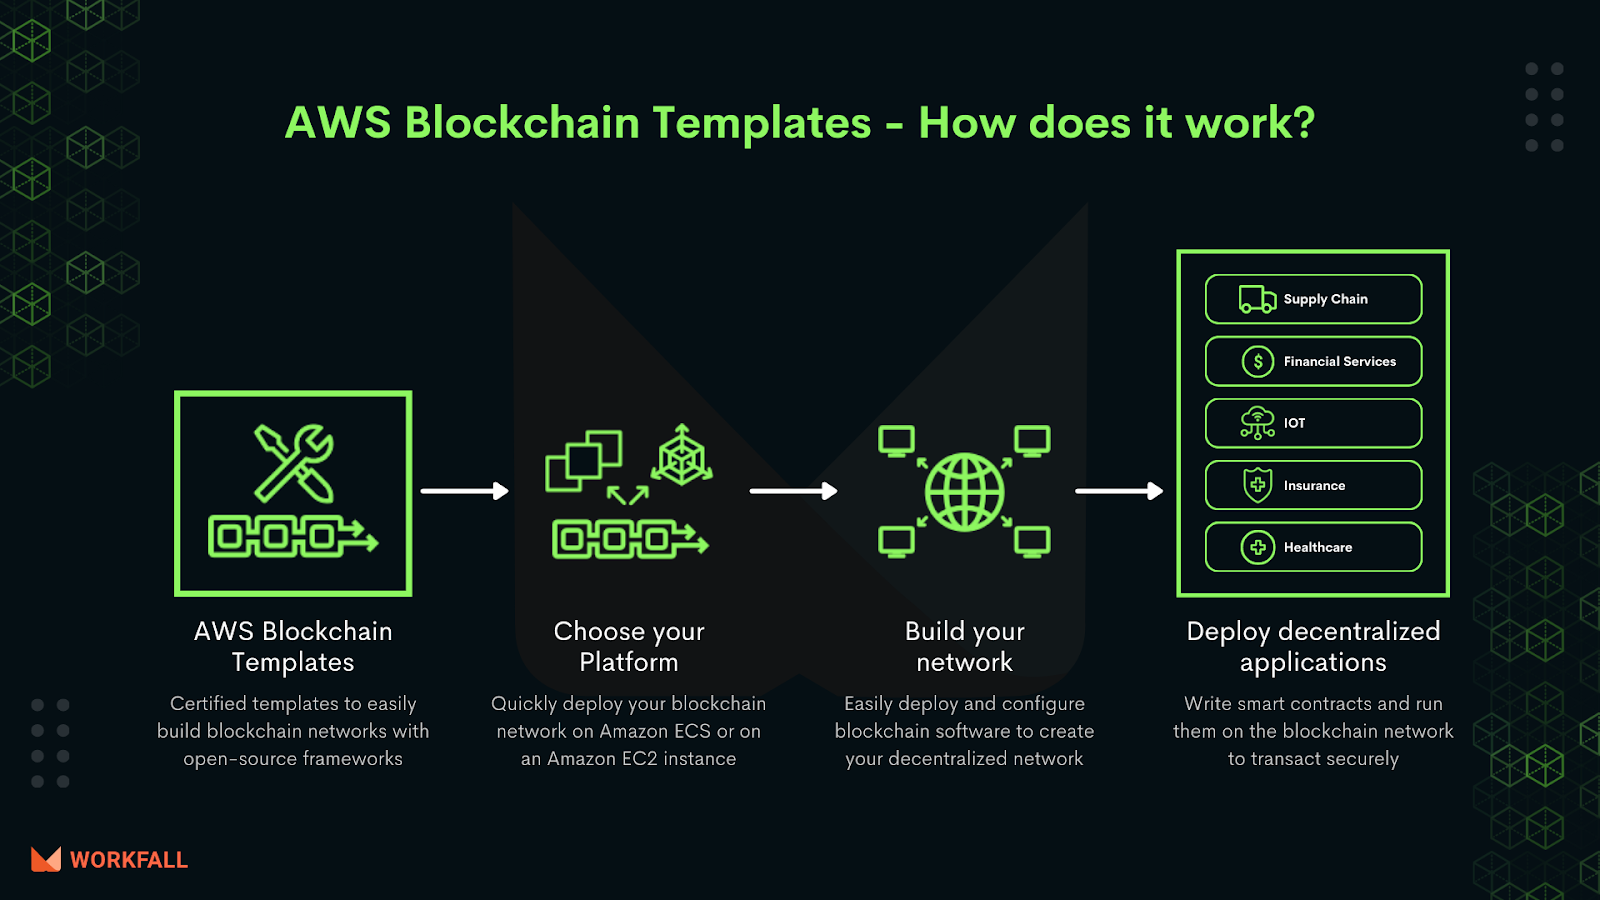
How does it work?
The blockchain framework you pick is deployed as containers on an Amazon Elastic Container Service (ECS) cluster or directly on an EC2 host running Docker. You may leverage your VPC subnets and network Access Control Lists to build your blockchain network on your own Amazon VPC.
Benefits of AWS Blockchain Templates
Faster Deployment: Because blockchain services can be deployed using pre-defined templates, the blockchain template allows for speedier development and deployment, resulting in a faster ‘time to market’ enabled service.
Choice of Platform Services: Because the AWS blockchain template supports a variety of blockchain services, such as Hyperledger Fabric and Ethereum, you can simply receive an “out of the box” selection of multiple blockchain frameworks.
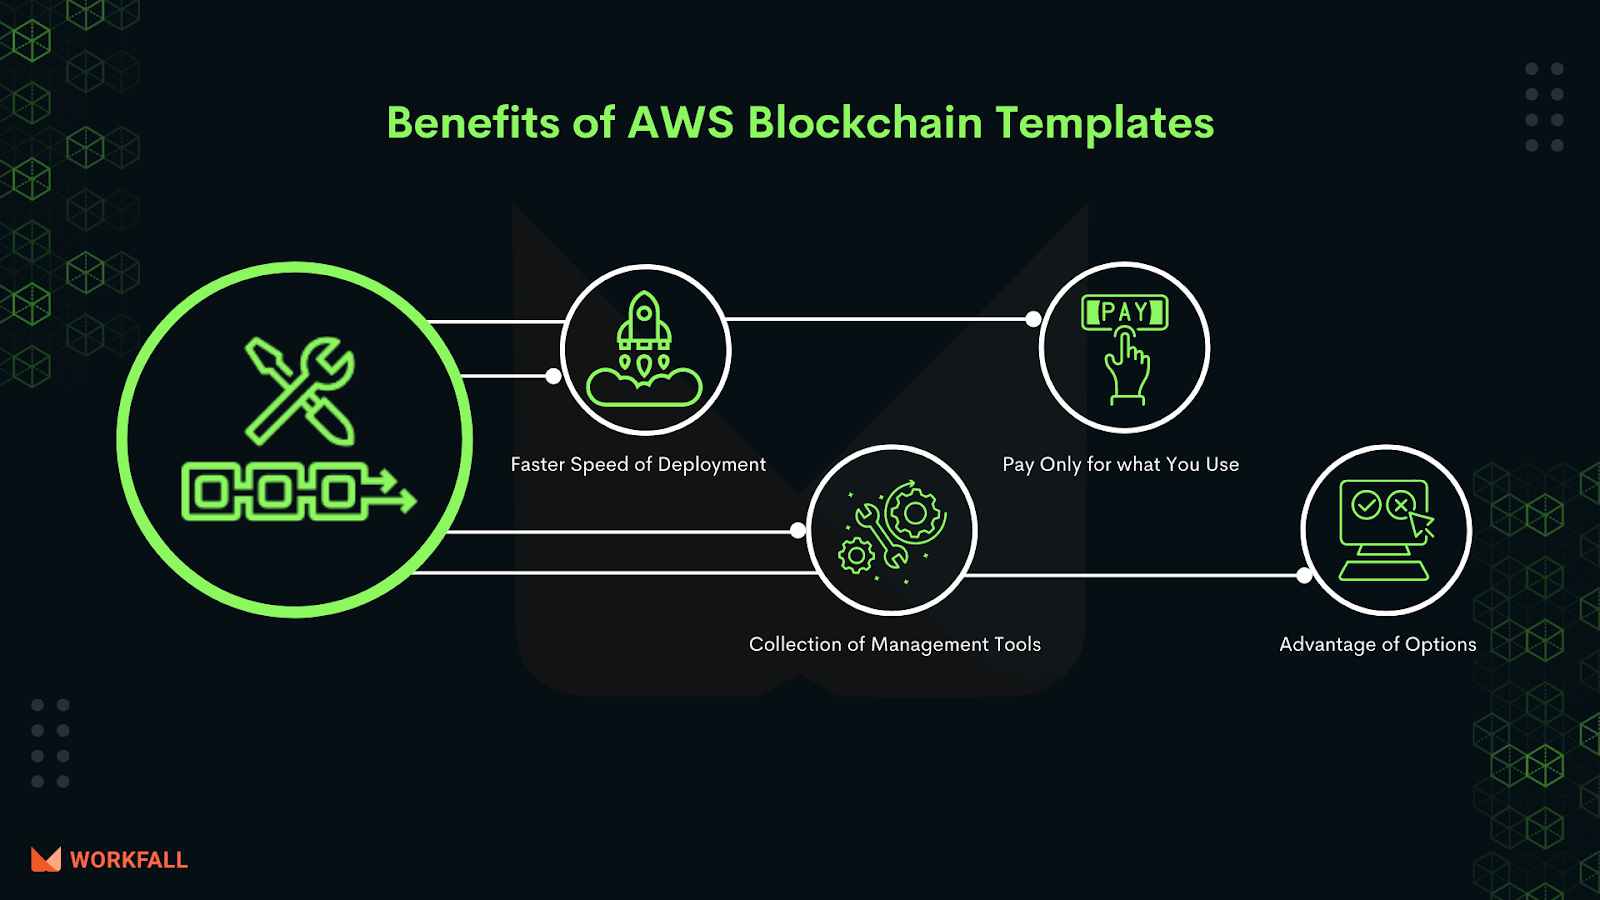
Cost-efficient: The AWS blockchain is extremely cost-effective because of the flexibility of the “pay as you go” service.
Associated Management tools and services: You may leverage monitoring and management services like AWS CodeDeploy and CloudWatch for a decentralized blockchain application, providing you the flexibility to connect to native services of the blockchain platform integration, thanks to the power of cloud services.
Types of AWS Blockchain Templates
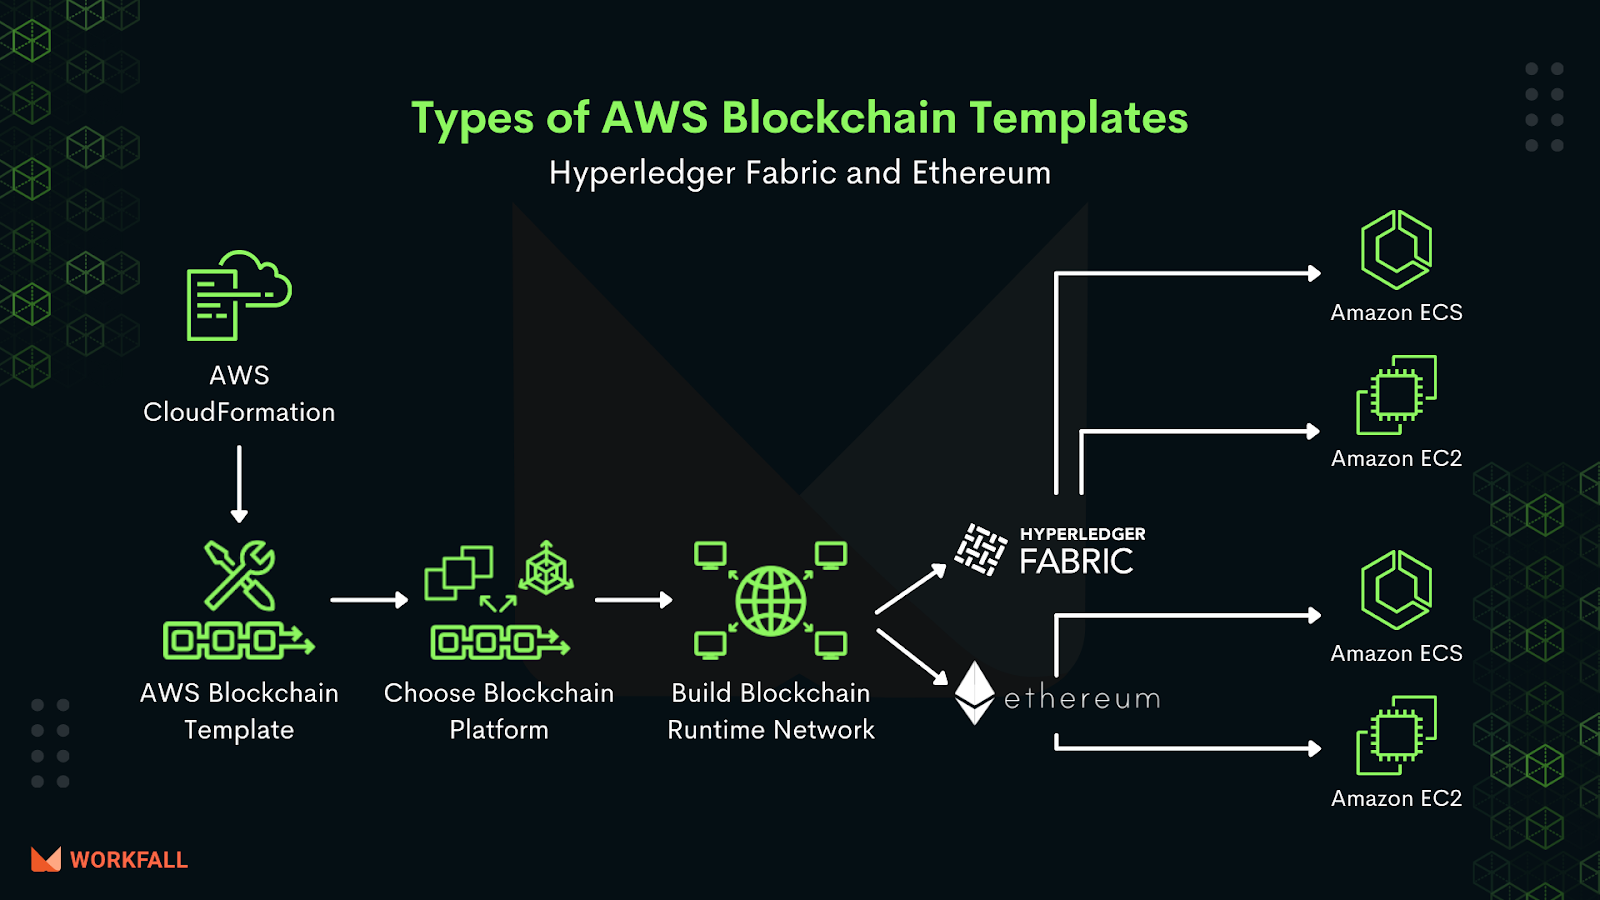
The simple process of choosing a blockchain template and tailoring it to meet your needs has the potential to revolutionize blockchain adoption.
There are two AWS blockchain templates available right now.
- AWS Blockchain Template for Ethereum – It is an open-source blockchain framework developed by the Ethereum Foundation that allows you to create blockchain apps that run without downtime, censorship, fraud, or third-party interference.
You can use AWS Blockchain Template for Ethereum if,
- You want to transact with other Ethereum users on a public Ethereum network.
- You want to use Ethereum’s Solidity smart contract language.
- You’d like to create a new public network
- AWS Blockchain Template for Hyperledger Fabric – It is a Linux Foundation open-source blockchain framework that allows you to develop blockchain apps and control and permission data on the blockchain.
You can use AWS Blockchain Template for Hyperledger Fabric if,
- You want to keep certain transactions hidden from each party’s view.
- You’d like to develop a private blockchain network
Finally, it is evident that getting started with AWS Blockchain templates is a simple process. To understand how to use templates, you’ll need a solid understanding of blockchain fundamentals and AWS services. The main benefits of the AWS Blockchain Template, such as choice, speed of deployment, and cost-effectiveness, provide significant value to users.
Hands-On
Setting up an Ethereum network to create blockchain templates using cloud formation stacks
Step 1: Setting up prerequisites
These are fundamental prerequisites for all blockchain configurations
Login into the AWS console and create an IAM user
- Sign in to the IAM console
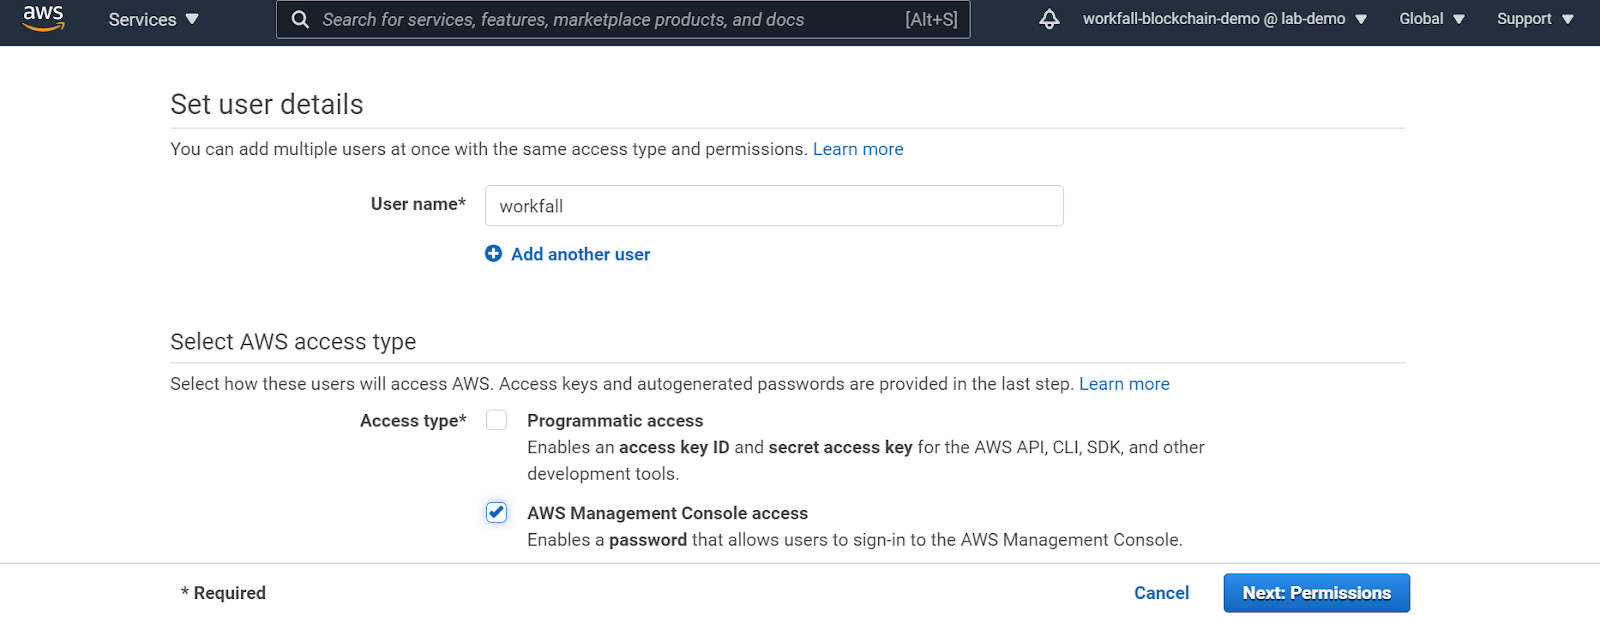
- In the navigation pane, choose Users and then choose Add User.
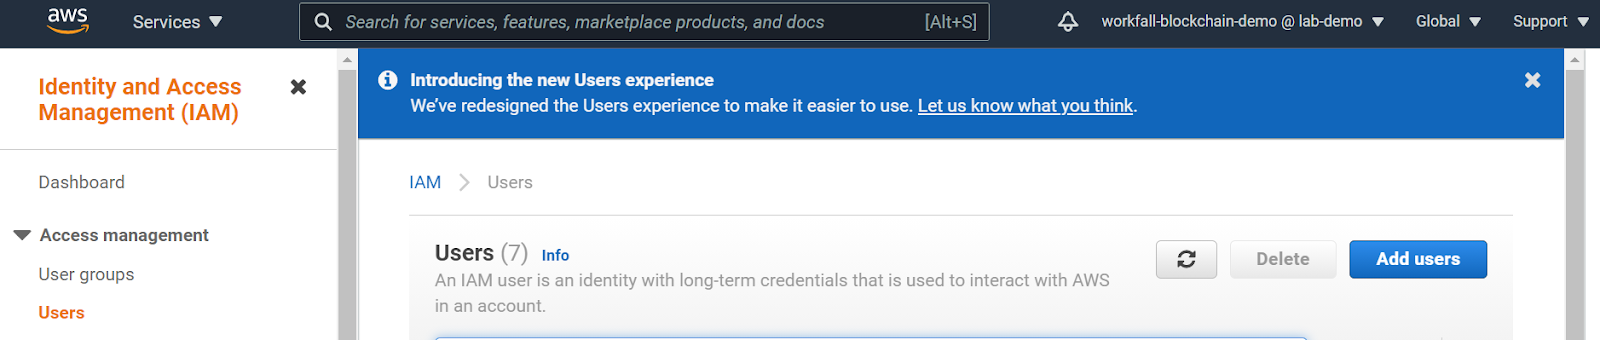
- Choose a username ,and click next on permissions
- Add user to a group, giving administrator access, click on next

- Review it, click on Create user


Create key-value pair
Open the EC2 console page, click on key pairs from the navigation bar
For Key pair name, enter a name for the new key pair, click on Create

Open the Amazon VPC Console

Choose Elastic IPs, Allocate a new address, and Allocate.
Make a note of the Elastic IP address that you create and choose Close.
In the list of Elastic IP addresses, find the Allocation ID for the Elastic IP address created earlier. You use this when you create the VPC.

To create a VPC, on the dashboard choose Start VPC Wizard.

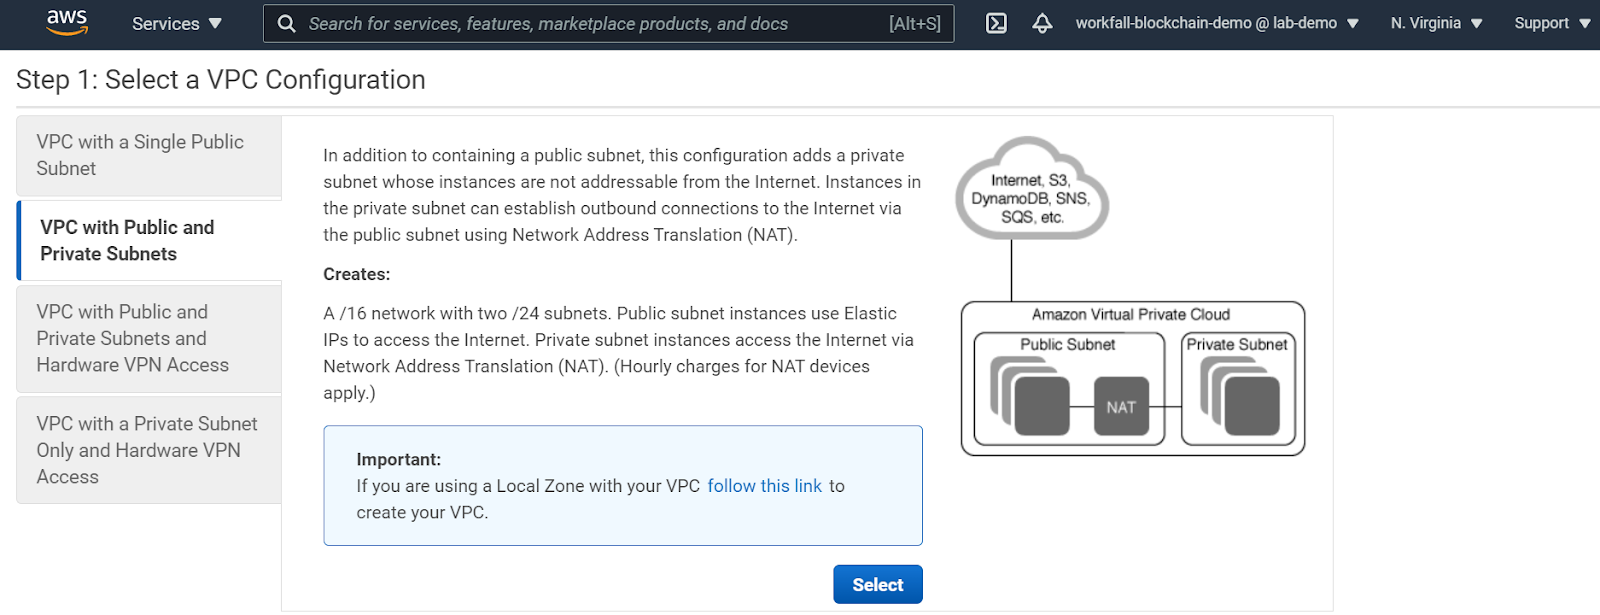
Select a VPC Configuration page, choose VPC with Public and Private Subnets, and Select.
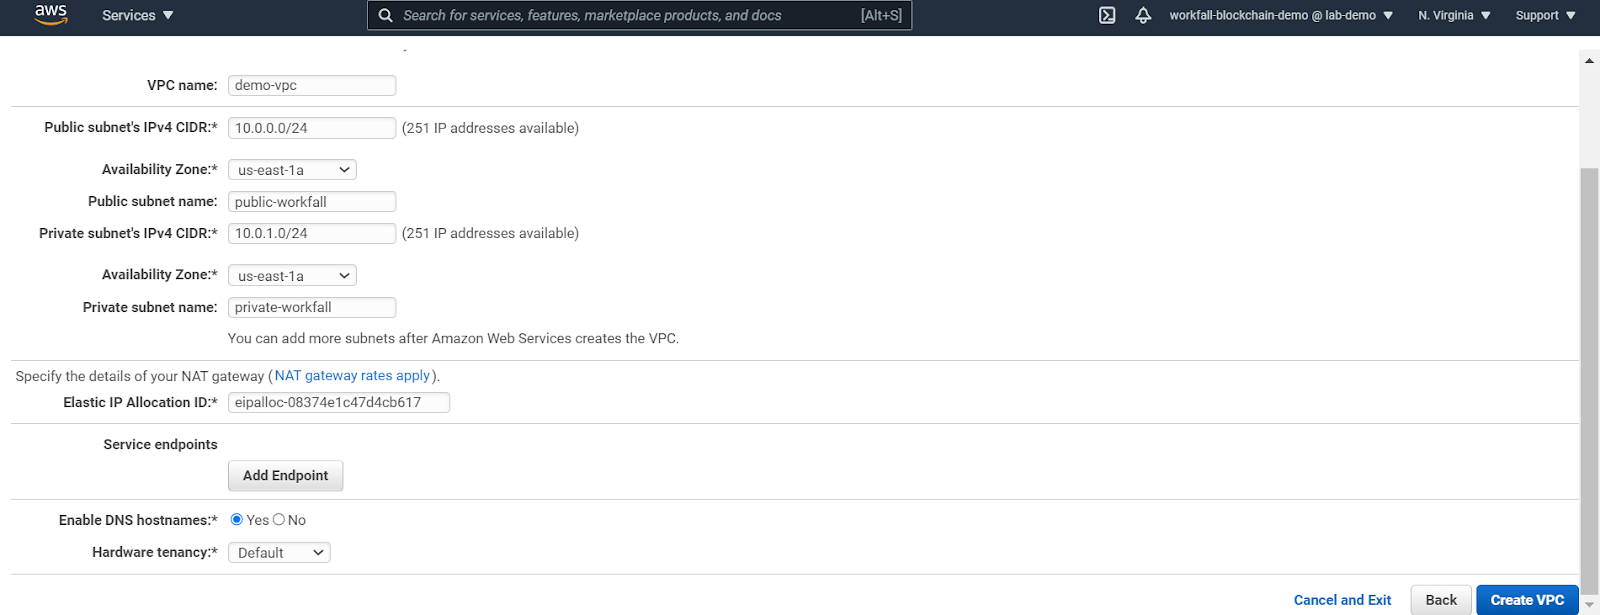
For the VPC name, enter a friendly name, enter a name for the public and private subnet, and select the elastic allocation ID created earlier. Click on Create VPC.
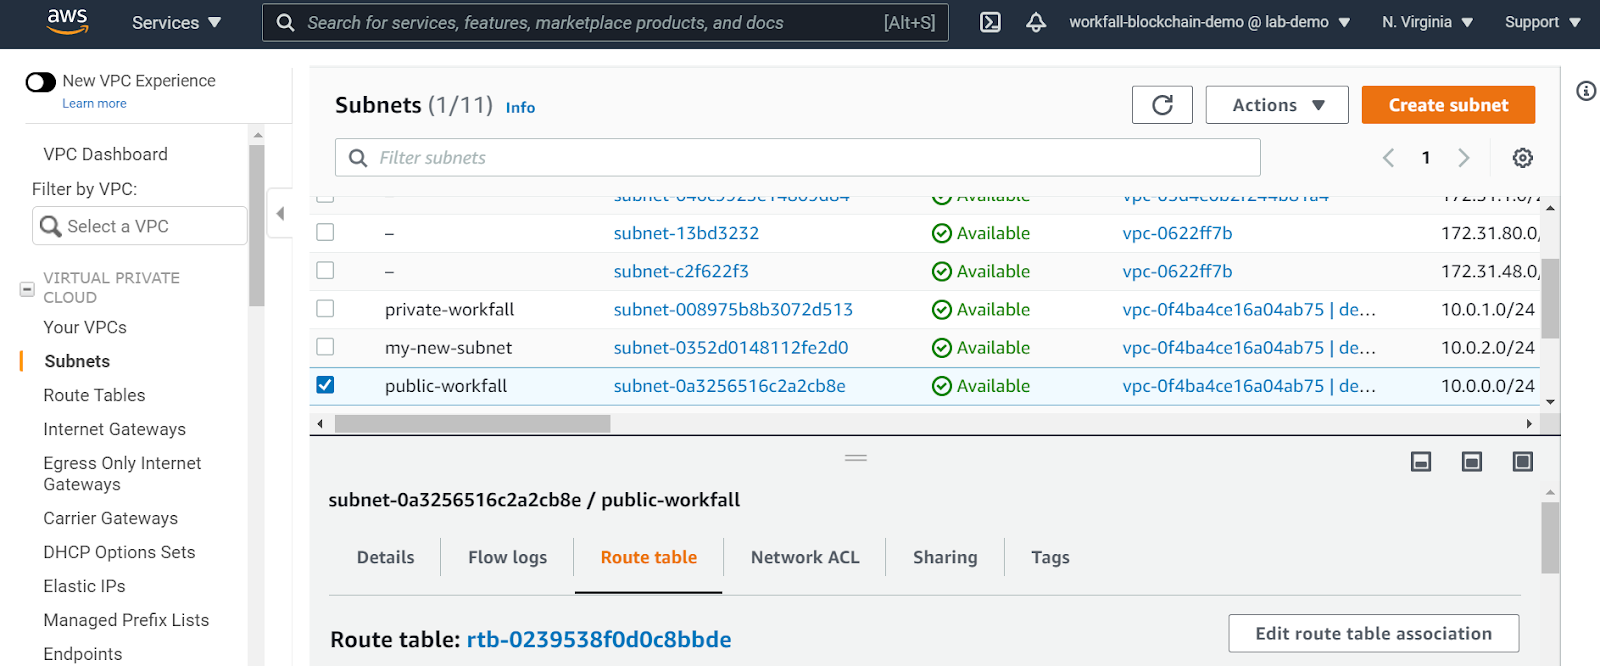
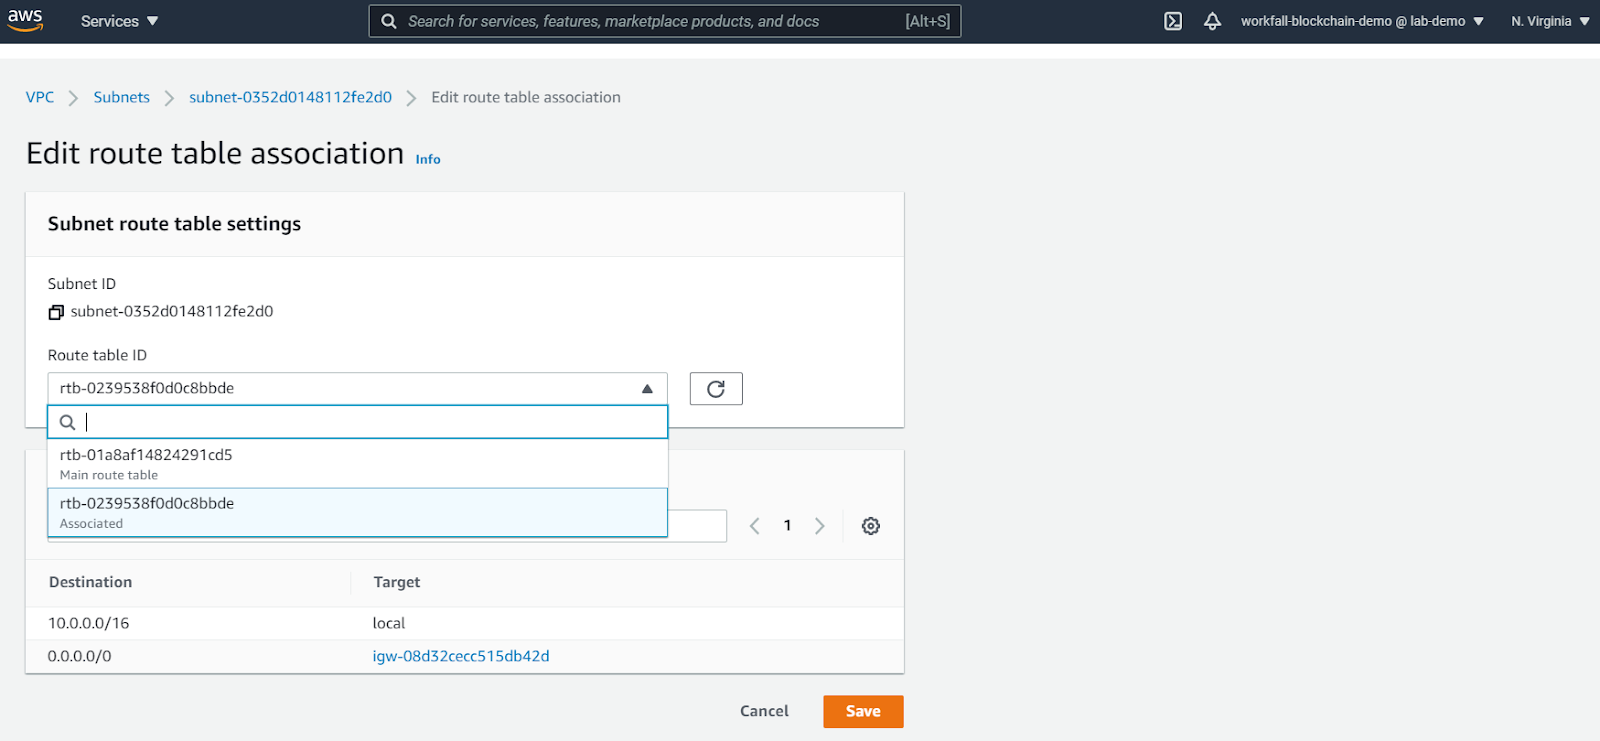
Choose Subnets and then select the public subnet that you created earlier from the list. Select the Route Table tab and note the Route table ID. You specify this same route table for the second public subnet below.
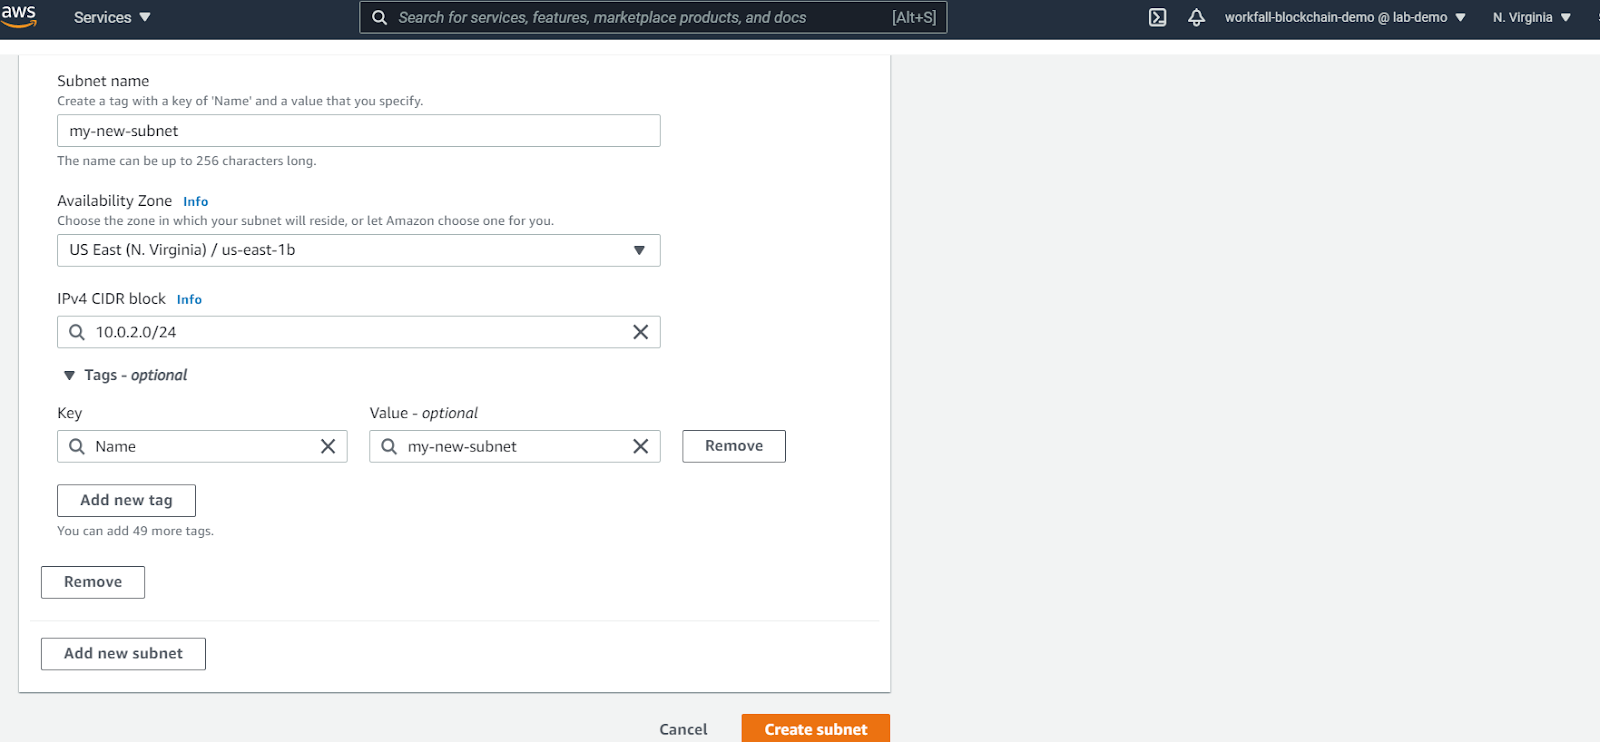
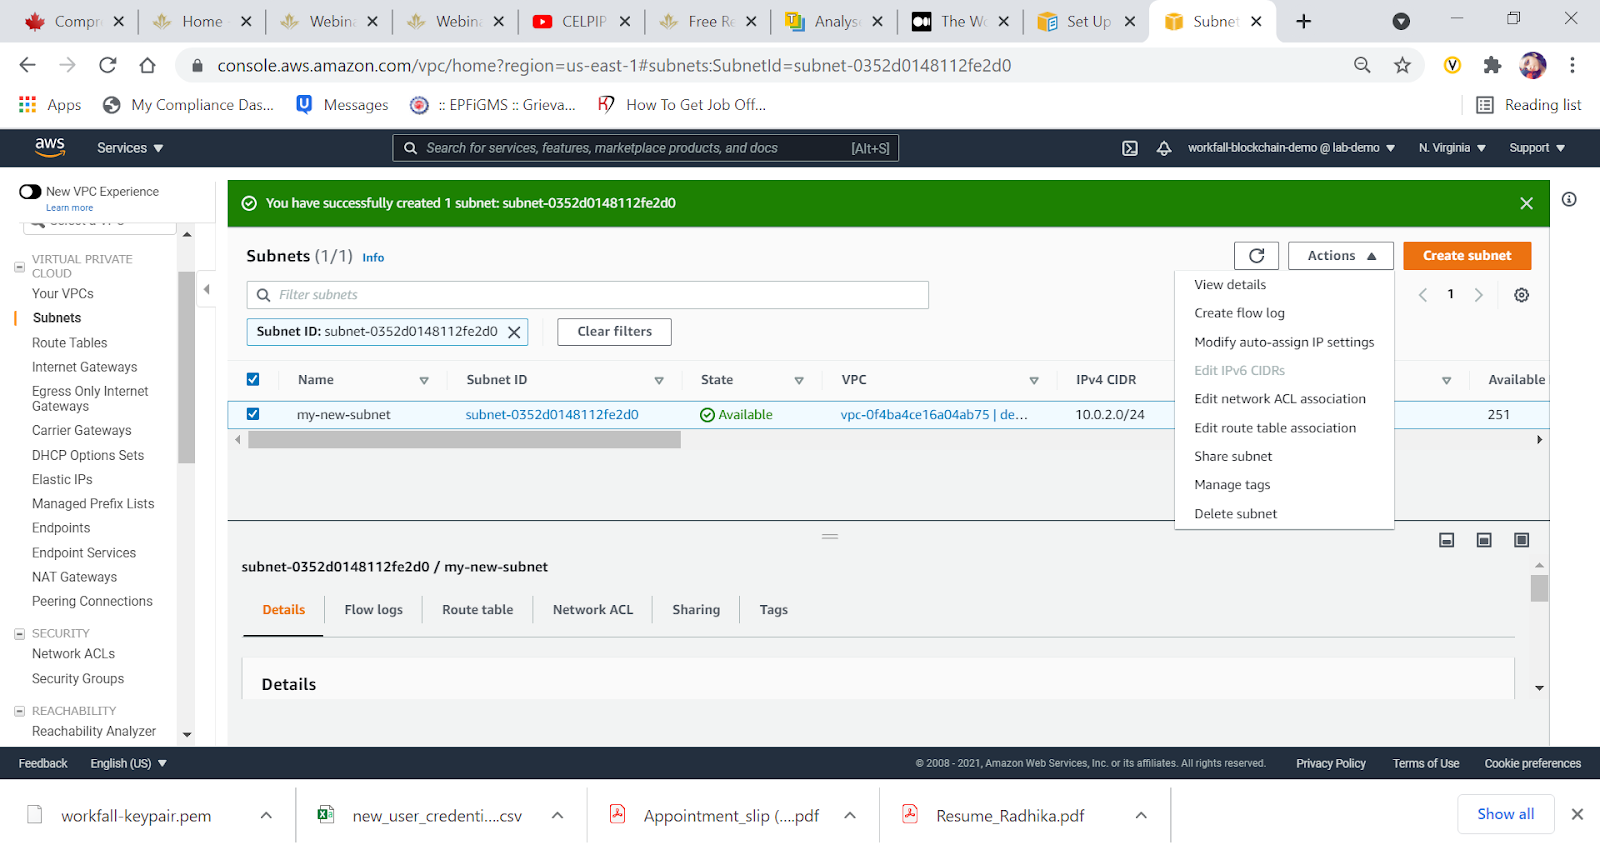
Choose Create Subnet
Create a new subnet in a different availability zone, enter a name and click on create a subnet.
The subnet is successfully created.
With the subnet selected from the list, choose Subnet Actions, Modify auto-assign IP settings. Select Auto-assign IPs, Save, Close. This allows the bastion host to obtain a public IP address when you create it in this subnet.

Choose Subnets and then select the public subnet that you created earlier from the list. Select the Route Table tab and note the Route table ID. You specify this same route table for the second public subnet below.
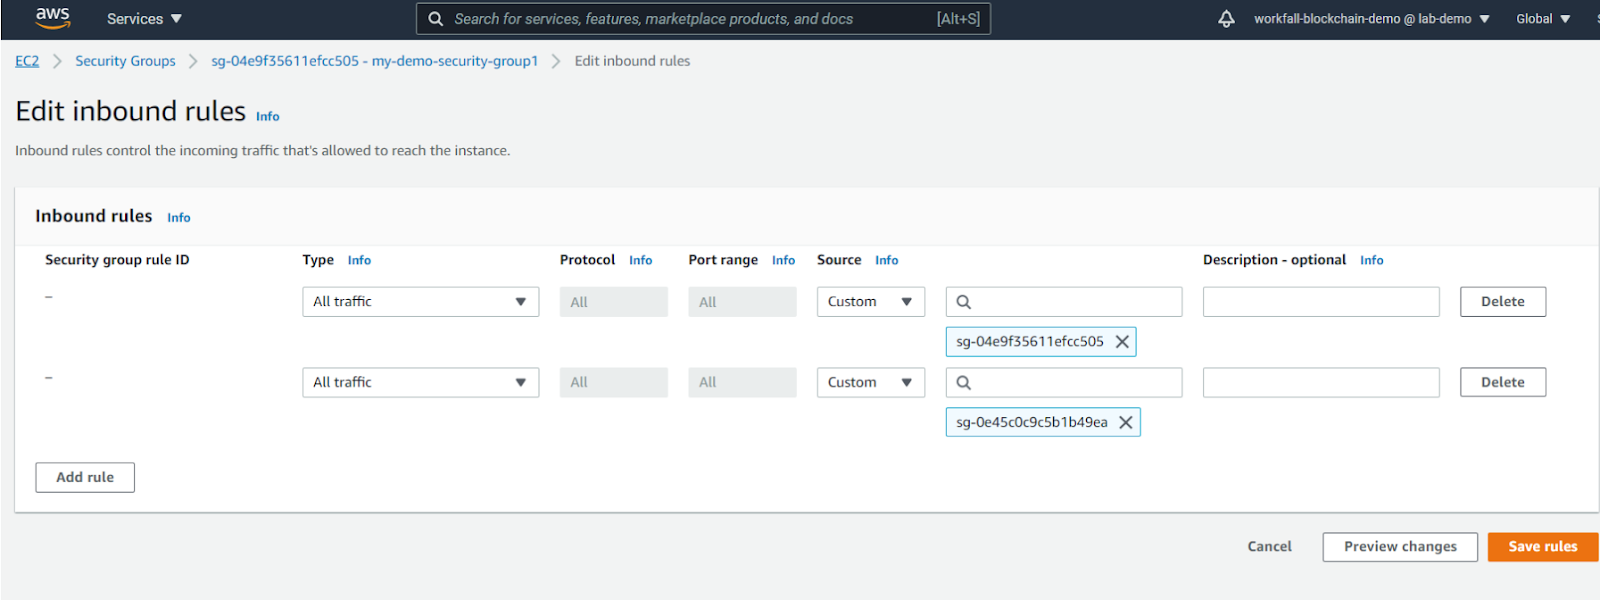
A security group for EC2 instances that controls traffic to and from EC2 instances in the cluster
A security group for the Application Load Balancer that controls traffic between the Application Load Balancer, EC2 instances, and the bastion host. You associate this security group with the bastion host as well.
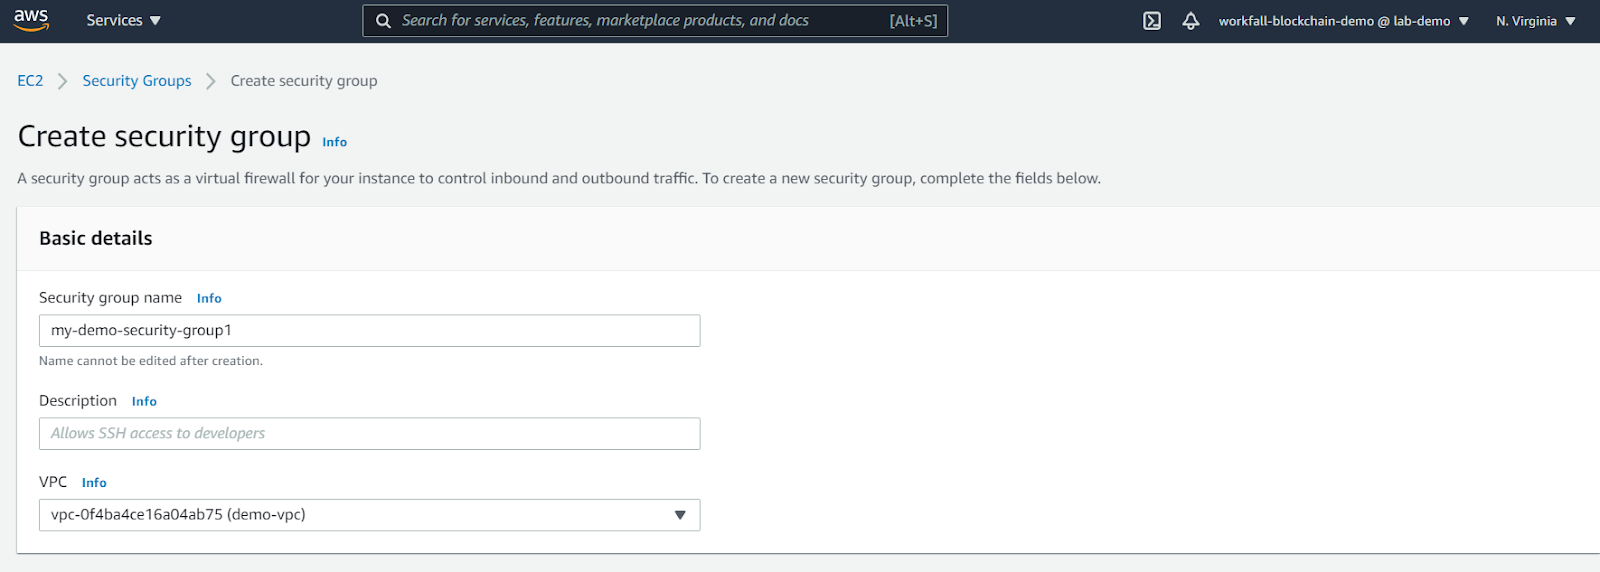
To create two security groups, Open the EC2 Console, choose security groups, create security groups, enter a name.
Select the VPC that you created earlier.
Repeat the same for 2nd security group

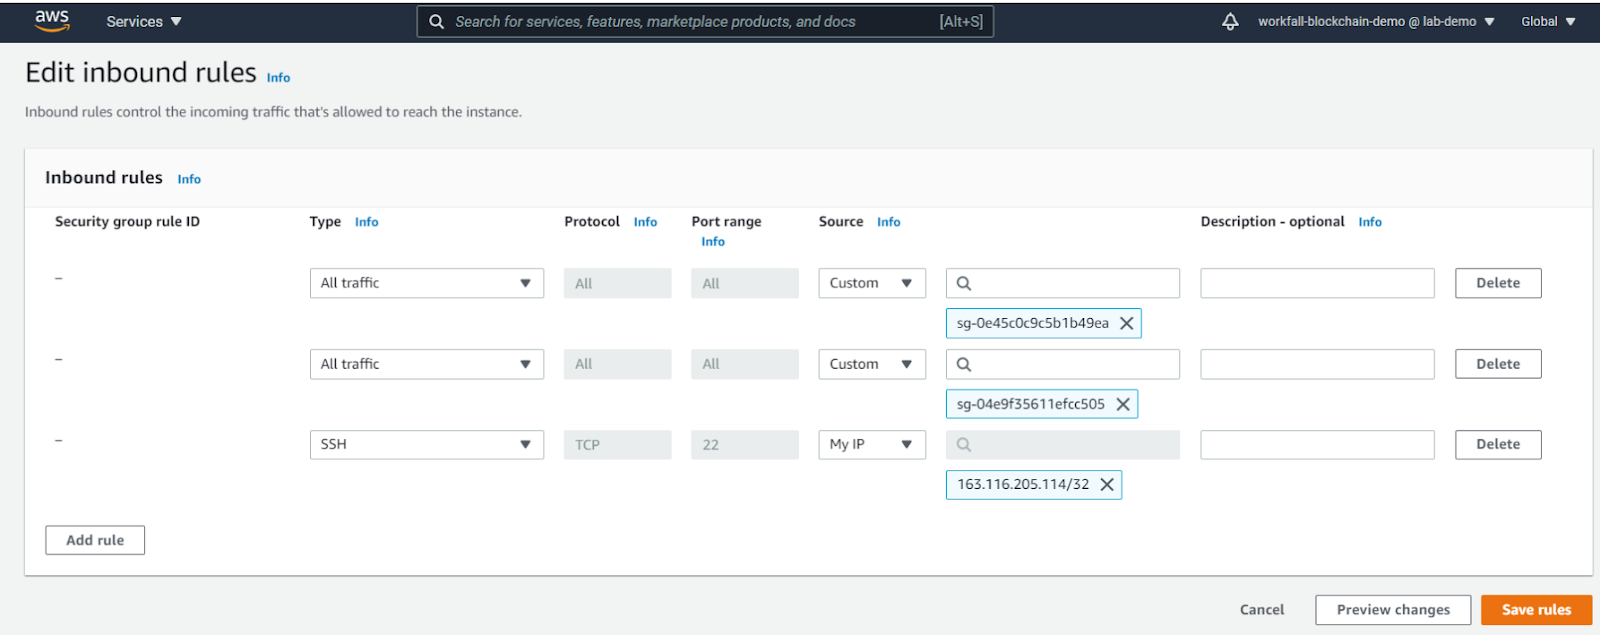
Add the inbound rules as follows for both the security groups:
Create an IAM Role for Amazon ECS and an EC2 Instance Profile
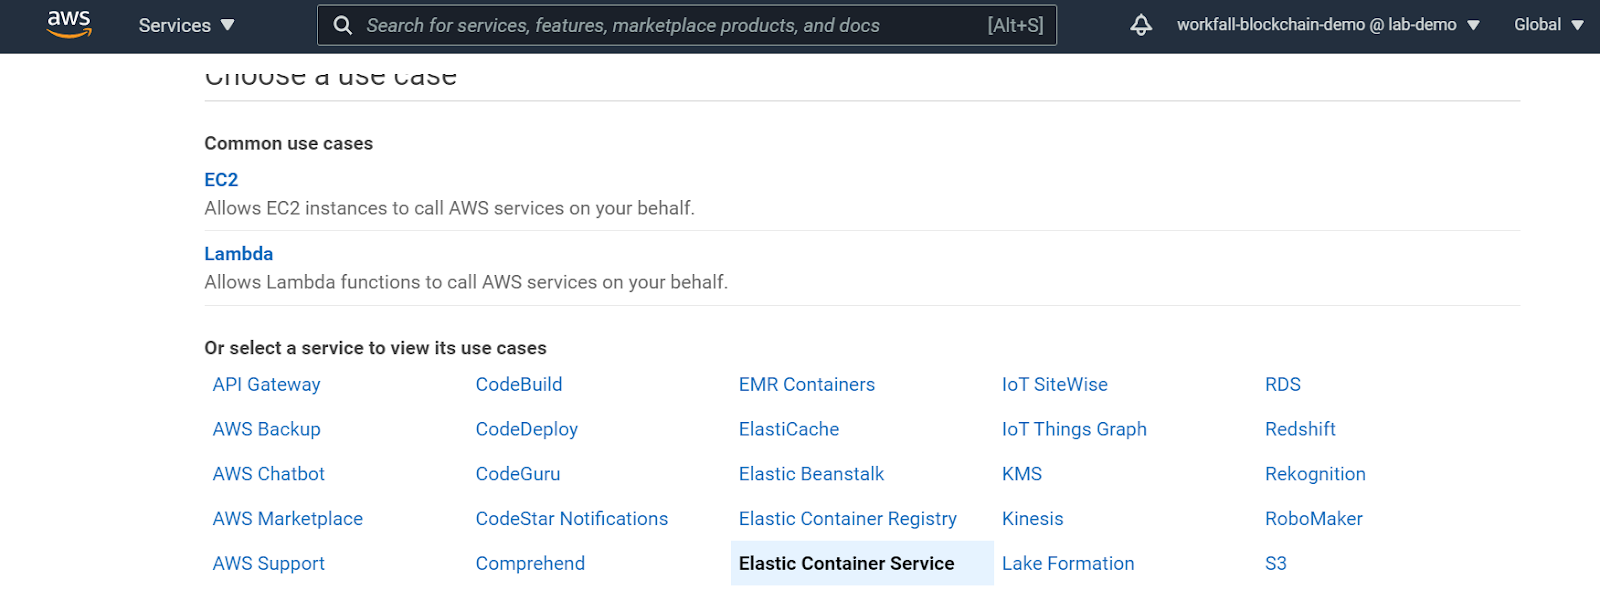
- Open IAM console , click on Roles ,choose ECS as service and proceed
- Enter name for the role such as ECSRoleForEthereum
- Click on create role
Review the created role ECSRoleForEthereum.

To create an EC2 instance profile
Choose Policies, Create policy. Enter policy name as EthereumPolicyForEC2, choose create policy

Choose Roles, Choose EC2, In the Search field, enter the name of the permissions policy that you created earlier, for example, EthereumPolicyForEC2.
Select the check mark for the policy that you created earlier, and choose Next: Review.

For Role name, enter a value that helps you identify the role, for example EC2RoleForEthereum. For Role description, enter a brief summary. Choose Create role.
Make a note of Role ARN.

Create a Bastion Host
- Create an EC2 instance first
- Choose Edit Instance Details. For Network, choose the VPC you created earlier, for Subnet select the second public subnet that you created earlier. Leave all other settings to their defaults.
- Confirm the change when prompted, and then choose Review and Launch.
- Choose Edit Security Groups. For Assigning a security group, choose Select an existing security group.
- From the list of security groups, select the security group for the Application Load Balancer that you created earlier, and then choose Review and Launch.
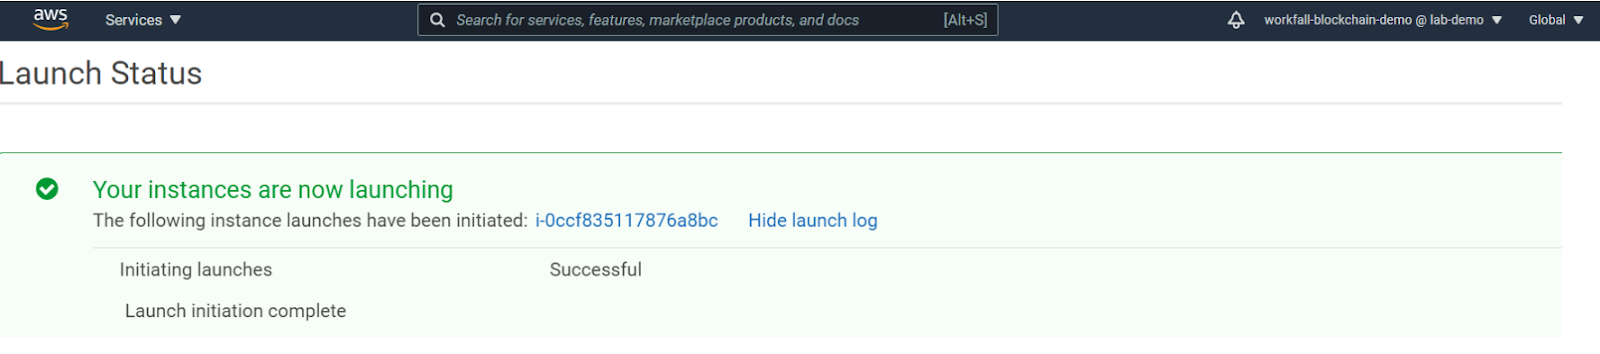
- Choose Launch.
Step 2 : Create the Ethereum Network
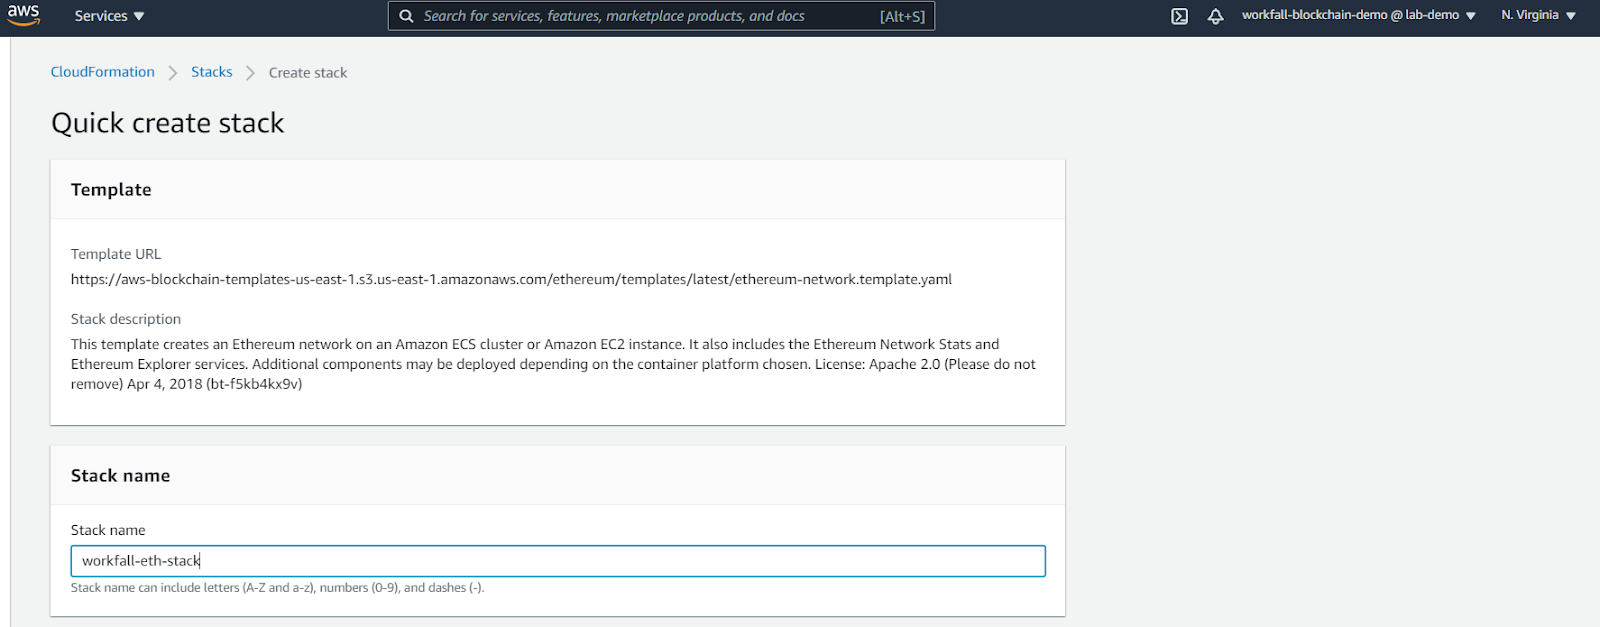
- See Getting Started with AWS Blockchain Templates, and open the latest AWS Blockchain Template for Ethereum in the AWS CloudFormation console using the quick-links for your AWS Region.
Click on create stack
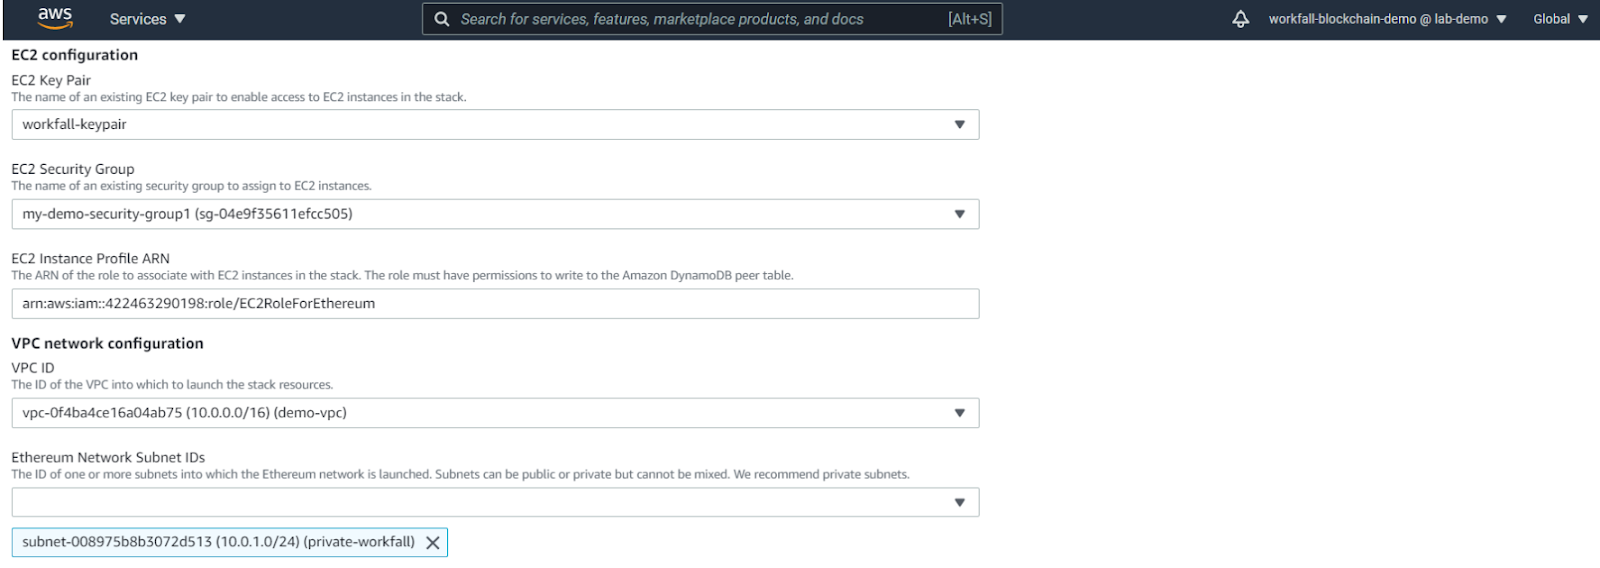
Under EC2 configuration, select options according to the following guidelines:
- For EC2 Key Pair, select a key pair. For information about creating a key pair, see Create a Key Pair.
- For EC2 Security Group, select the security group you created earlier in Create Security Groups.
- For EC2 Instance Profile ARN, enter the ARN of the instance profile that you created earlier in Create an IAM Role for Amazon ECS and an EC2 Instance Profile.
- Under VPC network configuration, select options according to the following guidelines:
- For VPC ID, select the VPC that you created earlier in Create a VPC and Subnets.
- For Ethereum Network Subnet IDs, select the single private subnet that you created earlier in the procedure To create the VPC.
Under Application Load Balancer configuration (ECS only), select options according to the following guidelines:
- For Application Load Balancer Subnet IDs, select two public subnets from the list of subnets that you noted earlier.
- For Application Load Balancer Security Group, select the security group for the Application Load Balancer that you created earlier in Create Security Groups.
- For IAM Role, enter the ARN of the ECS role that you created earlier in Create an IAM Role for Amazon ECS and an EC2 Instance Profile.
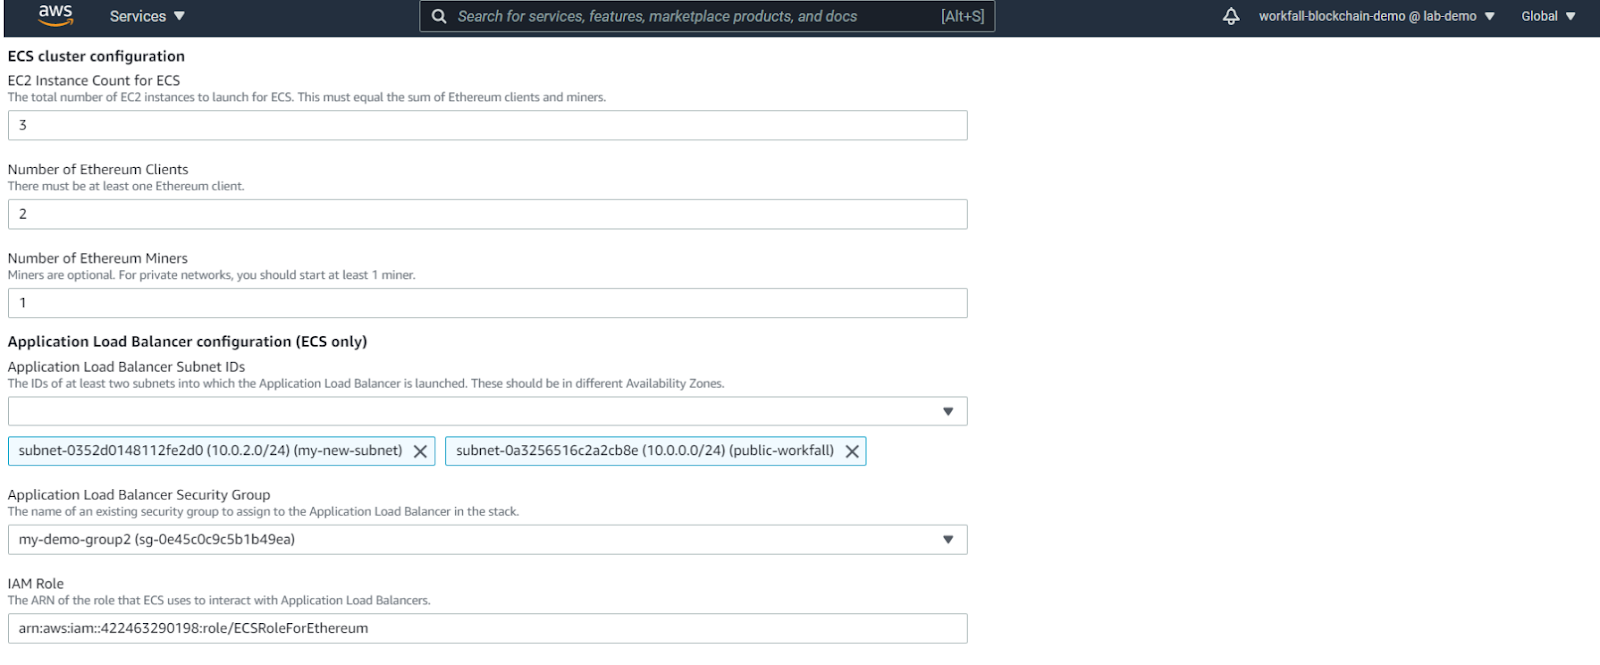
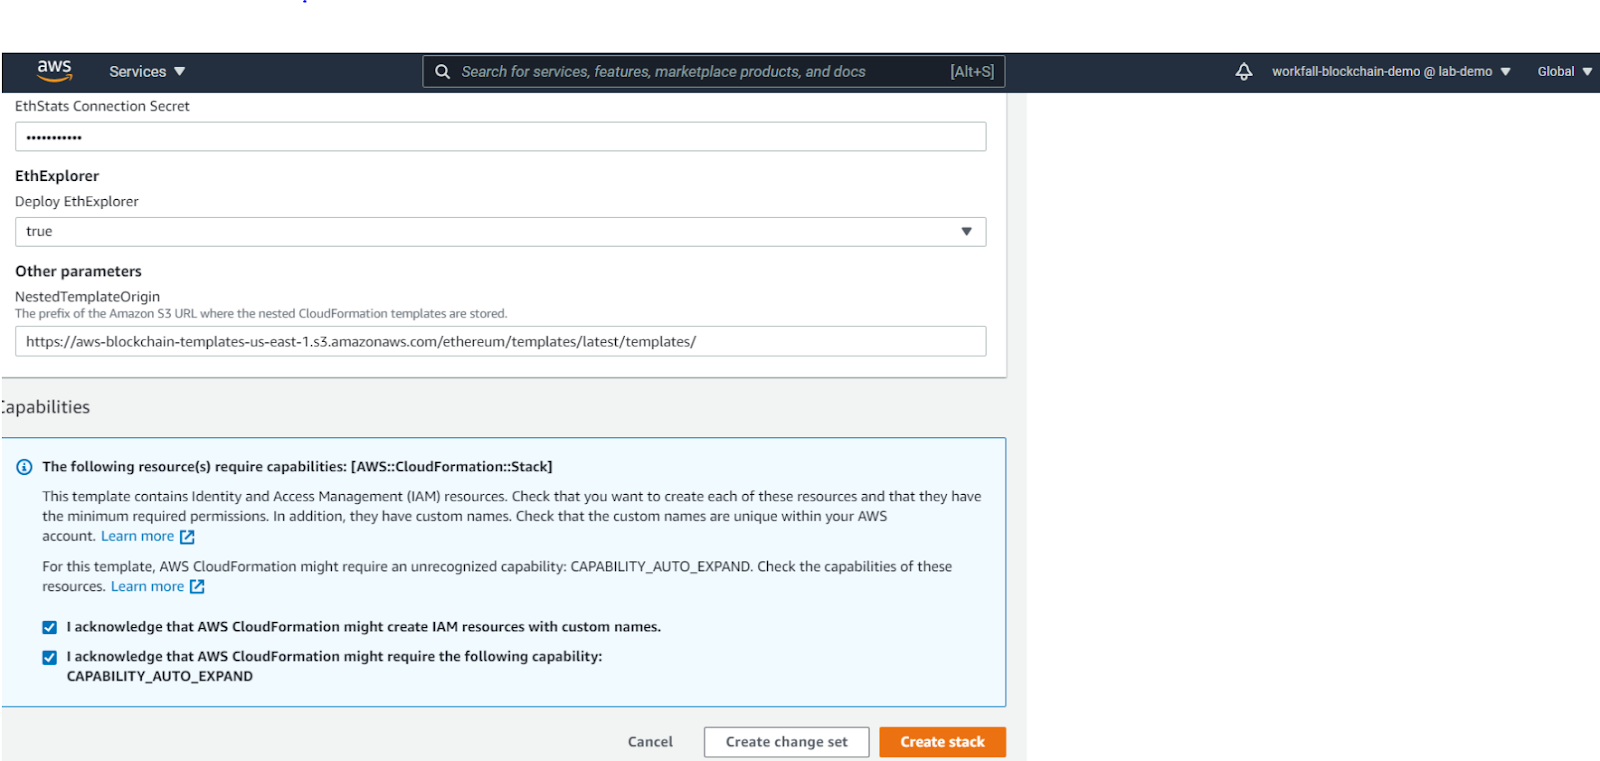
For EthStats Connection Secret, type an arbitrary value that is at least six characters.
Click on Create Stack
After creation of stack, this is how it will appear

When all stacks show CREATE_COMPLETE for Status, you can connect to Ethereum user interfaces to verify that the network is running and accessible. When you use the ECS container platform, URLs for connecting to EthStats, EthExplorer, and EthJsonRPC through the Application Load Balancer are available on the Outputs tab of the root stack.
The Output tab of the root stack provides links to services running on the Application Load Balancer. These URLs are not directly accessible for security reasons. To connect, you can set up and use a bastion host to proxy connections to them.
Conclusion
In this blog, we have explored the concept of amazon blockchain templates, its common framework Ethereum to create blockchain networks, and have demonstrated how to use cloud formation stacks to create blockchain templates for creating Ethereum networks. We will cover the implementation of the Hyperledger Fabric framework in our upcoming blogs. Stay tuned to keep getting all updates about our upcoming new blogs on AWS and relevant technologies.
Meanwhile …
Keep Exploring -> Keep Learning -> Keep Mastering
This blog is part of our effort towards building a knowledgeable and kick-ass tech community. At Workfall, we strive to provide the best tech and pay opportunities to AWS-certified talents. If you’re looking to work with global clients, build kick-ass products while making big bucks doing so, give it a shot at workfall.com/partner today.