Snowflake cloud data warehouse is a buzzing trend in managing data these days as it has advantages like cost-effectiveness, auto-scaling, easy-to-transform data, etc. over traditional data warehouses. It is greatly assisting organizations in terms of its critical role in ELT (Extract-Load-Transform).
Python is a very popular programming language that is used for data manipulation, ML, and data analysis with its rich libraries, and integrating Snowflake with Python would add to the insights that we can have from the data.
Data Scientists and Data Engineers are very familiar with Python and Pandas Data Frames, so being able to connect Snowflake with Python is critical.
As organizations generally use Snowflake to get insights from the data to make business decisions, there should be a way to get even better insights using some additional frameworks.
Python Snowflake Connector
The Snowflake Connector for Python interfaces with Snowflake to allow Python developers to connect to Snowflake and perform all standard operations. It provides a programming alternative to using the Snowflake JDBC or ODBC drivers to develop applications in Java or C/C++.
The connector is a pure Python package that does not rely on JDBC or ODBC. Pip can be used to install it on Linux, macOS, and Windows platforms that have a supported version of Python installed.
Benefits of integrating Python with Snowflake

- Reduce development time.
- ML & linear regression capabilities have been enhanced.
- Improve operational analytics capability.
Hands-on
- Installing necessary libraries to integrate Snowflake with Python
- Making the connection to the Snowflake cloud data warehouse
- Creating and using data warehouse, database, and schema
- Creating a table using Python in Snowflake
- Inserting rows in a table using Python
- Reading data from Snowflake table as Python pandas data frame
We would be using a jupyter notebook to demonstrate the above steps and as a prerequisite, it should be already installed. Otherwise, on other IDEs, the installation and steps will be similar.
Installing Libraries
First, we would be installing a Python Snowflake connector. It is a library that provides an interface for creating Python scripts that can connect to the Snowflake data warehouse and perform operations.
Run the following command as given below:
pip install snowflake-connector-python==2.7.9

After the successful installation, move to the next step.
Connecting to the Snowflake
Import the above-installed library as:
import snowflake.connector
Create the connection using the code snippet below:

Note: You can find the account details in the URL of Snowflake and after making the right connection, the conn variable will contain the connection object as displayed.
We can also confirm the connection by checking the version of snowflake using this code snippet :

If it returns a version number then the connection is verified.
Creating and using data-warehouse, database, and schema
Before creating the database objects, change the role to SYSADMIN using this command :

Now we can create our database, data warehouse, and schema using the following commands :

From here, the syntax is similar to SQL and we are executing similar operations in Snowflake.
Using the database objects commands following the above:

Creating a table
Now, we shall create a table student in Snowflake using Python which will have three columns: roll_no, name, and marks.
Inserting records in Snowflake
Following the table creation, inserting one record in the Snowflake table created :
We can also now check the presence of table and one record in the Snowflake UI :
The record has been successfully validated!
Reading data from the table as Python pandas dataframe
To read data, first, we need to import the panda’s library :
import pandas as pd
The following code snippet would read the data from the table :
Let’s validate this by adding another row and reading the data again :
Reading the data again :
The data from the Snowflake table is now successfully in Pandas data frame and we can use this to perform data manipulation as we want to.
Updating data in the table
We can update the data in our Snowflake table using the Update statement.
Let’s validate this by updating a row and reading the data again :
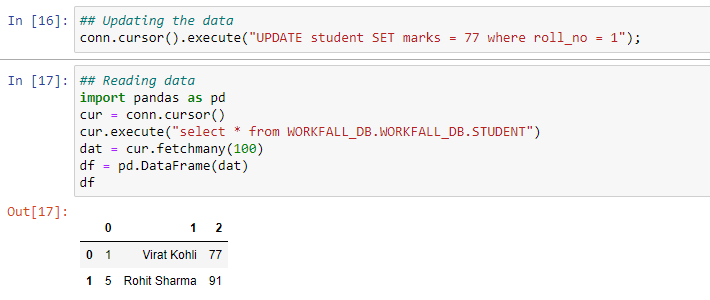
We can see that we have updated the marks of Virat to 77 and the changes have been reflected.
Deleting data in the table
We can delete the data in our Snowflake table using the Delete statement.
Let’s validate this by deleting a row and reading the data again :
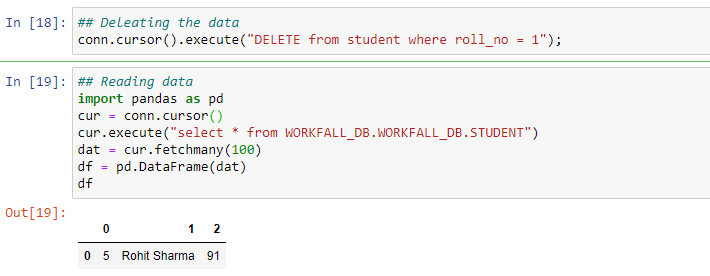
We have deleted a row with roll_no=1
Truncating the table
Truncating a table means deleting all the rows from the table at once.

To validate this we are expecting no rows returned from the table :

Vola! We have successfully truncated the table.
Conclusion
Snowflake helps data analysts, business users, developers, etc to get insights from the data, and with integration with Python, it would add to the power of generating meaning from the data for business use. We hope this blog will help you to connect Snowflake with Python and perform some basic operations on it. In addition to this, you can perform more queries based on your needs as its syntax is similar to SQL. We will come up with more such use cases in our upcoming blogs.
Meanwhile…
If you are an aspiring Python Lover and want to explore more about the above topics, here are a few of our blogs for your reference:
- How to easily build ETL Pipeline using Python and Airflow?
- How to send Webhooks using Python and receive via Node.js Applications?
- How to build a Web Scraper using Python?
Stay tuned to get all the updates about our upcoming blogs on the cloud and the latest technologies.
Keep Exploring -> Keep Learning -> Keep Mastering
At Workfall, we strive to provide the best tech and pay opportunities to kickass coders around the world. If you’re looking to work with global clients, build cutting-edge products and make big bucks doing so, give it a shot at workfall.com/partner today!