MMOG (Massively Multiplayer Online Gaming) is a vast and expanding market with a diverse user base. However, while global internet access, which is required for MMOGs, has risen, there are still significant technological obstacles.
It’s not easy to build sophisticated, reliable, and scalable infrastructure to offer MMOs. And, in any case, it isn’t a primary talent or emphasis area for game creators. They’d rather focus on providing the finest games possible to users and leave the MMO infrastructure to someone else. But how do you do it?
Amazon GameLift is the answer!
According to Statista – Market size of the video games industry in the United States from 2010 to 2021(in billion U.S. dollars)
In this blog, we will demonstrate how to create a GameLift fleet and add a queue to accept game session requests and route them to the best fleet globally using Amazon GameLift.
What is Amazon GameLift?
Amazon GameLift is a fully managed cloud service for setting up, running, and growing session-based multiplayer game servers. Amazon GameLift automates the tasks associated with running your own gaming servers, such as purchasing and installing hardware, as well as managing ongoing activity, security, storage, and performance monitoring. The auto-scaling capabilities of Amazon GameLift protect you from having to pay for more resources than you require, while also ensuring that your players can find and join games quickly. In this blog, we will download a game server, deploy it to your AWS account and create a GameLift Fleet that will accept game session requests, we will then extend this by adding a GameLift Queue that can accept the game session requests and route them to the best Fleet globally for the players.
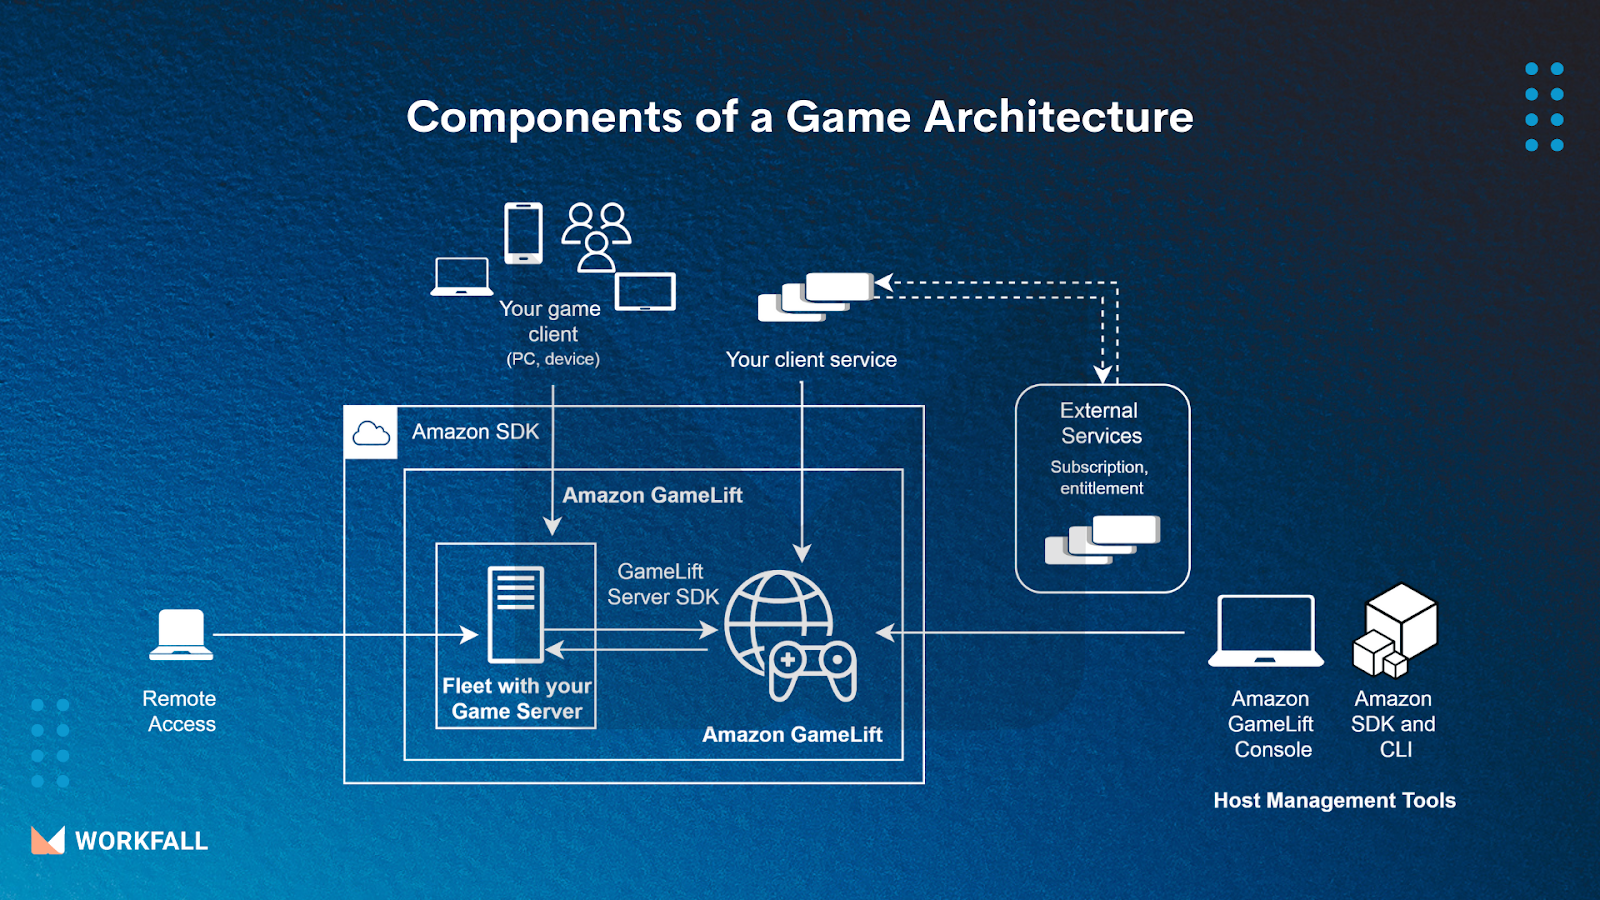
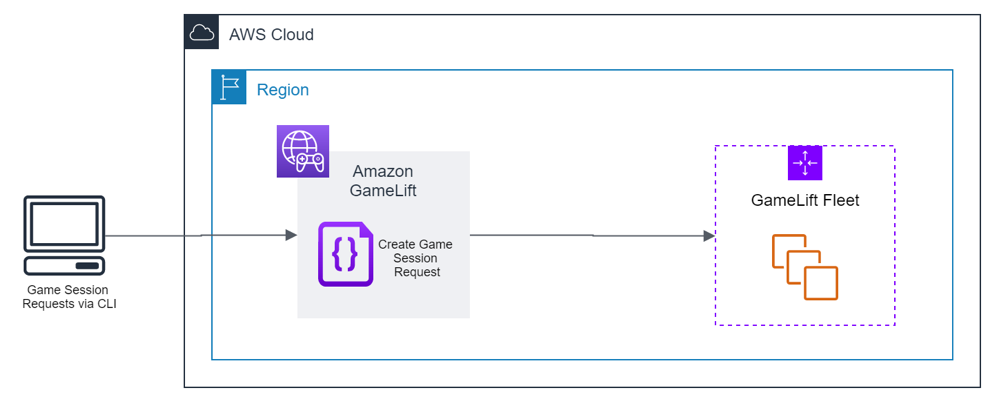
The overall architecture is depicted below:

The diagram below depicts the essential components of a game architecture hosted with the managed GameLift service.
Hands-on
Step 1: Setting up the Game server and Cloud9 environment
Step 2: Getting into the AWS console
Step 2: Uploading the build
Step 3: Creating a fleet
Step 4: Checking fleet creation progress
Step 5: Testing the fleet
Step 6: Creating a queue
Step 8: Testing the queue
- Setting up the Game server and Cloud9 environment
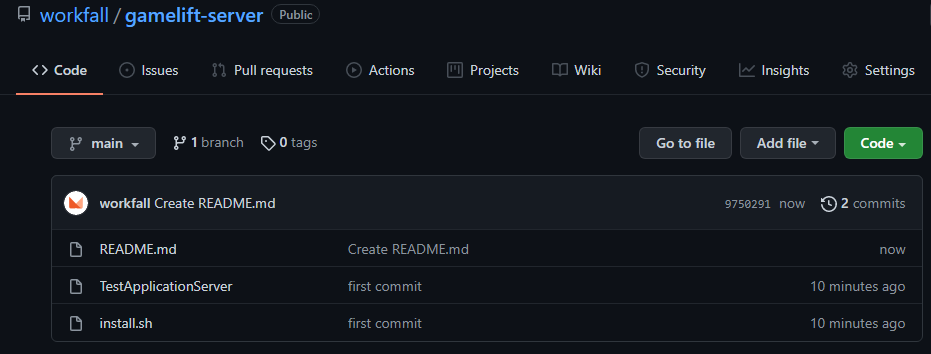
- Go to https://github.com/workfall/gamelift-server.git -> Click on the green Code button and select Download Zip to download the Game server.zip to your local system, and unzip the folder.
- Open Cloud9 service from the AWS console, click on Create Environment, enter
workfall-env in Name and click on Next.
- Leave all the default values as selected, and click on next to open the Cloud9 IDE as shown below.

- In the Cloud9 console, go to File -> Upload local files.
- Select the unzipped folder downloaded in the previous step, click on Upload
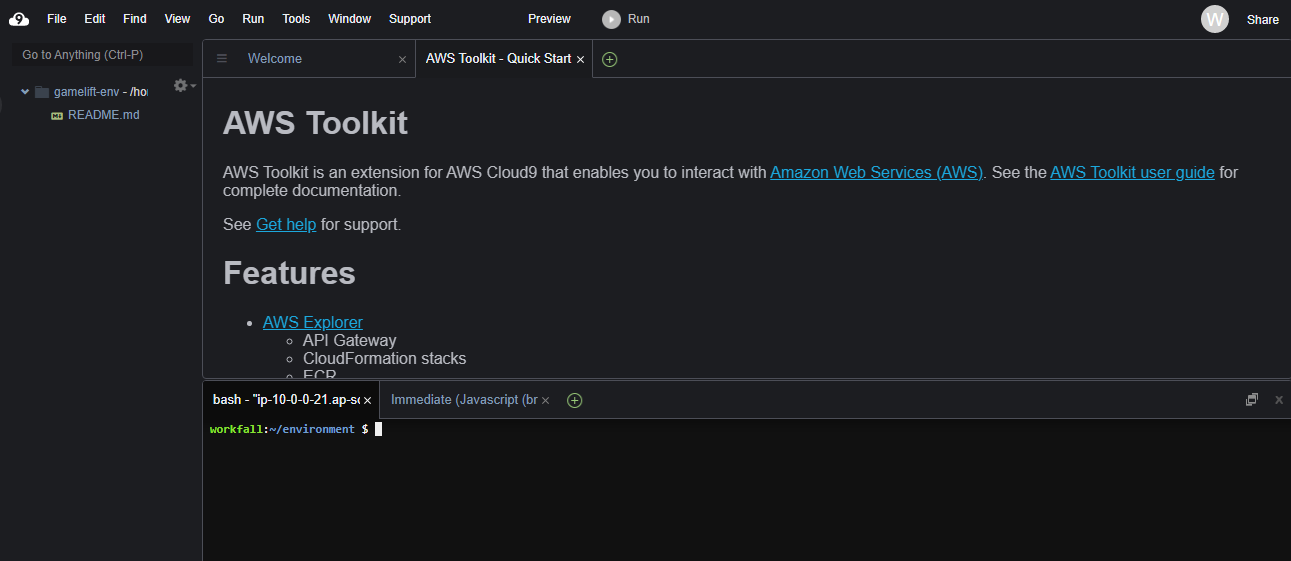
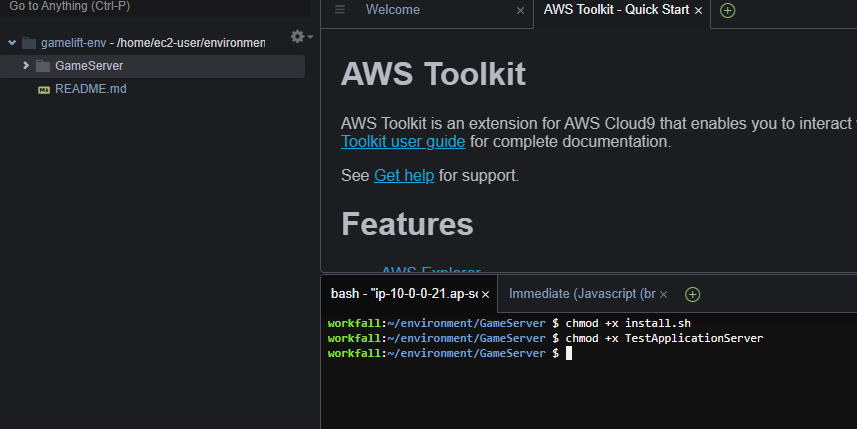
- The game server folder can now be accessed from the left pane of Cloud9
- Navigate to the folder in the command prompt, and run the below commands in the Cloud9 terminal as shown:

- Getting into the AWS console
- Sign in to the AWS Management Console and open the Amazon GameLift console at https://console.aws.amazon.com/gamelift
- You will see the Amazon GameLift Dashboard as shown below

- Uploading the build
- Inside the environment directory, run the below command to upload the server build to the AWS account
aws gamelift upload-build --region us-west-2 --name "GameLiftServer" --build-version 1.0 --build-root GameServer --operating-system "AMAZON_LINUX_2"


Return to the Amazon GameLift console and refresh the dashboard page to ensure the build is currently in your AWS account. The build should be displayed under “Builds” in the Oregon area, with the status “Ready” as shown below:
- Creating a fleet
- To get to the build information page for this build, click the GameLiftServer link.
- Select the Create fleet from build option from the Actions dropdown menu, as seen below:

Within the create fleet page, Enter the following values:
Name: GameLiftFleet
Description: Workfall-GameLift Fleet
Fleet type: On-Demand
Metric group: [LEAVE BLANK]
Binary Type: Build
Build: [This should be created automatically from your build; double-check that the name of your build matches]

- Leave the default c5.large instance type selected under Instance Type Section.
- Fill in the following settings in the Server process allocation section of the Process management section:
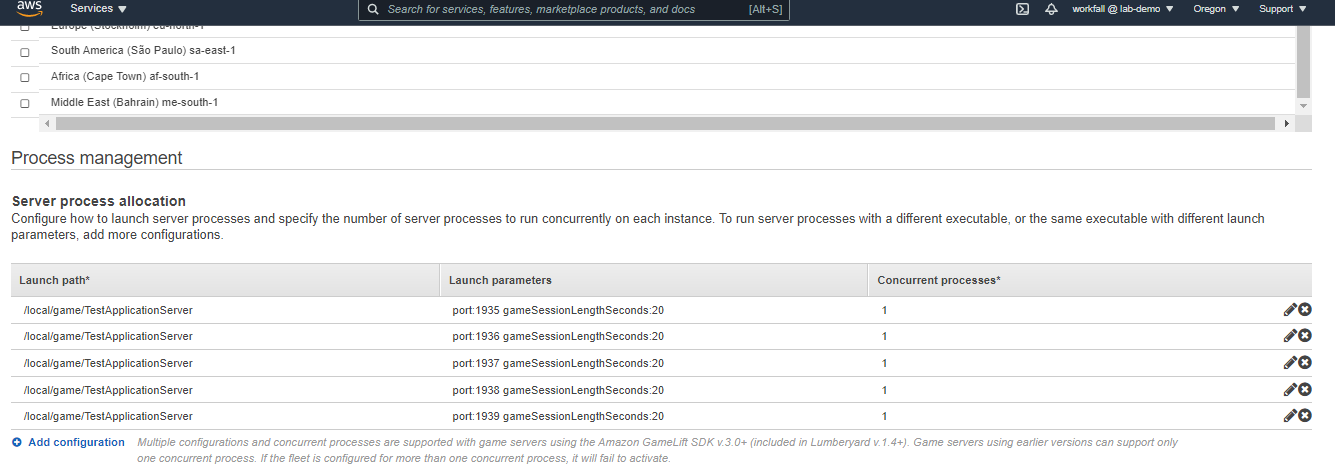
Launch Path: TestApplicationServer
Launch Parameters: port: 1935 gameSessionLengthSeconds: 20
Concurrent Processes: 1
- Repeat this four more times by clicking the Add Configuration link for each new configuration and increment the port number by 1 within the Launch Parameters.
Note: Make sure all process settings have a green tick to save them to the Fleet; otherwise, they will be lost and a validation error will appear on the screen.
This will create a total of 5 server processes on the EC2 instance running in your Fleet and will allow you to start up to 5 game sessions in parallel on that EC2 instance:
- Click the Initialize Fleet button at the bottom of the page and leave the rest of the settings default.
- Amazon GameLift will lead you to the dashboard for your GameLiftFleet page after the Fleet construction process has begun.
- To check the Fleet creation phases and progress, go to the Events page. This process will take 15-20 minutes to complete, so keep this tab open and use the refresh icon to update the events view to keep track of progress:

- Checking fleet creation progress
Once the Fleet creation process is complete it should be in the Active state as can be seen below:

If the Fleet is in an Active state you can proceed to testing your Fleet, otherwise please wait until the Fleet has finished the creation process before continuing.
- Testing the fleet
Now that we have a server build uploaded and have created a GameLift Fleet from it, let’s check that we are able to request a game session be placed on it.
- Within the Cloud9 terminal , run the below command :
aws gamelift create-game-session --region us-west-2 --fleet-id [YOUR GAMELIFT FLEET ID] --maximum-player-session-count 1

- Your GameLift Fleet ID can be found on the Fleet dashboard page in the format described below:
- Successful command output will be as shown below:

- Within 20 seconds, repeat the command 3 more times. This will cause GameLift to spread the sessions throughout your Fleet’s gaming servers.
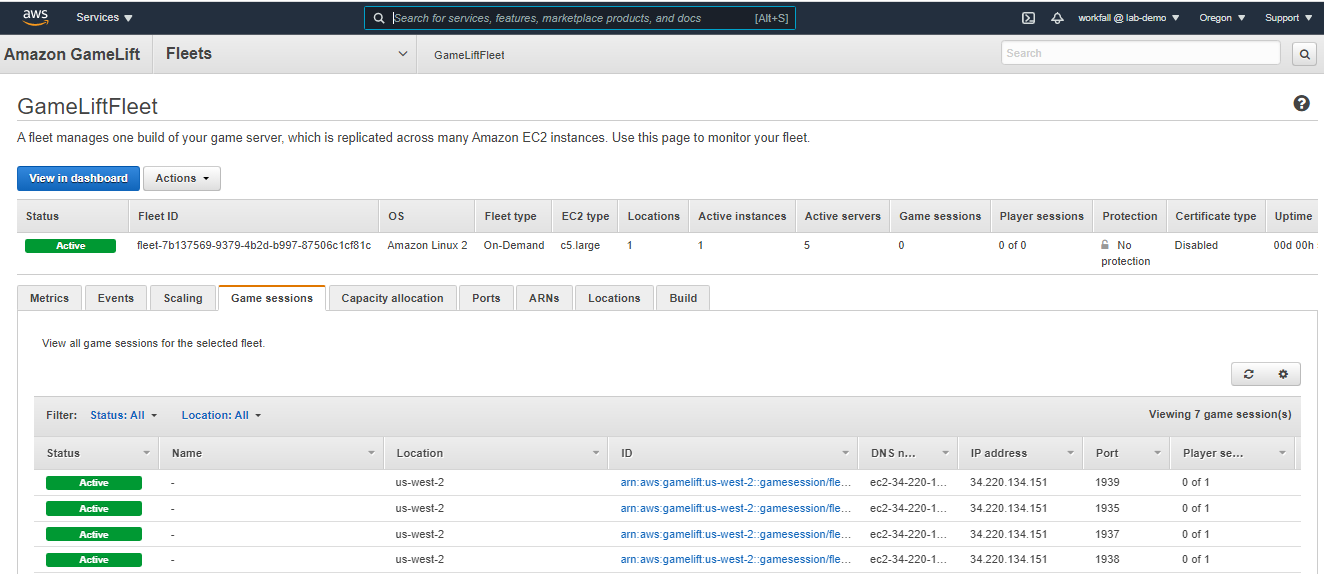
- Click the “Game sessions” tab on your Fleet dashboard page in the AWS console. In a table similar to the one below, you should see 4 gaming sessions listed:
- Creating a queue
The queues functionality in Amazon GameLift is used to quickly arrange new game sessions on any fleet in a group of fleets that can span numerous locations. When a gaming client or service requests a new game session, it creates a queue in which the request will be processed. Per account, you can have numerous queues. When working with your Fleets, using Queues is a preferred strategy since it gives you more flexibility.
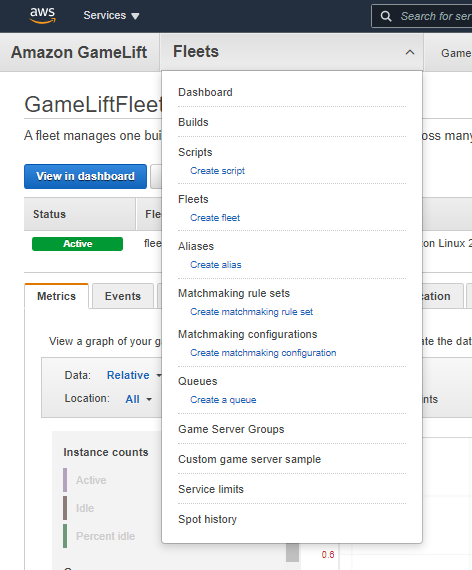
- Select the Dashboard dropdown option at the top of the page from the Amazon GameLift Console dashboard.
- Select the Create a queue link from the Queues section of the dropdown menu.
- Enter the following values on the Create Queue page.
Queue Name: GameLiftQueue
Queue Timeout: [LEAVE SET TO DEFAULT VALUE]

- Enter the following values in the Destinations row:
Region: us-west-2
Type: Fleet
Fleet or Alias name: {fleet ARN specific to your account} (GameLiftFleet)
Make sure to save the destination setting to the Queue by clicking the green check mark symbol on the right side of the row.
At the bottom right corner of the page, click the Create Queue icon:

- Testing the queue
After we created the Fleet, we tested that we were able to place game sessions on the running game servers. Now we have a Queue in place, let’s perform the same test but instead using our Queue.
Within the Cloud9 terminal, enter the following command:
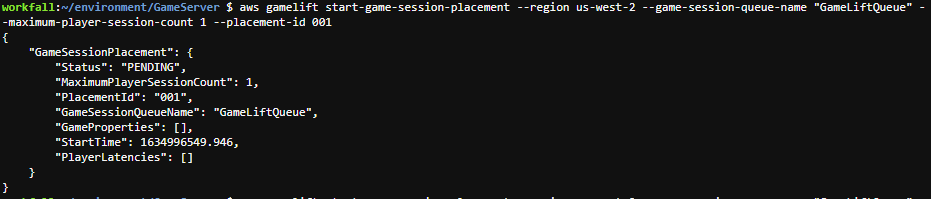
aws gamelift start-game-session-placement --region us-west-2 --game-session-queue-name "GameLiftQueue" --maximum-player-session-count 1 --placement-id 001
The output will be as follows:
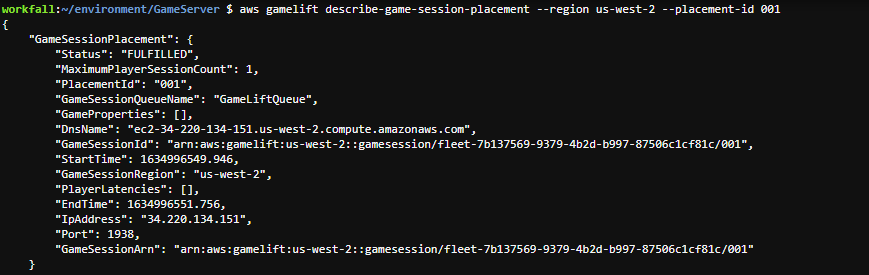
- Check the status of an existing game session placement request using the describe game session placement call. In your Command Prompt, type the following command:
aws gamelift describe-game-session-placement --region us-west-2 --placement-id 001
The output should look similar to the image below, with a placement status of “FULFILLED”:
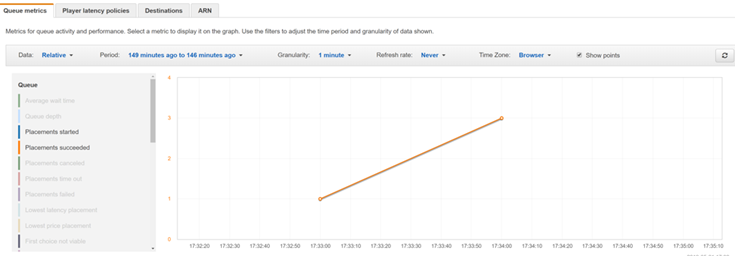
- We may examine the Queue metrics to validate that our Queue is correctly placing gaming sessions. After creating it, your AWS console should still be on the Queue dashboard page. From here, pick the “Queue metrics” tab and press the icon in the upper right corner of the metrics view pane. Select “Placements begun” and “Placements successful” as metrics to track on the left hand side of the metrics view pane. If all of the games have been successfully placed, the graph should only display a single incremental line, as illustrated below:
Companies using AWS GameTech
Conclusion
In this blog, we explored the Amazon GameLift service; we created a game fleet and queue that we can send game session placement requests to. We also tested that we can successfully create game sessions on the Fleet either by using create game session directly referencing our Fleet or by using create game session placement pointing at our GameLift Queue which then creates a game session on the Fleet.
We checked that both approaches were successful but confirmed that sessions had been placed on our Fleet via the “Game sessions” tab and metrics views for our Queue.
In a real-world scenario, the use of Queues in GameLift is generally best practice as it allows for the use of several Fleets in conjunction. Stay tuned to keep getting all updates about our upcoming new blogs on AWS and relevant technologies.
Meanwhile …
Keep Exploring ->; Keep Learning ->; Keep Mastering
This blog is part of our effort towards building a knowledgeable and kick-ass tech community. At Workfall, we strive to provide the best tech and pay opportunities to AWS-certified talents. If you’re looking to work with global clients, build kick-ass products while making big bucks doing so, give it a shot at workfall.com/partner today.