Did you know that more than 50% of the server-side world uses Spring Boot? Spring is the world’s most popular Java framework. And Spring Boot is an extension of the Spring framework which revolutionized the way you approach Java programming jobs, greatly streamlining your workflow. It simplifies the construction of self-contained, production-ready Spring-based applications that can be “simply run.” FreeMarker is a Java-based engine that can be used in both standalone and servlet-based Java applications to define templates.
In this blog, we will take a look at the FreeMarker form and add some validations in Spring Boot.
In this blog, we will cover:
- What are Microservices?
- What is Spring Boot?
- Some of the Best Spring Boot-based Startups
- What is FreeMarker?
- What is Lombok?
- Hands-on
- Conclusion
What are Microservices?
Microservices are a type of service-oriented architecture (one of the most important Java developer skills) in which applications are created as a collection of smaller services rather than a single large app.
Microservices capture your business scenario, allowing you to answer the question, “What problem are you trying to solve?” Microservices, also known as microservice architecture, is an architectural approach in which an application is structured as a series of services that are interconnected.
Large, sophisticated applications can be delivered quickly, often, and reliably with the microservice design. It also allows a company’s tech stack to evolve.
The microservice architecture pattern language is a set of microservice architecture patterns. It has two objectives:
- The pattern language can be used to determine whether microservices are a good fit for your application.
- The pattern language helps you to successfully employ the microservice Architecture.
Smaller, more agile teams produce services using the tools and frameworks they are most familiar with, rather than huge teams working on large, monolithic projects. Each of the applications involved is versioned, executed, and scaled individually. These microservices can communicate with one another and have unique URLs or names, all while being available and consistent despite failures.
Benefits of Microservices

Microservices can be launched independently, giving teams more control.
- Microservices are scalable in their own right.
- Microservices reduce downtime by isolating faults.
- The smaller codebase allows teams to comprehend the code more readily, making it easier to maintain.
Microservices Frameworks for Java Examples
There are various microservices frameworks available for Java development. Here are a few examples:
- Boots for Spring: This is the greatest Java microservices framework for Inversion of Control, Aspect-Oriented Programming, and other programming languages.
- Jersey: This open-source framework is simple to use and supports JAX-RS APIs in Java.
- Swagger: It assists you in describing APIs and provides you with a development portal where users may test your APIs.
Dropwizard, Ninja Web Framework, Play Framework, RestExpress, Restlet, Restx, and Spark Framework are among others to consider.
What is Spring Boot?

Spring Boot is a Spring Framework-based project. It makes setting up, configuring, and running both simple and web-based applications easier and faster. The Spring module extends the Spring Framework’s RAD (Rapid Application Development) features. It is also used to make a standalone Spring-based application that you can just execute because it only requires a few Spring configuration options.
In a nutshell, Spring Boot combines the Spring Framework with Embedded Servers. XML configuration is not used in Spring Boot (deployment descriptor). It employs a convention-over-configuration software design approach, reducing the developer’s workload. To create Spring Boot Java apps, we can utilize the Spring STS IDE or Spring Initializr.
Why Spring Boot?
- It gives you the ability to customize Java Beans, XML settings, and Database Transactions.
- It maintains REST endpoints and offers robust batch processing.
- Everything is auto-configured in Spring Boot; no human configuration is required.
- It has a spring application that is annotation-based.
- Management of dependencies is made easier.
- Embedded Servlet Container is included.
Spring Boot Features

Reason of existence for Spring Boot
Spring Boot was created with the following objectives in mind:
- To avoid having to deal with a lot of XML configuration in Spring
- To make it easier to create production-ready Spring applications.
- to shorten the development time and make the application self-contained
- Provide a simpler way to get started with the programme.
Spring Boot & Java Developers
Spring Boot is a good platform for Java developers to create a stand-alone, production-ready spring application that can be run straight away. You may get started with just a few configurations without having to set up a full Spring configuration.
Spring Boot Layers
Spring Boot has four layers, as shown in the image:
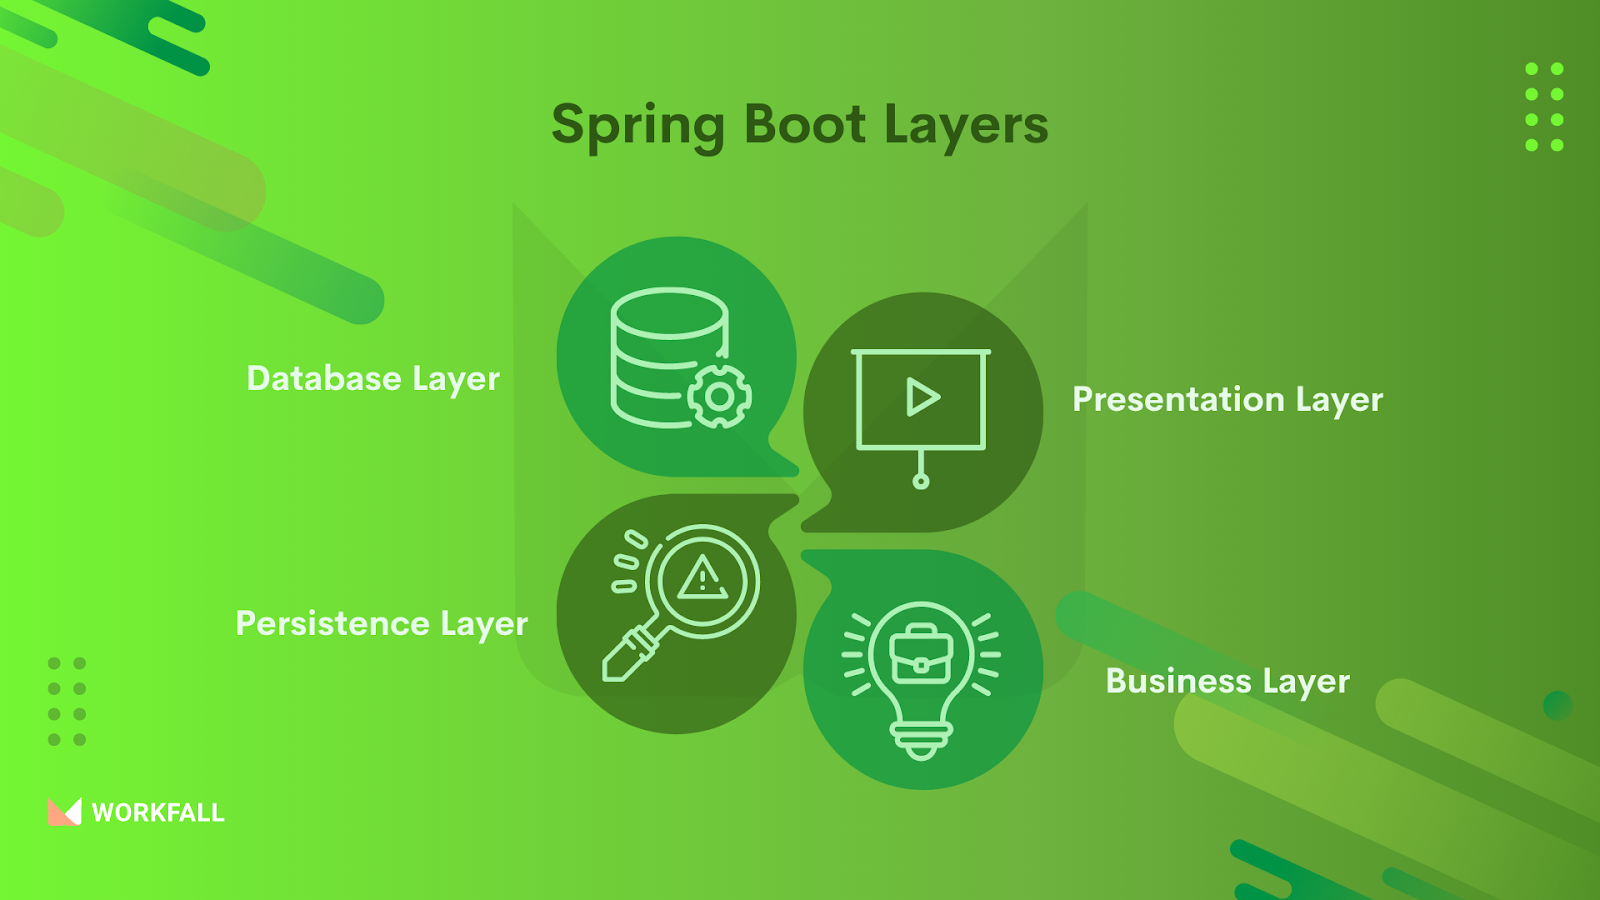
- Presentation Layer: This layer receives HTTP requests, converts JSON parameters to objects, authenticates the request, and passes it on to the business layer. In a nutshell, it is made up of views, or the frontend portion.
- Business Layer: This layer is in charge of all business logic. It is made up of service classes and makes use of data access layer services. Authorization and validation are also performed by it.
- Persistence Layer: This layer contains all of the storage logic and converts business objects to and from database records.
- Database Layer: This layer performs CRUD (create, retrieve, update, and delete) actions.
Spring Boot Workflow Architecture

Spring Boot is a framework that is created on top of Spring Framework. So it has all the features and modules of a Spring-like framework, such as Spring MVC, Spring core, and so on, with the exception that DAO and DAOImpl classes are no longer required in Spring Boot. The client, Controller, Service Layer, Model, and Database are the components that make up this system.
- Create a data access layer first, then perform CRUD operations on it.
- The HTTP requests are made by the client (PUT or GET).
- The request is routed to the controller, which maps and processes the request. If necessary, it then invokes the service logic.
- All business logic takes place in the service layer. It executes logic on data that has been mapped to JPA using model classes.
- If no errors occur, the user is presented with a JSP page.
Spring VS Spring Boot
Now that we know what Spring and Spring Boot are, let’s look at the important differences between the two:
| Spring | Spring Boot |
| Spring is a lightweight open-source framework for developing enterprise applications. | Spring Boot is developed on the spring framework, which is extensively used to create REST APIs. |
| Dependency injection is the most vital factor of the Spring Framework. | Autoconfiguration is the most vital factor of Spring Boot. |
| It improves the function of an interrelated application. | It improves the function of a stand-alone application. |
| We must manually set the server to execute the Spring application. | Spring Boot has integrated servers like Tomcat and Jetty, among others. |
| A deployment descriptor is required to start the Spring application. | A deployment descriptor is not required. |
| The developers write a lot of code to create a Spring application. | It reduces code lines. |
| There is no support for an in-memory database. | It supports in-memory databases like H2 and others. |
Spring Boot VS Spring MVC
Spring Boot and Spring MVC are two separate frameworks that serve different objectives. The following are the main differences between Spring Boot and Spring MVC:
| Spring Boot | Spring MVC |
| Spring Boot is a Spring module that provides appropriate defaults for Spring-based applications. | Spring MVC is a model-view-controller-based web framework that is part of the Spring framework. |
| It comes with predefined configurations for creating Spring-powered frameworks. | It comes with ready-to-use functionality for creating web applications. |
| There is no need to manually build the setup. | It necessitates manual build configuration. |
| It is not necessary to use a deployment descriptor. | It’s necessary to have a deployment descriptor. |
| It eliminates boilerplate code and encapsulates dependencies in a single unit. | Each dependent is listed separately. |
| It cuts down on development time and boosts output. | It takes longer to attain the same result. |
Common Annotations used in Spring Boot
The annotations in Spring Boot are essential for getting started with the framework. They allow you to direct the framework to perform your bidding, allowing you to take command and override the framework’s defaults as necessary. Annotations are quick, simple to use, and hundreds of times faster than creating the same functionality manually.
- @controller: The @Controller annotation is applied at the class level. It’s a @Component specialization. It is used to designate a class as a web request handler. It’s frequently used to deliver web pages. It returns a string by default, indicating which route to redirect. It’s most commonly associated with the @RequestMapping annotation.
- @restcontroller: @Controller and @ResponseBody annotations are combined in this annotation. The @ResponseBody annotation is applied to the @RestController annotation. It eliminates the requirement for @ResponseBody annotations on each method.
- @getmapping: The HTTP GET requests are mapped to a specified handler method. It’s used to construct a web service endpoint that gets data from a database. @RequestMapping(method = RequestMethod.GET) is used instead.
- @postmapping: This method maps HTTP POST requests to a certain handler method. It’s used to construct a web service endpoint that generates documents. It’s used instead of @RequestMapping(method = RequestMethod.POST)
- @putmapping: This method maps HTTP PUT requests to a certain handler method. It’s used to make a web service endpoint that either produces or modifies data. It’s used instead of @RequestMapping(method = RequestMethod.PUT)
- @deletemapping: This method maps HTTP DELETE requests to the appropriate handler method. It’s used to construct a resource deletion web service endpoint. It’s used instead of: @RequestMapping(method = RequestMethod.DELETE)
Companies using Spring Boot-based Applications
The following image shows companies using Spring Boot-based applications:

What is FreeMarker?
FreeMarker is a Java template engine that runs on the server and may be used in both web and standalone settings. The FreeMarker Template Language (FTL) is a basic, specialized language used to create templates.
The complete separation of the Presentation layer and the Business Layer is a major benefit of utilizing FreeMarker. Designers can work on the HTML page design while programmers work on the application coding. Finally, using FreeMarker, you can merge these to create the final output page.
Features of FreeMarker
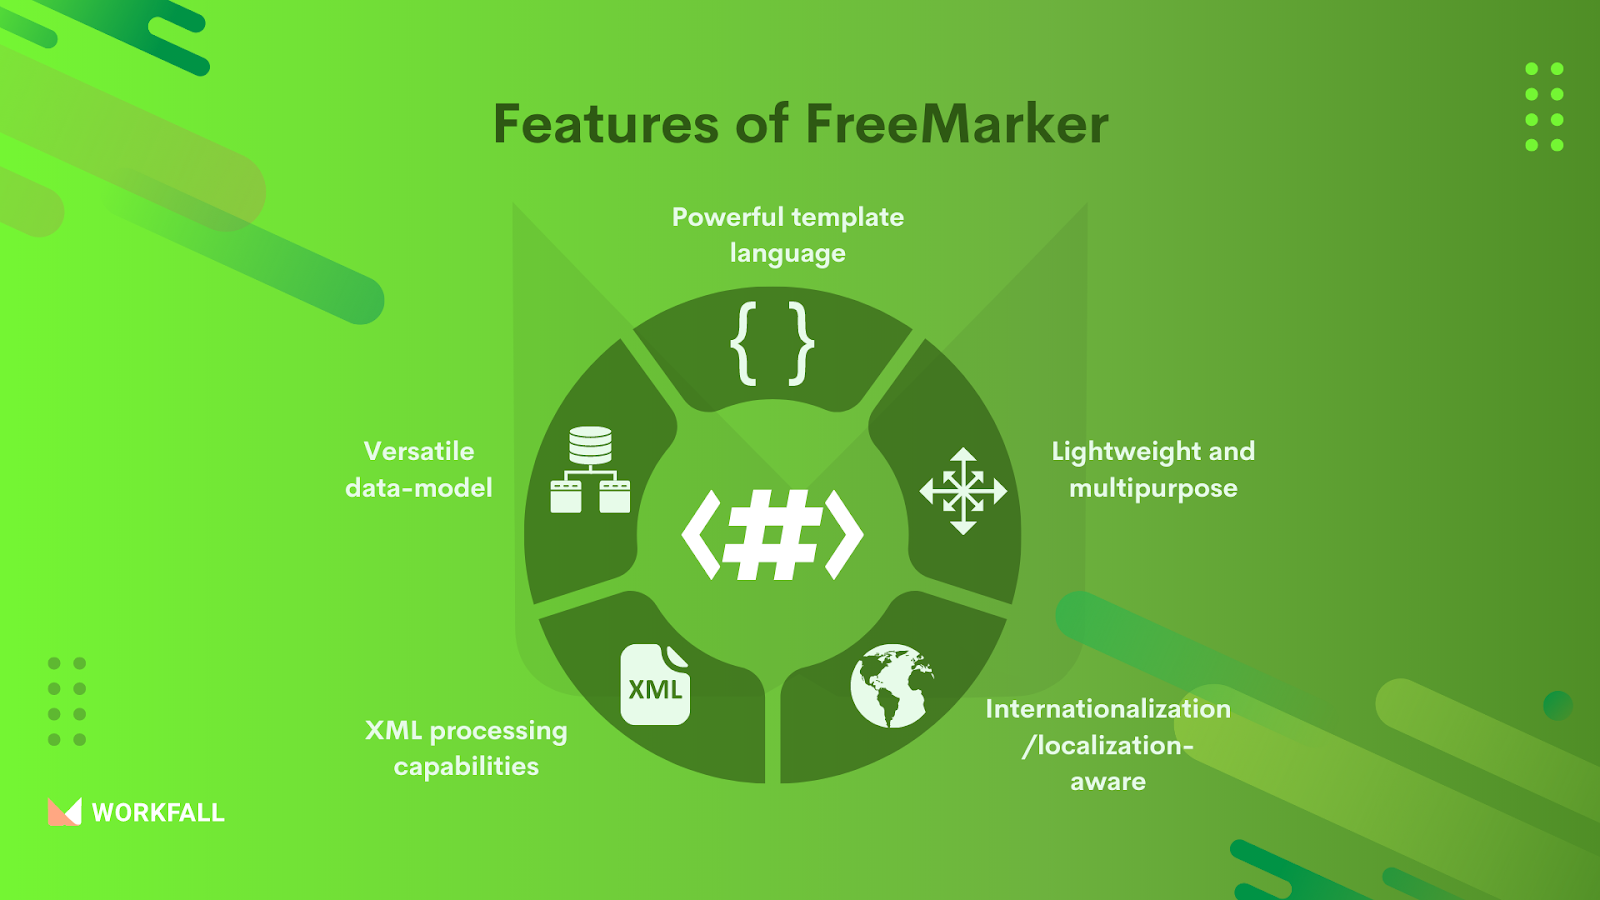
- Powerful template language: Iterations, assignments, string, and arithmetic operations and formatting, macros, and functions, including other templates, escaping by default (optional), and many other features are available.
- Lightweight and multipurpose: There are no dependencies, any output format may be used, templates can be loaded from anywhere (pluggable), and there are several configurable possibilities.
- Internationalization/localization-aware: Number and date/time formatting that is responsive to the locale, as well as localized template modifications.
- XML processing capabilities: Add XML DOMs to the data model and traverse them, or handle them declaratively.
- Versatile data model: Pluggable adapters offer Java objects to the template as a tree of variables, which determines how the template views them.
What is Lombok?

Despite Java being the most widely used object-oriented programming language, it is not without flaws. Writing a lot of boilerplate code is a huge disadvantage. Project Lombok was created in order to address this shortcoming. It’s a utility that adds some flavor to our Java app.
The Lombok project is a well-known and commonly used Java library for reducing or eliminating boilerplate code. It helps you save time and effort. We may save space and improve the readability of the source code simply by utilizing annotations. To spice up our Java programme, it instantly plugs into IDEs and builds tools.
Is it possible that project Lombok and IDEs are doing the same thing? If that’s the case, what’s the point of Lombok?
The answer is no; IDEs and Lombok perform separate tasks yet are very similar. When we use IDEs to produce boilerplate code (getters and setters), we save time by not having to write them manually, but they are still present in the source code, which increases lines of code and reduces maintenance and readability. While the project Lombok adds all of these boilerplate codes to the class file at compile time rather than adding them to the original source code.
Characteristics of the Lombok Project
- It cuts down on the boilerplate.
- It uses easy-to-use annotations to replace boilerplate code.
- It makes code easier to comprehend and less likely to include errors.
- Lombok allows developers to be more productive.
- It is compatible with all major IDEs.
- Delombok utility is also available (adding back all the boilerplate code).
- Check for null values with annotations.
- Data objects that are concise
- Cleanup is simple.
- Logging with minimal effort.
All of the annotations and classes needed to use Lombok are included in the package. Except for the following two packages, which are only relevant to those who are extending Lombok for their own purposes, all other packages are only applicable to those who are extending Lombok for their own purposes:
- lombok.extern.*: The packages include Lombok annotations that can help libraries eliminate boilerplate. It is not included in the JRE.
- lombok.experimental: Before committing to long-term support, this package provides Lombok features that are new or likely to change.
Hands-on
Source code of this hands-on for your reference:
https://github.com/workfall/springboot-freemarker-form-validation.git
Let’s get started!
In this blog, we will demonstrate how to build Spring Boot FreeMarker form validation by using Eclipse Kepler SR2, JDK 8, and Maven. In case you’re confused about where you should create the corresponding files or folder, let us review the project structure of the spring boot application.

- Creating application
- Maven dependency
A <code>pom.xml</code> file contains the information about the project and configuration details used by maven to build the project. In the <code>pom.xml</code> the file we will define the required dependencies.

- Application properties file
Create a properties file in the <code>resources</code> folder and add the following content to it. The file will contain information about the application port and FreeMarker configuration. You’re free to change the details as per your wish.

- Java classes
- Model class
Create a model class that will be responsible for user form schema and set the validations on these attributes with the help of <code>javax.validations</code>. The HTML form will have these four fields.

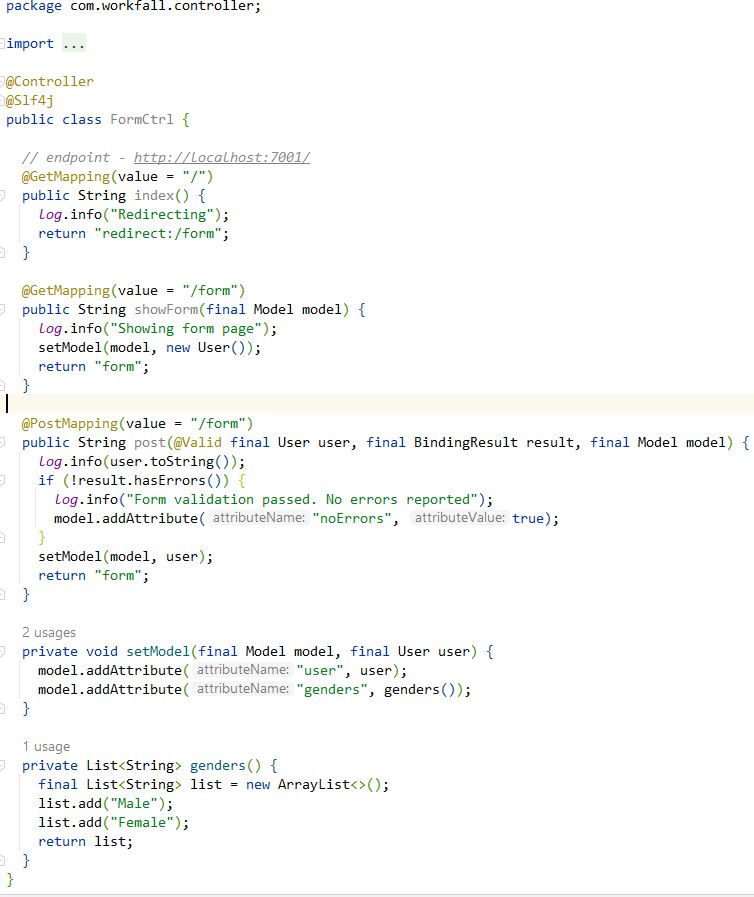
- Controller class
Create a controller class that will be responsible to interact with the client and handle the incoming requests. This controller will be responsible to show the user form HTML page. The <code>post(..)</code> method in this class will be responsible to validate the user form with the help of <code>@Valid</code> annotation. If there are any form violations it will be shown on the HTML page with the help of the <code>BindingResult</code> interface. If no form violations the form will be submitted successfully.
- implementation/main class
To bootstrap, the application from the main method, add the following code to the main class. Always remember, that the entry point of the spring boot application is the class containing <code>@SpringBootApplication</code> annotation and the static main method.

- FreeMarker template
Add the following code to the FreeMarker template created in the <code>resources</code> folder that will be responsible for showing the HTML form on the console. You’re free to add your own customization to the template but remember that it should be in sync with the model class.

- Run the main class
- Run from ide
To execute the application, right-click on the <code>SpringbootQueryExampleApplication.java</code> class, <code>Run As -> Java Application</code>.

- Demo
Once the application is application is started successfully hit the URL as shown in the below figure and the index page of the application will be shown.

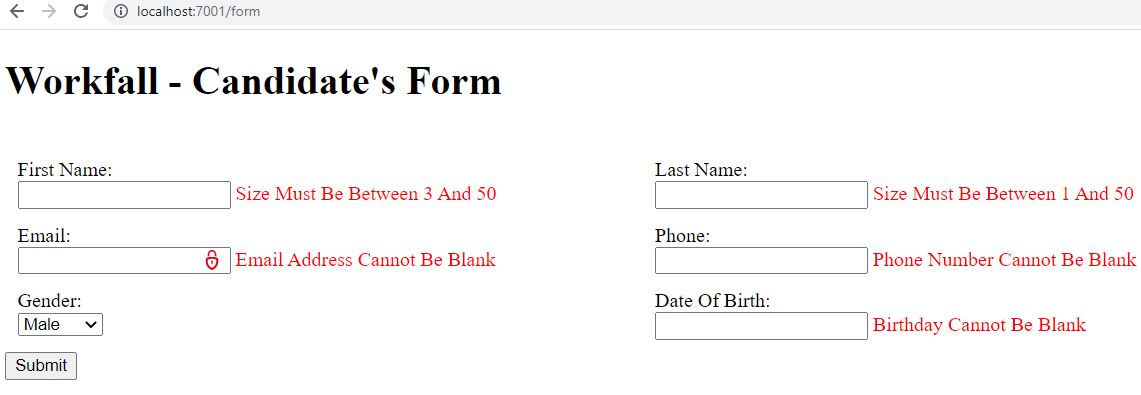
Without filling in any of the form detail just click on the submit button and you should be able to see the form validations as shown below.
Once all of the HTML form validations have been eliminated, the completed form will look like this.

Conclusion
In this blog, we explored what Spring Boot is, its features, the workflow architecture of Spring Boot, Spring Boot VS Spring, Spring Boot VS Spring MVC, some popular Spring Boot-based startups, what FreeMarker is & its features, What Lombok is & its characteristics. We also demonstrated how to build the Spring Boot FreeMarker application and added some validations to the form. We will come up with more such use cases in our upcoming blogs. Stay tuned to keep getting all updates about our upcoming new blogs on AWS and relevant technologies.
Meanwhile…
Keep Exploring -> Keep Learning -> Keep Mastering
This blog is part of our effort towards building a knowledgeable and kick-ass tech community. At Workfall, we strive to provide the best tech and pay opportunities to AWS-certified talents. If you’re looking to work with global clients, build kick-ass products while making big bucks doing so, give it a shot at workfall.com/partner today.